


59
Basic Setups for the Switcher
Chapter 3 Preparations
3
Turn the F3 control to set the same VISCA ID as that set on the camera
under “VISCA ID.”
You can select VISCA ID 1 to 7 or “Off.”
Pressing the CAMERA button set in step 2 enables you to control a BRC-
series camera with the same VISCA ID as selected in this step. When “Off”
is selected, no camera can be controlled with the CAMERA button selected
in step 2.
You can assign the same VISCA ID to two or more CAMERA buttons.
4
Repeat steps 2 and 3 to assign a VISCA ID to each of the CAMERA
buttons.
5
Press the F4 control to confirm the settings in steps 2 to 4.
Pressing the F4 control enables confirmation of the settings.
To reassign the VISCA IDs
If a camera in the VISCA system configuration is changed, you should reassign
the VISCA IDs.
Press the F4 control on menu page 912 to execute “NET CHG” (Network
Change). The VISCA IDs of all the cameras are then reassigned to the
CAMERA buttons.
When the setting is complete
Press the CAM mode button or SW mode button to exit menu mode.
If you change the setting, “Save setup data? [PAGE] (yes) or [EXIT] (no)”
appears on the display panel. Press the PAGE button to store the data.
To control the power on/off of the VISCA cameras (menu page 917)
You can turn on/off the power of the connected VISCA cameras from the
switcher. You can also turn on the connected VISCA cameras automatically
when the power of the switcher is turned on.
1
Display menu page 917.
For the procedure for displaying the menu, see “Menu Operation” on page
46.
2
Turn the F1 control to set the CAMERA button number of the camera
whose power on/off you wish to control under “CAM BTN.”
You can select “All” and CAMERA button 1 to 7.
When “All” is selected, you can control power on/off of all the connected
VISCA cameras.
3
Turn the F2 control to set “On” or “Off” under “TURN.”
On: to turn on the camera
Off: to turn off the camera
Note
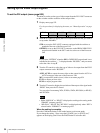
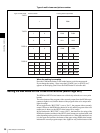
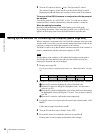
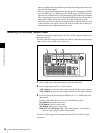
CAMERA
CAM BTN TURN APPLY AUTO ON 7/8
PWR MNG
All Off NOP On 917