


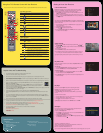
NETWORK VIDEO RECEIVER Quick Setup Guide
DMX-NV1
© Sony Corporation 2008. Printed in USA. 4-116-031-11(1)
BRAVIA
®
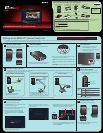
Internet Video Link Accessories
z Ethernet cable required
(not supplied).
Setting up the BRAVIA
®
Internet Video Link
z If you need to configure a fixed IP address or proxy server, check the Operating Instruction Manual for more information.
POWER
PORT 1
PORT 2
PORT 3
PORT 4
POWER
PORT 1
Gaming Adapter as Wireless Bridge
Ethernet Cable
Wireless Router
Gaming
Adapter
Receiver
POWER
PORT 1
PORT 2
PORT 3
PORT 4
E
x
i
s
t
i
n
g
E
l
e
c
t
r
i
c
a
l
W
i
r
i
n
g
Powerline Ethernet Adapter
Ethernet Cable
Ethernet Cable
Router
Powerline
Ethernet
Adapter
Receiver
POWER
PORT 1
PORT 2
PORT 3
PORT 4
Direct to Router
Ethernet Cable
Router
POWER
INTERNET
Modem
Receiver
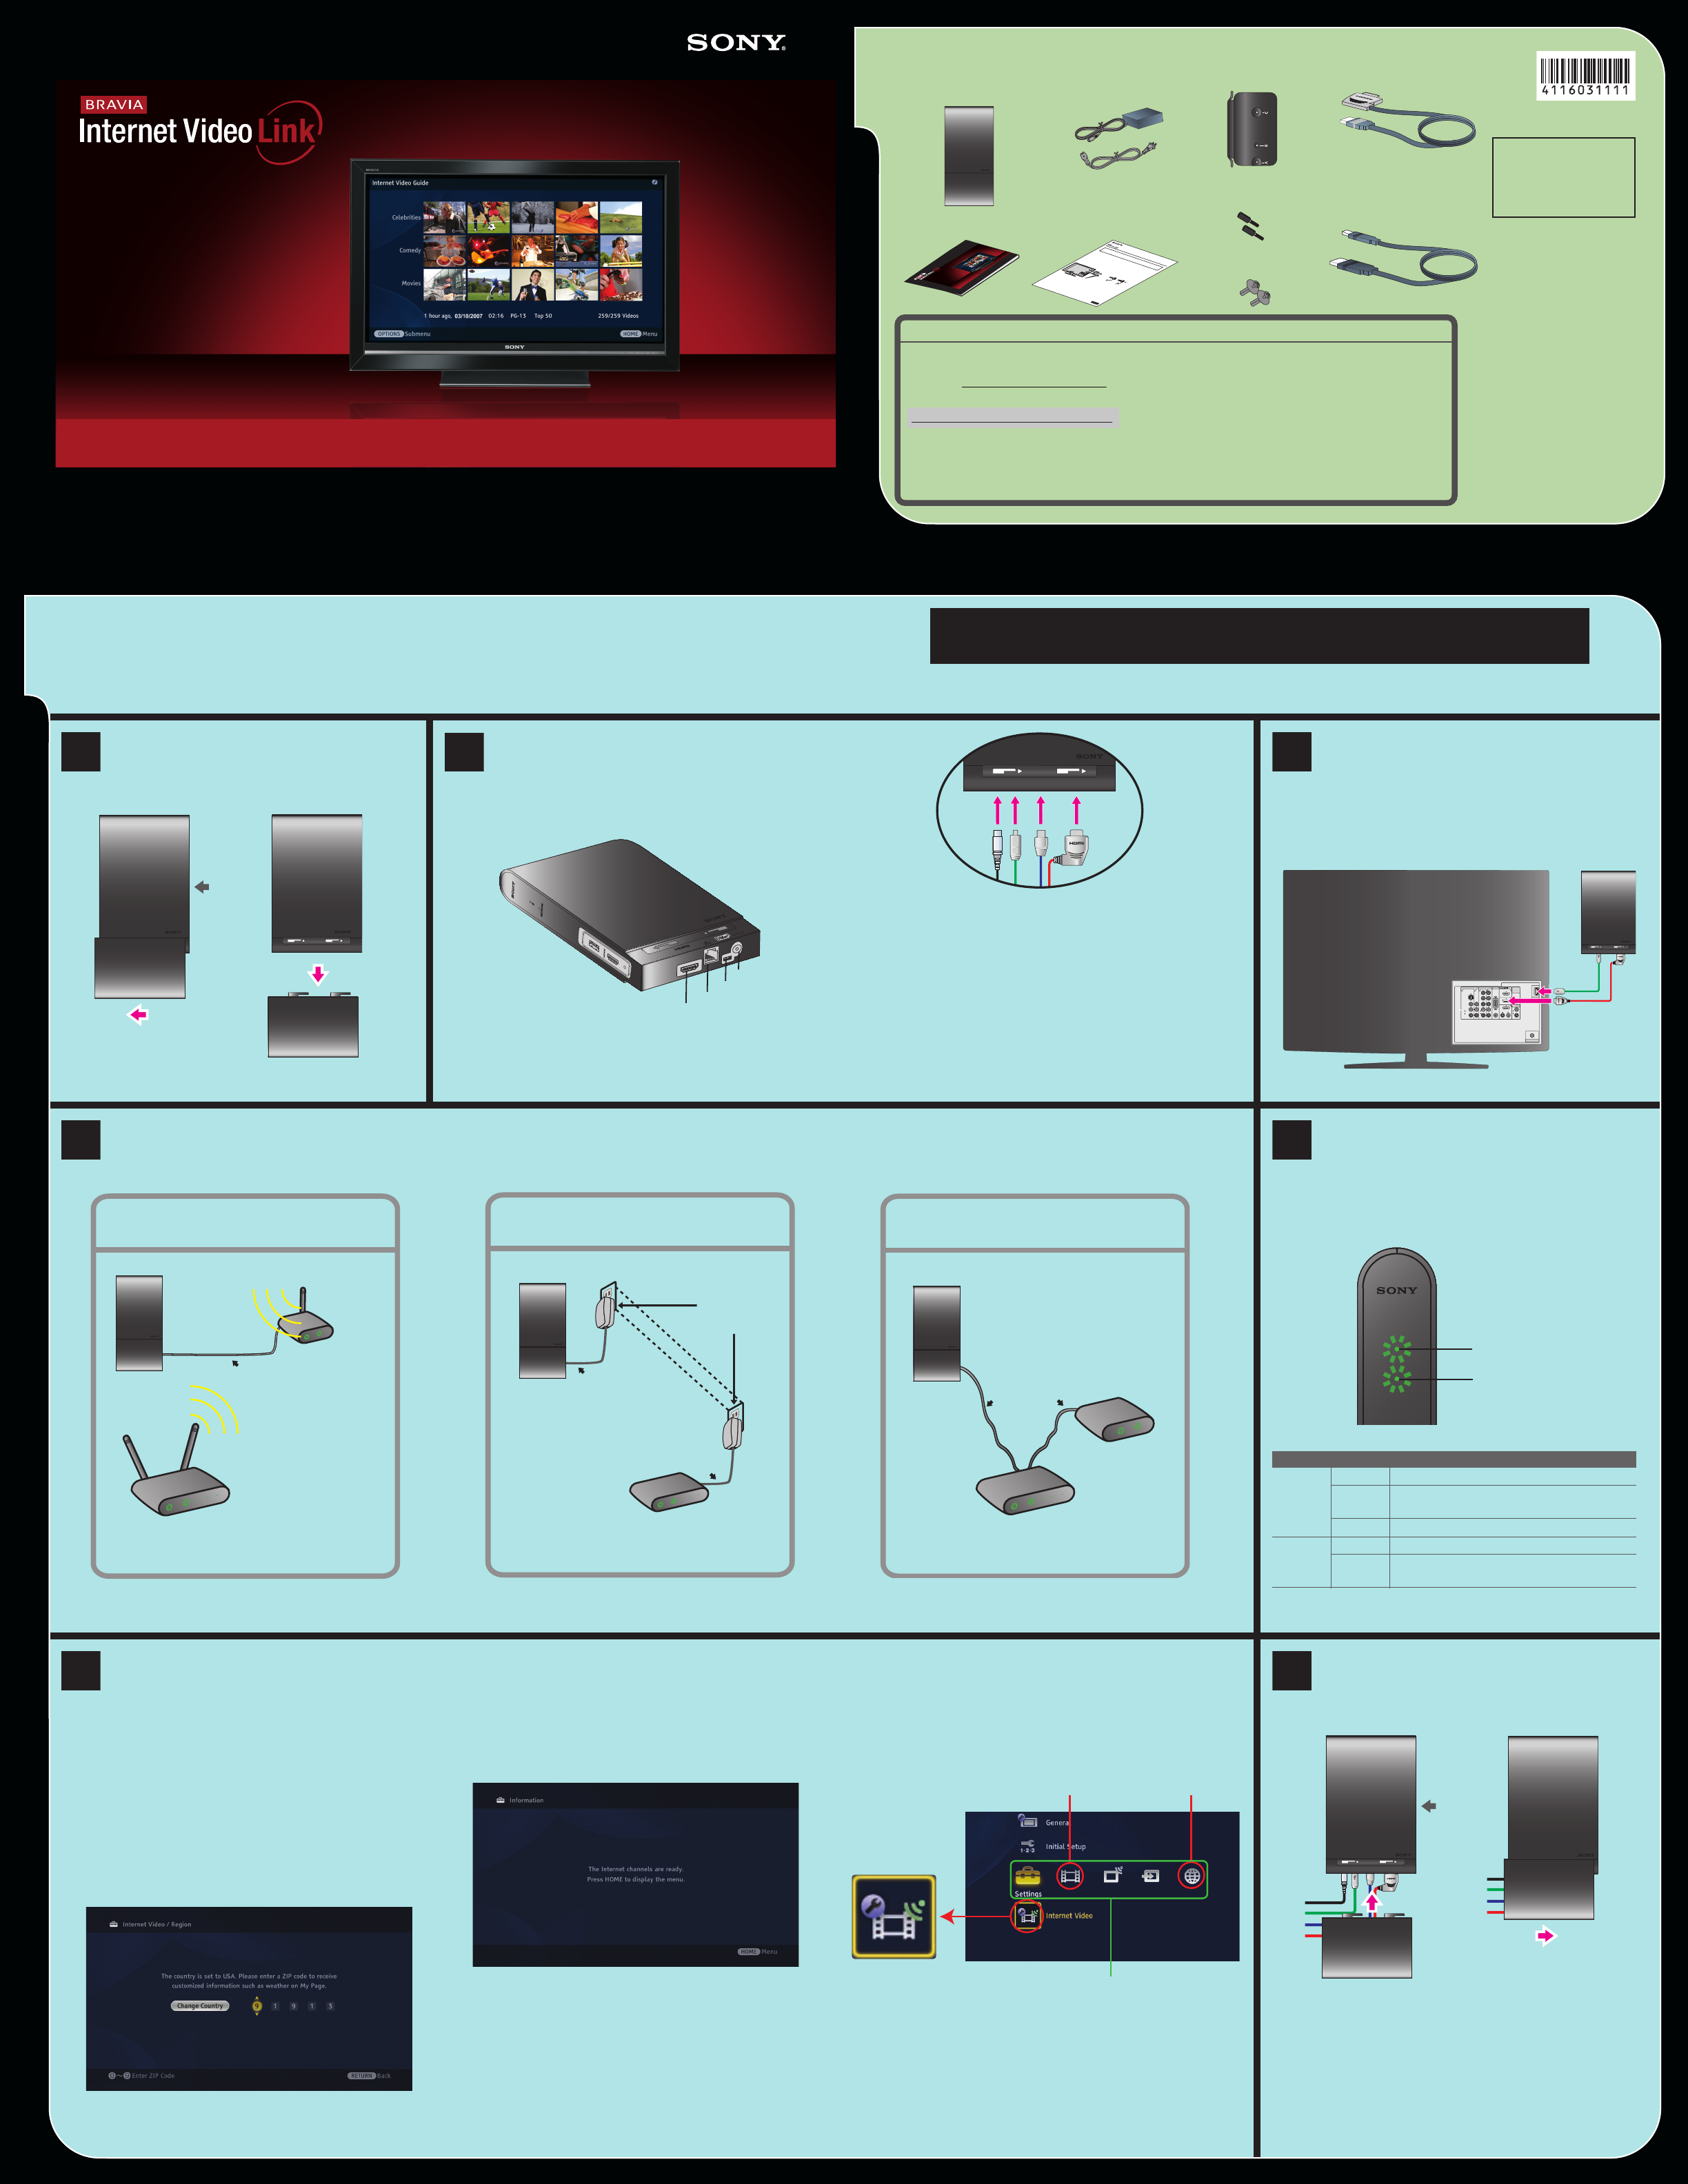
A DC IN 9V: Connect the AC adapter to this port. Do not
plug into the wall outlet at this time.
B DMe
x
: Connect the small end of the USB cable to this
port.
C LAN: Connect an Ethernet cable (not supplied) to this
port.
D HDMI OUT: Connect the L-shaped end of the HDMI cable
to this port.
Your BRAVIA LCD TV includes BRAVIA Internet Video Link. The Sony BRAVIA Internet Video Link brings on-demand entertainment and information from the Internet, including movies, news, traffic, and weather.
High-speed Internet access is also required. Power off your TV before beginning the setup.
OUT
LAN
DC IN 9V
NETWORK
INPUT
SERVICE
%
$
#
"
Front of
Receiver
D
C
B
A
B
1
Remove Cable Cover
Remove the cable cover to expose the ports
located on the bottom of the receiver.
Please read all instructions before beginning the installation.
Refer to the separate Attachment Guide for instructions on mounting to your TV.
NETWORK
Power LED
Network LED
2
Connect Cables
Connect the cables in the order shown below.
3
Connect to TV
B Connect the large end of the USB cable
to the DMe
X
/SERVICE port on the TV.
D Connect the straight end of the HDMI cable
to any HDMI port on the TV.
4
Connect to the Internet
Choose one of the following recommendations to connect the BRAVIA Internet Video Link receiver to the Internet with easy “plug and play.” Connect an Ethernet cable
(not supplied) between the receiver and your Internet source.
5
Verify Connection
a. Plug in the receiver and power on the TV.
b. Once the receiver and TV are powered on,
confirm the LED lights.
Standard Definition video: 802.11g
High Definition video: 802.11n
Standard Definition video: HomePlug Turbo,
HomePlug AV, UPA, HD-PLC
High Definition video: HomePlug AV, UPA, HD-PLC
6
Confirm Connection
Follow these instructions to confirm.
a. Press the DMe
X
button on your TV’s remote control
to view the connection status.
z If “Fea
ture available with DMeX module” appears on the
screen, wait a few moments and try again.
z The first time the receiver is connected to the
Internet, the software may require an update
.
b. Follow the instructions on-screen to complete Region
Setup.
z Default country is the United States. Press the B
button to select a different country.
7
Attach Cable Cover
Slide the cable cover back into place.
B
OUT
LAN
DC IN 9V
OUT
LAN
DC IN 9V
Front of
Receiver
z For instructions on attaching to the TV, see the
separate Attachment Guide.
When you see... Receiver...
Power
LED
Green is powered “On.”
Red is not connected. Check all cable
components.
Orange is in update mode.
Network
LED
Green is connected to the Internet.
Blinking
Green
has network activity.
z Look for the serial number found on the bottom of
the receiver to record in the Owner’s Record.
-------------------------------
Owner’s Record
Record the serial
number below:
CABLE / ANTENNA
DMe /
x
SERVICE
4
1 3 1
3
2
IN
VIDEO IN
VIDEO
L
(MONO)
AUDIO
R
S VIDEO
COMPONENT IN
L
R
P
B
RGB
DIGITAL
AUDIO
OUT
(OPTICAL)
PC IN
AUDIO OUT
(VAR/FIX)
(1080p/1080i/720p/480p/480i)
1
AUDIO
L
R
AUDIOAUDIO
AUDIO
R L
P
R
Y
B
D
B
A
c. When your region is setup, the receiver will attempt to
connect to the Internet. Upon succesful connection, you will
see the screen below.
For Your Convenience
Please contact Sony Customer Support directly if you have questions on the use of your BRAVIA Internet
Video Link after reading your Quick Setup Guide and Operating Instruction Manual (available on the
Internet at http://internet.sony.tv/manual).
United States
http://esupport.sony.com/bravialink
Or to speak with a support representative:
1-866-918-BIVL (2485)
Please Do Not Return the Product to the Store
Contact Sony Customer Support at:
d. Press the HOME button on your remote control to display the
XMB
TM
. These menu icons associated with the receiver will
appear when the service content providers are ready.
Internet
Video Icon
Network Icon
Video Icon
Media Category Bar
z
IMPORTANT:
Do not press the INPUT button on the remote
control to access the BRAVIA™ Internet Video Link. It is
available on the
XMB
TM
.
N
E
TW
O
RK
V
ID
EO
R
EC
E
IVE
R
Qu
ic
k Setu
p
G
u
i
d
e
D
M
X
-
NV
1
©
S
o
n
y
C
o
r
p
or
a
t
i
o
n
2
0
0
7
.
P
r
i
n
t
e
d
i
n
US
A
.
3
-
1
2
6
-
1
1
1
-
1
1(
1
)
AC Adapter with
AC Power Cord
Attachment Guide
Quick Setup Guide
Receiver (DMX-NV1)
& Cable Cover
Mounting Bracket
Mounting Knobs
Plastic Fasteners
USB Cable
HDMI Cable
4-116-032-
11
(1
)
D
M
X
-
N
V
1
A
t
t
a
ch
m
e
n
t
G
u
i
d
e
©
S
o
n
y
C
o
r
p
o
r
a
t
i
o
n
2
0
0
8
P
r
i
n
t
e
d
i
n
U
.
S
.
A
.
Fo
r
T
V
M
o
d
e
l
s
:
K
D
L
-
4
0
W
L
1
4
0
/
K
D
L
-
4
6
W
L
1
4
0
/
K
D
L
-
5
2
W
L
1
4
0
R
e
q
u
i
r
e
d
I
t
e
m
s
f
o
r
A
s
s
e
m
bl
y
Y
o
u
r
S
o
n
y
T
V
w
i
t
h
X
M
B
™
(
1
)
/
B
R
A
V
I
A
®
I
n
t
e
r
n
e
t
V
i
d
e
o
L
i
n
k
(
D
M
X
-
N
V
1
)
(
1
)
/
C
a
b
l
e
C
o
v
e
r
(
1
)
/
M
o
u
n
t
i
n
g
B
r
a
c
k
e
t
(
1
)
/
P
l
a
s
t
i
c
F
a
s
t
e
n
e
r
(
2
)
/
M
o
u
n
t
i
n
g
K
n
o
b
(
2
)
/
P
h
i
l
l
i
p
s
S
c
r
e
w
d
r
i
v
e
r
(
f
o
r
r
e
m
o
v
a
l
o
n
l
y
;
n
o
t
s
u
p
p
l
i
e
d
)
T
o
B
e
g
i
n
O
n
t
h
e
b
a
c
k
o
f
t
h
e
T
V
,
l
o
c
a
t
e
t
h
e
a
t
t
a
c
h
m
e
n
t
h
o
l
e
s
s
i
t
u
a
t
e
d
o
n
t
h
e
r
i
g
h
t
s
i
d
e
,
a
b
o
v
e
t
h
e
r
e
a
r
i
n
p
u
t
p
a
n
e
l
.
T
h
e
s
e
i
n
s
t
r
u
c
t
i
o
n
s
a
r
e
s
h
o
w
n
w
i
t
h
o
u
t
c
a
b
l
e
s
a
t
t
a
c
h
e
d
.
W
e
r
e
c
o
m
m
e
n
d
t
h
a
t
y
o
u
f
a
m
i
l
i
a
r
i
z
e
y
o
u
r
s
e
l
f
w
i
t
h
t
h
e
a
t
t
a
c
h
m
e
n
t
p
r
o
c
e
s
s
,
t
h
e
n
re
v
i
ew
t
h
e
B
R
A
V
I
A
I
n
t
e
r
n
e
t
V
i
d
e
o
L
i
n
k
’
s
Q
u
i
c
k
S
e
t
u
p
G
u
i
d
e
(
s
u
p
p
l
i
e
d
)
f
o
r
i
n
f
o
r
m
a
t
i
o
n
o
n
c
o
n
n
e
c
t
i
n
g
t
h
e
c
a
b
l
e
s
.
1
A
l
i
g
n
t
h
e
h
o
l
e
s
o
n
t
h
e
b
r
a
c
ke
t
(
s
u
p
p
l
i
e
d
)
t
o
t
h
e
h
o
l
e
s
o
n
t
h
e
b
a
c
k
o
f
y
o
u
r
T
V
.
2
I
n
s
e
r
t
t
h
e
2
P
l
a
s
t
i
c
F
a
s
t
e
n
e
r
s
(
s
u
p
p
l
i
e
d
)
i
n
t
o
t
h
e
h
o
l
e
s
,
t
h
e
n
p
r
e
s
s
i
n
t
h
e
h
e
a
d
o
f
t
h
e
f
a
s
t
e
n
e
r
s
u
s
i
n
g
y
o
u
r
fi
n
g
e
r
u
n
t
i
l
t
he
y
c
l
i
c
k
.
~
D
o
n
o
t
p
u
s
h
i
n
t
h
e
h
e
a
d
o
f
t
h
e
f
a
s
t
e
n
e
r
u
n
t
i
l
y
o
u
h
a
ve
i
n
s
e
r
t
e
d
t
h
e
fa
s
t
e
n
e
r
i
n
t
o
t
he
b
r
a
c
k
e
t
a
n
d
t
h
e
h
o
l
e
o
n
t
h
e
T
V
.
D
o
n
o
t
u
s
e
a
s
c
r
ew
d
r
i
v
e
r
t
o
t
i
g
h
t
e
n
t
h
e
s
c
r
ew
s
.
P
l
a
s
t
i
c
F
a
s
t
e
n
e
r
s
z If the LEDs do not light up in green, confirm that all
cables are securely connected.