2011 Sony Corporation Printed in China
4-400-627-13 (1)
Preparations
DPF-WA700/W700
Digital Photo Frame
Read This First
Operating Instructions
Checking included items
Digital photo frame (1)
AC adaptor (1)
Stand (DPF-W700 only) (1)
Operating Instructions (this manual)
CD-ROM (Digital Photo Frame Handbook) (1)
Warranty (1) (In some regions, the warranty is not packaged together.)
Attaching the stand (DPF-W700 only)
Align the claw of the stand with the bottom of the
unit then insert it firmly until it clicks.
To enjoy wireless LAN environments
The following preparations are required before setting.
Internet environment that supports wireless LAN
Information required for connecting to a wireless LAN (for Wi-Fi settings)
Information from your Internet Service provider (for setting the mail address)
User registration for Facebook or PlayMemories Online
On descriptions in this manual
The illustrations and screen shots used in this manual may not be identical to what is
seen in actual use.
Not all models of the digital photo frame are available in all countries and regions.
The illustrations and screen shots used in this manual are of the DPF-WA700 unless
noted otherwise.
Printed using VOC (Volatile Organic Compound)-free vegetable oil based ink.
Connecting the AC adaptor
Align the claw of the stand with the bottom of the unit then insert it firmly until it clicks.
DPF-WA700
MENU button
to wall outlet
Standby indicator
VOL +/–
buttons
(on/standby) button
DPF-W700
(on/standby) button
to wall outlet
Standby indicator
MENU button
If the photo frame is not operated for a certain time, the demonstration mode is displayed. If any other
button than (on/standby) is pressed, the demonstration display will close.
Do not use the AC adaptor placed in a narrow space, such as between a wall and furniture.
To adjust the sound volume for the demonstration display
(DPF-WA700 only)
Press the VOL +/– buttons on the rear of the unit.
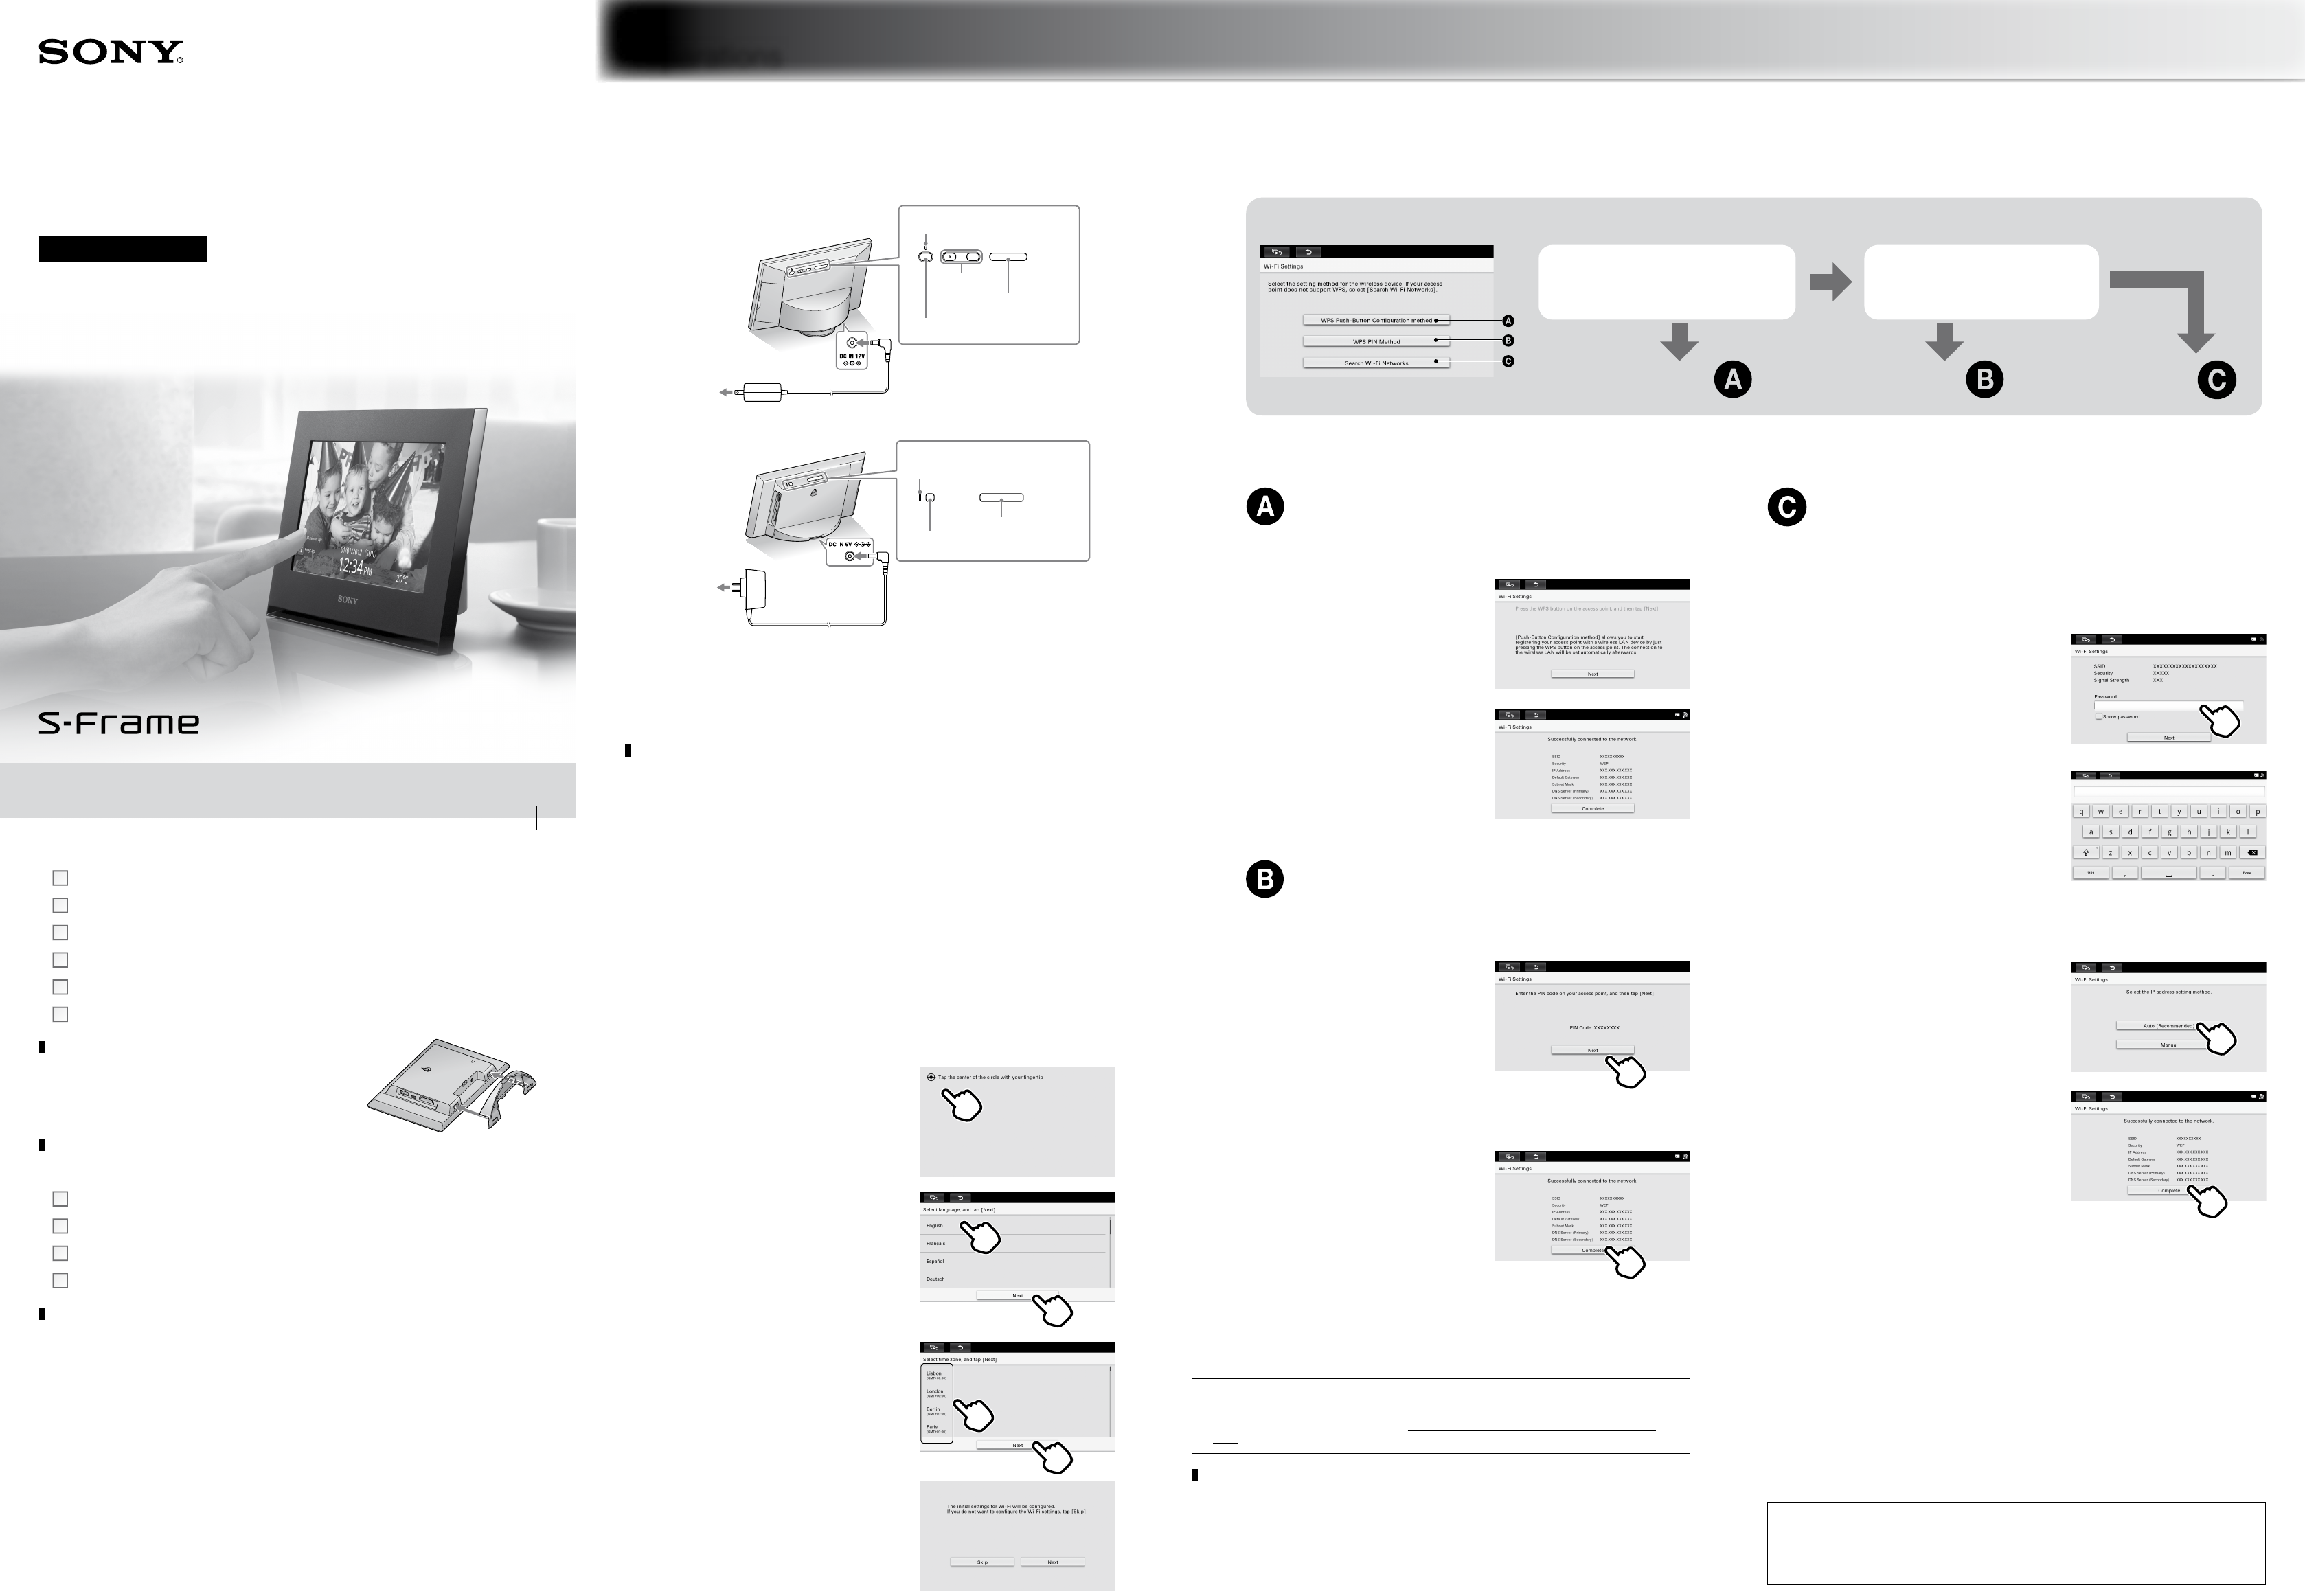
Getting started
Set up the photo frame by following the on-screen instructions. Perform touch screen
calibration, screen language, time zone, and wireless LAN settings (only when making the
wireless settings) in sequence.
1
Touch screen calibration
This product is equipped with a touch screen and the setup is achieved by
tapping operations. The pressure-sensitive panel operates when it detects
pressure from your tapping on the panel. The panel will respond more precisely
when you apply pressure to a small area (a point). Operation is easier by touching
with a fingertip with finger extended or a fine plastic tool.
Tap on the screen once by fingertip.
Following the on-screen instructions, tap
the circles displayed one after another.
Tap [Next].
2
Screen language setting
Select the desired language then tap [Next].
3
Time zone setting
Select the appropriate time zone then tap
[Next].
A message for Wi-Fi settings appears.
Tap [Next] when you want to make the
initial settings for Wi-Fi connection.
Go to step 4.
Tap [Skip], if you want to connect a Wi-Fi
network later.
For how to make the Wi-Fi settings, refer to “Changing
the Settings” in the Digital Photo Frame Handbook.
WPS Push-Button Configuration method
Tap [WPS Push-Button Configuration method].
Press the WPS button for your access
point then tap [Next].
Note that operation of the button
depends on the access point.
When connection with the access
point is established, tap [Complete].
The setup is completed.
WPS PIN method
Tap [WPS PIN Method].
Enter the WPS PIN code of the photo
frame (the code is displayed on the
screen) to your access point. Then tap
[Next].
For details on entering the WPS PIN
code for your access point, refer to
the instruction manual for your access
point.
When connection with the access
point is established, tap [Complete].
The setup is completed.
Search Wi-Fi Networks
Tap [Search Wi-Fi Networks].
Searching begins, and the list of access points available in the connection area appears.
Tap to select the access point to be connected on the list.
Specify the Password (security key).
Tapping the blank box for Password displays the
screen keyboard.
By tapping the [Show password] button so that
the mark appears on it, you can confirm the
entered password.
Enter the Password then tap [Complete].
For the Password, ask the network administrator
or refer to the instruction manual of the access
point.
Input in a case-sensitive manner.
The Wi-Fi Setting display is resumed.
Tap [Next].
Tap to select the IP address setting method.
Normally select [Auto (Recommended)].
When connection with the access point is
established, tap [Complete].
4
Wi-Fi settings
When Wi-Fi setting is completed, the unit is connected to a network. When a network is connected, the time and date are automatically adjusted and network service may be enabled.
No
No
Does your wireless device (access point) have or support …
Proceed to Proceed to Proceed to
Yes Yes
WPS button* or WPS push-button
configuration?
WPS (Wi-Fi Protected Setup)?
Refer also to the operating instructions for the wireless device (access point). The Network name (SSID)
and Password (WEP key or WPA key) may be printed on the side or rear of the main unit of the access
point. If they are not clear, contact the manufacturer of the access point.
If it cannot be connected to wireless LAN.
Check if the access point of the wireless LAN is turned on.
Move this photo frame to another position or bring it closer to the access point.
Some equipment that uses a frequency band of around 2.4 GHz, such as a microwave
oven or Bluetooth device, may be in use near the photo frame. Move the photo frame
away from such equipment or turn that equipment off.
Note that frequencies in the IEEE 802.11a (5-GHz band) band cannot be used.
Customer support home page
The latest support information is available at the following home page address:
http://www.sony.net/
* Some wireless LAN routers may support the WPS push-button configuration with their AOSS button.
Confirm it with the operation manual of your wireless LAN router.


