


2-1 (E)
HDCU-900 MM
Section 2
Replacement of Main Parts
2-1. Replacing the Switching Regulator
w
The components marked ! are critical to safe operation. If
you replace with parts other than the specified ones, fire or
electric shock may result.
c
When repairing or replacing the power supply block, set
the voltage. If the voltage is set incorrectly, a fire or
electric shock may result.
. When repairing or replacing the power supply block, set
to the same power supply voltage as that of repair shop
work bench.
. When delivering to the user, adjust the power supply
voltage to suit the user.
Gently remove or attach the power supply unit while
holding it by hand.
Otherwise, the unit may fall, causing an injury.
If the power supply unit is not attached securely, the
contact resistance of the unit increases, which may result in
damage to parts or a fire. Tighten completely the fixing
screws of the power supply unit.
Do not turn on the power before fixing the power supply
unit securely.
Replacement Part
Part : Switching regulator
Part No. : ! A-8312-120-B
Replacement Procedure
1. Turn off the main power and disconnect the plug from
the outlet.
n
Wait for at least three minutes before starting replace-
ment, because there are electrically live blocks inside
the machine that could cause electric shock.
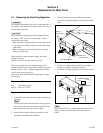
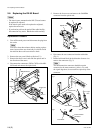
2. Remove the front panel. (Refer to Section 1 of the
Installation and Maintenance Manual.)
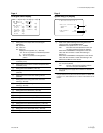
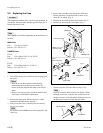
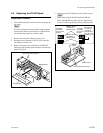
3. Fully loosen the four screws (with drop-safe) and
remove the switching regulator in the direction of the
arrow.
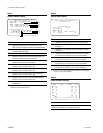
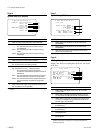
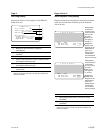
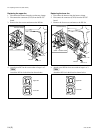
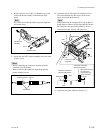
4. Set the two voltage selectors of the new switching
regulator as shown in the following figure.
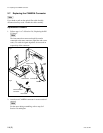
5. Attach the switching regulator in reverse order of step
3.
n
When using the unit at a voltage other than the specified
voltage, contact your local Sony Sales Office/Service
Center.
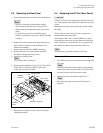
115 V
100 V
110-120 V 220-240 V
CAMERA TRANS
PWH4 x 8
(with drop-safe)
PWH4 x 8
(with drop-safe)
Switching regulator