


Chapter 3 Convenient Recording/Playback Functions
3-2 Chapter 3 Convenient Recording/Playback Functions
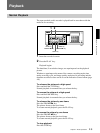
Timer Recording
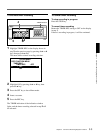
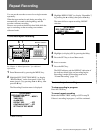
3 Highlight TIMER REC by pressing the V or v key,
then press the b key.
The menu shifts to the selection layer of timer
recording.
SETUP MENU
REC FUNCTION MENU
TIMER REC
M TIMER REC : OFF m
TIMER
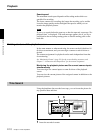
4 Highlight TIMER SET by pressing the V or v key,
then press the b key.
The TIMER set display appears on the monitor
screen and the indication at the upper left flashes.
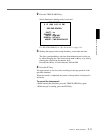
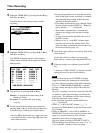
TIMER set display
TIMER
DAY TIME REC TIME REC
Mo 0:00AM 1, 5:00PM 2
Tu 0:00AM 1, 5:00PM 2
We 0:00AM 1, 5:00PM 2
Th 0:00AM 1, 5:00PM 2
Fr 0:00AM 1, 5:00PM 0
Sa –: —— –, –: —— –
Su –: —— –, –: —— –
TIME MODE=1900HOURS
5 Set the day(s) by pressing the V or v key.
Mon-Fr: To operate at the same setting from
Monday to Friday.
Everyday: To operate at the same setting
everyday.
6 Set the time and the recording mode number by
pressing the V or v key in the sequence then move
to the next digit or item by pressing the b key.
• Pressing !¢ of the numeric keys selects the item
on the previous line, and pressing !∞ selects the
item on the next line.
• By specifying another set of time and recording
mode in the right column, recording is continued
after changing the recording mode at the time
specified in the right column.
• If recording mode need not to be changed, delete
the time by pressing the RESET key. When the
time is deleted, “––––” is displayed.
• Time Mode is automatically calculated and
displayed according to the selected recording
mode.
• To stop recording at the specified time, set 0 in
the REC column.
• When you set “A” in the REC column, alarm
recording will start at the specified time. This
alarm recording is performed in the mode set on
the alarm set display (page 3-5).
7 Perform the same settings for each day of the week
when required.
For the day which recording is not necessary,
delete the day or time by pressing the RESET key.
8 When the settings are completed, press the SET
key.
A message “NOW SAVING” is displayed and the
settings are stored in nonvolatile memory.
Notes
•The time mode shown on the TIMER set display
suggests the timing for changing the cassette tape
next after starting recording at 0:00 AM on Monday.
That is, if “TIME MODE=178HOURS” is shown,
you may change the tape by 10:00 AM on the next
Monday.
However, recording is not always started at 0:00 AM
on Monday, so the time mode may not indicate the
precise time. The difference will be large especially
when the time mode value is small.
•If the calculated time mode exceeds 9999 hours,
“
****
” is displayed.
•When “A” is set in the REC column, “
****
” is
displayed for TIME MODE, as the time mode cannot
be calculated.
•When ALARM REC is set to ON in NORMAL or
INTERLEAVE mode on the recording function menu
(page 3-6), alarm recording will be activated
regardless of the timer recording setting.
However, alarm recording in FRAME, EVENT or
PREALARM will be activated only when “0” or “A”
is set in the REC column for timer recording.