


48 (GB)
Preparations
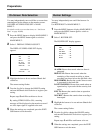
On-Screen Data Selection
You may independently turn on/off the on-screen data
superimposed on the images on the monitor screen.
Use DISPLAY/VIDEO LOSS SET of MAIN
MENU 2.
For details on the on-screen data items, see “On-Screen
Data” on page 16(GB).
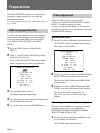
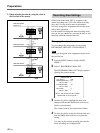
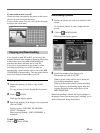
1 Press the MENU button to display MAIN MENU 1
and press the MENU button again to switch to
MAIN MENU 2.
2 Select 1. DISPLAY/VIDEO LOSS SET.
The DISPLAY/VIDEO LOSS SET display
appears.
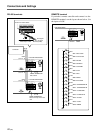
<DISPLAY SET>
DATE : ON
TIME : ON
QUALITY : ON
REC CYCLE : ON
ALARM COUNT : ON
ALARM TYPE : ON
<VIDEO LOSS SET>
VIDEO LOSS : ON
3 Highlight the item to be set and turn Shuttle dial
clockwise.
The current setting flashes.
4 Turn the Jog dial to change the ON/OFF setting
and turn the Shuttle dial clockwise to register your
setting.
Repeat steps 3 and 4 for each item to be set.
By setting VIDEO LOSS to ON, a warning
message will be displayed on the monitor screen if
no video input signal is supplied to the unit.
5 When the settings are completed, press the EXIT/
OSD button to exit the menu.
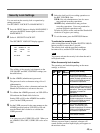
Buzzer Settings
You may independently turn on/off the buzzers for
warning.
Use BUZZER SET of MAIN MENU 2.
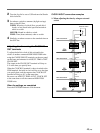
1 Press the MENU button to display MAIN MENU 1
and press the MENU button again to switch to
MAIN MENU 2.
2 Select 3. BUZZER SET.
The BUZZER SET display appears.
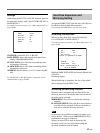
<BUZZER SET>
ALARM : ON
DISK FULL : ON
DISK ERROR : ON
LOCK WARNING : ON
KEY IN : OFF
NON REC : OFF
ALARM: Buzzer that sounds when an alarm is
generated
DISK FULL: Buzzer that sounds when the
remaining of the normal recording or alarm
recording area drops below the specified value.
DISK ERROR: Buzzer that sounds when an error
is generated for the hard disk
LOCK WARNING: Buzzer that sounds when an
operation key is pressed with the security lock
active.
KEY IN: Buzzer that sounds when an operation
key is pressed
NON REC: Buzzer that sounds when recording is
interrupted
3 Highlight the buzzer to be set and turn Shuttle dial
clockwise.
The current setting flashes.
4 Turn the Jog dial to change the ON/OFF setting
and turn the Shuttle dial clockwise to register your
setting.
Repeat steps 3 and 4 for each buzzer to be set.
5 When the settings are completed, press the EXIT/
OSD button to exit the menu.