


A
3-083-573-01(1)
Slave Flash
HVL-FSL1A
Sony Corporation © 2003 Printed in Japan
Operating Instructions
Mode d'emploi
Manual de instrucciones
Bendienungsanleitung
Gebruiksaanwijzing
•
•
•
•
•
•
•
•
•
•
•
•
1.5 2
A
CR123A
1
1
2
3
B
1
2
3
4
•
5
-
1
5
-
2
•
1
LOW HIGH
2
READY
5
3
4
•
C
• OFF
•
•
OFF
•
•
•
•
• CR123A
HIGH
480
GN
DSC-P9
F 2.8 3.8
DSC-P9
HIGH
F 2.8 6.3
READY
•
•
•
• 2
•
DC 3 V
1
480
14
52.7
×
60.5
×
37.2
×
×
60g
HVL-FSL1 1
1
CR123A 1
1
1
1
READY
OFF
15
READY
CR123
480
•
•
• 1
• : HVL-FSL1A
•
:
•
B
1
2
12
3
12
35
141-0001 6-7-35
0564-62-4979
9 5
HVL-FSL1A
English
WARNING
To prevent fire or shock hazard, do not
expose the unit to rain or moisture.
This symbol is intended to
alert the user to the
presence of uninsulated
“Dangerous voltage”
within the product’s
enclosure that may be of
sufficient magnitude to
constitute a risk of electric
shock to persons.
This symbol is intended to
alert the user to the
presence of important
operating and
maintenance (servicing)
instructions in the
literature accompanying
the appliance.
CAUTION
You are cautioned that any changes or
modifications not expressly approved in
this manual could void your authority to
operate this equipment.
NOTE
This equipment has been tested and found
to comply with the limits for a Class B
digital device, pursuant to Part 15 of the
FCC Rules. These limits are designed to
provide reasonable protection against
harmful interference in a residential
installation. This equipment generates,
uses, and can radiate radio frequency
energy and, if not installed and used in
accordance with the instructions, may
cause harmful interference to radio
communications.
However, there is no guarantee that
interference will not occur in a particular
installation. If this equipment does cause
harmful interference to radio or television
reception, which can be determined by
turning the equipment off and on, the user
is encouraged to try to correct the
interference by one or more of the
following measures:
– Reorient or relocate the receiving
antenna.
– Increase the separation between the
equipment and receiver.
– Connect the equipment into an outlet on
a circuit different from that to which the
receiver is connected.
– Consult the dealer or an experienced
radio/TV technician for help.
CAUTION
Danger of explosion if battery is
incorrectly replaced.
Replace only with the same or equivalent
type recommended by the manufacturer.
Discard used batteries according to the
manufacturer's instructions.
Replace the battery with a Sony CR123A
lithium manganese dioxide battery. Use of
another battery may present a risk of fire
or explosion.
WARNING
Battery may explode if mistreated. Do not
recharge, disassemble or dispose of in fire.
Slave Flash Features
•The slave flash is for use with the Sony
digital still camera.
•You can also use the tripod while fitting
the Slave Flash with the shoe adapter.
•The slave flash lets you take clear photos
even when there is insufficient light from
the built-in flash of the digital still
camera.
•The slave flash senses the reflected light
from the built-in flash and fires of the
digital still camera. (It does not fire with
the pre-flash for red-eye prevention. It
only fires in synchronization with the
main flash.)
•The distance at which photos can be
taken with the slave flash is about one
and half or two times that with only the
built-in flash.
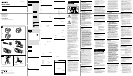
A Inserting the
Battery
The slave flash uses one Sony CR123A
lithium manganese dioxide battery.
1 Slide open the battery cover in the
direction of the arrow.
2 Insert the battery, making sure the
polarity of the battery is correct.
3 Slide the battery cover closed in
the direction of the arrow until it
clicks into place.
B Fitting the Slave
Flash
1 Fit the slave flash with the shoe
adapter provided.
2 Insert the screw of the shoe
adapter into the tripod hole of the
digital still camera and lightly
tighten it.
3 Adjust the length of the shoe
adapter and choose the position of
the slave flash.
4 Firmly tighten the screw of the
shoe adapter.
After Use
•You can remove and attach the slave
flash with the shoe adapter still fitted to
the digital still camera. Slide the slave
flash in the direction of the arrow (5-2)
while pressing the black button at the
bottom (5-1).
•Remove the slave flash from the shoe
adapter when carrying.
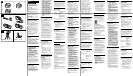
Using the Slave
Flash
For details of how to use the digital still
camera, please refer to the digital still
camera instruction manual.
1 Set the power switches of the
digital still camera and the slave
flash to LOW or HIGH, as required.
2 Check that the slave flash’s READY
lamp has stopped flashing and is
glowing. The slave flash must be
charged before taking a photo.
Charging takes about 5 seconds, (if
the battery is new). When
charging is complete, the orange
power lamp stops flashing and
glows.
3 Check that the built-in flash of the
digital still camera is ready to fire.
For details, please refer to the
digital still camera instruction
manual.
4 Point the digital still camera and
focus before pressing the shutter
button. When the built-in flash
fires of the digital still camera, the
slave flash senses the light and
also fires.
Note
•Do not rotate or carry the slave flash and
digital still camera when attached to a
tripod. C
•Switch off the slave flash after use.
•The battery takes longer to charge as it
gets older.
•Even if the slave flash is charged when
you turn it off, you must charge it again
before it can fire.
•Be careful not to block the light receptor
with your finger during use.
•The slave flash cannot be used outdoors
or in sunlight because its sensitivity is
reduced.
•The slave flash may fire if facing a light
source or if the light receptor is filled
with a powerful light source (such as
using a flash around you).
•The slave flash does not fire when there
is no reflective object in the background.
•The slave flash can fire approximately
480 times with a new Sony CR123A
lithium manganese dioxide battery and
the light amount set to HIGH. This
number varies according to the
conditions of use.
Recommended
Distance
The recommended distance varies with the
guide number (GN) of the build-in flash of
the digital still camera.
For details, please refer to the digital still
camera instruction manual.
Example:
When using a DSC-P9 built-in flash
At f-stop 2.8, the recommended
distance is 3.8m.
When using a DSC-P9 built-in flash and
slave flash together (when this unit is
set to HIGH)
At f-stop 2.8, the recommended
distance is 6.3m.
READY Lamp
•Flashes orange... Charging is underway.
•Glows orange... Charging is complete.
The slave flash can now be used.
•Flashes red... The battery is wearing out.
Replace it with a new one.
•Glows red for about 2 seconds then goes
off... The slave flash will not fire even if it
detects the built-in flash of the digital still
camera, the object is within range, and
the quantity of flash light is sufficient.
•Glows green... The slave flash has fired.
Maintenance
Wipe the surface of the slave flash with a
soft cloth. If it is very dirty, dampen the
cloth slightly with a neutral cleanser and
wipe again. Do not use thinners, benzene
or alcohol, which damage the surface of
the slave flash.
Main Specifications
Power Source 3V DC lithium manganese
dioxide battery
Guide number Around 14
Max. No. of Flashes
Approx. 480
Max. Dimensions
52.7mm × 60.5mm ×
37.2mm (2 1/8 × 2 1/2 × 1
1/2 inches) (w × h × d)
(excluding protruding
parts)
Weight Approx. 60g (2.2 oz) (not
including batteries)
Design and specifications are subject to
change without notice.
Supplied Accessories
Slave flash HVL-FSL1 (1)
Shoe adaptor (1)
Sony CR123A lithium manganese
dioxide battery (1)
Pouch (1)
Instruction manual (1)
Troubleshooting
sIf the READY lamp does not light up
when the power switch is turned on
t Turn the power switch “OFF” and
then on again.
When the flash is left untouched with
the power turned on, it automatically
turns itself off after 15 minutes in
order to prevent battery wear.
sIf the READY lamp flashes red
t Replace the battery.
Sony CR123A lithium manganese
dioxide battery lasts for about 480
flashes.
AVERTISSEMENT
Afin d’éviter tout risque d’incendie ou
d’électrocution, ne pas exposer cet
appareil à la pluie ou à l’humidité.
ATTENTION
Il existe un risque d’explosion si la pile est
remplacée de façon incorrecte.
Remplacez-la uniquement par une de type
identique ou équivalent, recommandé par
le fabricant.
Éliminez les piles usagées conformément
aux instructions de leur fabricant.
Remplacez la pile par une pile Sony
CR123A au lithium et dioxyde de
manganèse. L’emploi d’une autre pile peut
présenter un risque d’incendie ou
d’explosion.
AVERTISSEMENT
La pile peut exploser si elle est traitée de
façon inappropriée. Ne la rechargez pas,
ne la démontez pas et ne la jetez pas dans
un feu.
Caractéristiques du
flash asservi
• Le flash asservi est conçu pour servir
avec l’appareil photo numérique Sony.
•Vous pouvez également utiliser le trépied
en installant le flash asservi sur
l’adaptateur porte-accessoire.
• Le flash asservi vous permet de prendre
des photos nettes, même si le flash
incorporé à l’appareil photo numérique
ne fournit pas une lumière suffisante.
• Le flash asservi capte la lumière
réfléchie, provenant du flash incorporé,
et il se déclenche sur l’appareil photo
numérique. (Il ne se déclenche pas avec
un pré-flash pour réduire l’effet des yeux
rouges. Il se déclenche simplement en
synchronisation avec le flash principal.)
• La distance à laquelle des photos
peuvent être prises avec le flash asservi
est entre 1,5 et 2 fois celle disponible avec
le flash incorporé seul.
A Mise en place de
la pile
Le flash asservi s’alimente sur une pile
Sony CR123A (lithium et dioxyde de
manganèse).
1 Ouvrez le couvercle de la pile en le
glissant dans le sens de la flèche.
2 Installez la pile en respectant ses
polarités.
3 Refermez le couvercle de la pile en
le glissant dans le sens de la flèche
jusqu’à son encliquetage.
B Installation du
Flash asservi
1 Installez le flash asservi sur
l’adaptateur de porte-accessoire
fourni.
2 Insérez la vis de l’adaptateur de
porte-accessoire dans l’orifice de
trépied sur l’appareil photo
numérique et serrez-la légèrement.
3 Ajustez la longueur de
l’adaptateur de porte-accessoire et
déterminez la position du flash
asservi.
4 Serrez fermement la vis de
l’adaptateur de porte-accessoire.
Après l’utilisation
•Vous pouvez déposer et fixer le flash
asservi en laissant l’adaptateur de porte-
accessoire installé sur l’appareil photo
numérique. Glissez le flash asservi dans
le sens de la flèche (5-2) en appuyant
sur le bouton noir dans le bas (5-1).
•Retirez le flash asservi de l’adaptateur de
porte-accessoire lorsque vous le
transportez.
Utilisation du flash
asservi
Pour les détails sur l’utilisation de
l’appareil photo numérique, reportez-vous
à son mode d’emploi.
1 Réglez les interrupteurs
d’alimentation de l’appareil photo
numérique et du flash asservi sur
LOW ou HIGH, selon les besoins.
2 Assurez-vous que le voyant READY
du flash asservi a cessé de
clignoter et qu’il reste allumé. Le
flash asservi doit être rechargé
avant de prendre une photo. Une
recharge prend 5 secondes environ
(si la pile est neuve). À la fin de la
recharge, le voyant d’alimentation
orange cesse de clignoter et il
reste allumé.
3 Assurez-vous que le flash
incorporé à l’appareil photo
numérique est prêt à fonctionner.
À ce sujet, reportez-vous au mode
d’emploi de l’appareil photo
numérique.
4 Dirigez l’appareil photo numérique
vers le sujet et effectuez la mise au
point avant d’appuyer sur le
déclencheur. Lorsque le flash
incorporé à l’appareil photo
numérique se déclenche, le flash
asservi détecte l’éclair et il se
déclenche aussi.
Remarques
•Ne tournez pas ni ne transportez le flash
asservi et l’appareil photo numérique
quand ils sont attachés à un trépied. C
•Désactivez le flash asservi après son
utilisation.
•Plus la pile vieillit, plus longtemps dure
la recharge.
•Même si le flash asservi est chargé
lorsqu’il est désactivé, il doit être chargé
à nouveau avant de pouvoir se
déclencher.
•Prenez soin de ne pas faire obstacle au
capteur de lumière avec les doigts
pendant l’utilisation du flash.
•Le flash asservi ne peut pas fonctionner à
l’extérieur ou au soleil parce que sa
sensibilité est réduite.
•Le flash asservi peut se déclencher s’il
fait face à une source de lumière ou si le
capteur de lumière reçoit une forte
lumière (par exemple, si vous utilisez un
flash près de vous).
•Le flash asservi ne se déclenche pas s’il
n’y a pas d’objet réfléchissant à l’arrière-
plan.
•Le flash asservi peut fonctionner 480 fois
avec une nouvelle pile Sony CR 123A au
lithium et dioxyde de manganèse et si le
réglage de lumière est sur HIGH. Ce
nombre varie en fonction des conditions
d’utilisation.
Distance Éclair -
Sujet
La distance recommandedée l’éclair au
sujet varie selon le nombre-guide (NG) du
flash incorporé à l’appareil photo
numérique. Pour les détails, reportez-vous
au mode d’emploi de l’appareil photo
numérique.
Exemple:
Si vous utilisez un flash incorporé DSC-
P9(quand cette unité est réglée sur
HIGH):
À l’ouverture 2.8, la distance éclair-
sujet est de 3,8 m.
Si vous utilisez ensemble un flash
incorporé DSC-P9 et le flash asservi:
À l’ouverture 2.8, la distance éclair-
sujet est de 6,3 m.
Voyant READY
•Il clignote en orange ... La recharge est en
cours.
•Il s’allume en orange ... La recharge est
terminée. Le flash asservi peut
fonctionner.
•Il clignote en rouge ... La pile est usée.
Remplacez-la par une neuve.
•Il s’allume en rouge pendant 2 secondes
puis s’éteint ... Le flash asservi ne se
déclenchera pas même s’il détecte l’éclair
du flash incorporé de l’appareil photo
numérique, l’objet est dans la plage
voulue et la quantité de lumière du flash
est suffisante.
•Il s’allume en vert ... Le flash asservi s’est
déclenché.
Entretien
Nettoyez la surface du flash asservi avec
un linge doux. Si elle est très sale,
humectez le linge avec un produit de
nettoyage neutre et utilisez-le pour le
nettoyage. N’utilisez pas de diluant pour
peinture, benzène ou alcool car ces
produits endommageraient la surface du
flash asservi.
Spécifications
principales
Source d’alimentation Pile de 3 V, lithium
et dioxyde de manganèse
Nombre-guide Autour de 14
Nombre maximum d’éclairs Env. 480
Dimensions maximum 52,7 × 60,5 × 37,2
mm (2 1/8 × 2 1/2 × 1 1/2
pouces) (L × H × P) (sans
les parties saillantes)
Poids Env. 60 g (2.2 oz) (pile non
comprise)
La conception et les spécifications peuvent
être modifiées sans avis préalable.
Accessoires fournis
Flash asservi HVL-FSL1 (1)
Adaptateur de porte-accessoire (1)
Pile Sony CR123A, lithium et dioxyde
de manganèse (1)
Pochette (1)
Mode d’emploi (1)
Guide de dépannage
sSi le voyant READY ne s’allume pas
lorsque l’interrupteur d’alimentation est
allumé
t Tournez l’interrupteur
d’alimentation sur “OFF”, puis à
nouveau sur on.
Si le flash n’est pas utilisé pendant 15
minutes après avoir été activé, il se
met automatiquement hors service
pour éviter une décharge de la pile.
sSi le voyant READY clignote en rouge
t Remplacez la pile.
Une pile Sony CR123A au lithium et
dioxyde de manganèse peut fournir
environ 480 éclairs.
Français
C
100 VOC (
)
Printed on 100% recycled paper using VOC (Volatile
Organic Compound)-free vegetable oil based ink.
• • Do not carry.
• Ne pas transporter.
• • Do not rotate.
• Ne pas tourner.