


,
2-897-437-01 (1)
Battery Video Light
Lampe vidéo à batterie
HVL-LBP
© 2007 Sony Corporation Printed in Japan
•
•
•
1
2
POWER OFF
ON
JBRC http://www.jbrc.net/hp/contents/index.html
• LED
• LED 10000
•
•
•
• NP-F970/F960/F770/F750/F730
NP-F970/F770
• NP-F570/F550/F530/F330
•
• 0 40
•
• LED
•
•
•
•
–
–
–
•
10
–
– 10 30
• POWER OFF
•
• LED
OFF
•
•
A
•
•
•
•
3 #
•
3 #
•
•
A
B
Operating Instructions
Mode d’emploi
Manual de instrucciones
E
1
2
A
45 45 45
1
POWER
ON
2
3
ON 1.5 LED
4
ON 8
BRIGHT 100% MAX) 10 MIN
2
•
• BRIGHT LED
•
POWER OFF
1
2
POWER OFF
3
4
8
5
10
POWER ON POWER ON
POWER ON
4 75
3 75 50
2 50 25
1 25 5
5
•
5 1
•
10
1 POWER OFF
•
4 10
L 10 4 LED
• L NP F900 NP F700
•
• AC
20 AC
•
TEMP
LED TEMP
60
TEMP
1
POWER OFF
2
3
RELEASE
4
L
NP-F900 NP-F700
DC 7.2 V
16 W
600 lux 1 m
45 60
3 NP-F970 BRIGHT MAX 25
2 (NP-F770 BRIGHT MAX 25 )
1m 600 lux
3m 66 lux
5m 24 lux
8m 9 lux
10m 6 lux
5500 K BRIGHT MAX 25
0 40
-20 60
108 150 129 mm( / / )
420 g
1
1.2 1
•
•
• 1
8
• HVL-LBP
•
•
0570-00-2288
PHS 0466-31-2588
FAX 0466-31-2595
9:00 18:00
http://www.sony.jp/
108-0075 1-7-1
English
Before operating the unit, please read these instructions thoroughly, and retain them for future
reference.
WARNING
To reduce fire or shock hazard, do not expose the unit to rain or moisture.
To avoid electrical shock, do not open the cabinet. Refer servicing to qualified personnel
only.
Do not look at the sun through the condenser lens. It may damage your eyes and even
cause blindness.
Disposal of Old Electrical & Electronic Equipment (Applicable in the
European Union and other European countries with separate collection
systems)
This symbol on the product or on its packaging indicates that this product shall
not be treated as household waste. Instead it shall be handed over to the
applicable collection point for the recycling of electrical and electronic
equipment. By ensuring this product is disposed of correctly, you will help
prevent potential negative consequences for the environment and human
health, which could otherwise be caused by inappropriate waste handling of
this product. The recycling of materials will help to conserve natural resources.
For more detailed information about recycling of this product, please contact
your local Civic Office, your household waste disposal service or the shop
where you purchased the product.
For Customers in the U.S.A.
NOTE
This equipment has been tested and found to comply with the limits for a Class
B digital device, pursuant to Part 15 of the FCC Rules. These limits are
designed to provide reasonable protection against harmful interference in a
residential installation. This equipment generates, uses, and can radiate radio
frequency energy and, if not installed and used in accordance with the
instructions, may cause harmful interference to radio communications.
However, there is no guarantee that interference will not occur in a particular
installation. If this equipment does cause harmful interference to radio or
television reception, which can be determined by turning the equipment off
and on, the user is encouraged to try to correct the interference by one or more
of the following measures:
– Reorient or relocate the receiving antenna.
– Increase the separation between the equipment and receiver.
– Connect the equipment into an outlet on a circuit different from that to which the receiver is
connected.
– Consult the dealer or an experienced radio/TV technician for help.
This device complies with Part 15 of the FCC Rules. Operation is subject to the following two
conditions:
(1)this device may not cause harmful interference, and
(2)this device must accept any interference received, including interference that may cause
undesired operation.
CAUTION
You are cautioned that any changes or modifications not expressly approved in this manual
could void your authority to operate this
equipment.
For Customers in Canada
This Class B digital apparatus complies with Canadian ICES-003.
For Customers in Europe
This product with the CE marking complies with both the EMC Directive (89/336/EEC) issued
by the Commission of the European Community.
Compliance with these directives implies conformity to the following European standards:
• EN55103-1 :Electromagnetic Interference (Emission)
• EN55103-2 :Electromagnetic Susceptibility (Immunity)
This product is intended for use in the following Electromagnetic Environment(s):
E1 (residential), E2 (commercial and light industrial), E3 (urban outdoors) and E4 (controlled
EMC environment ex. TV studio).
Features
• The HVL-LBP is a video light that uses a high-brightness white LED as its lens light source.
• The white LED has a long lifetime of about 10,000 hours along with excellent impact-
resistance and weather-resistance qualities, and so requires hardly any maintenance. It is built
to last and does need to be replaced.
• By using the battery adaptor cord when the video light is attached to your camcorder, the
weight of the camcorder is reduced and so is lighter to hold.
Precautions
• The video light does not have dust-proof, splash-proof or water-proof specifications.
• The video light is a precision instrument. Do not cause strong impacts to the video light such
as by dropping it or striking it.
• Use the “InfoLITHIUM” battery pack NP-F970/F960/F770/F750/F730. The NP-F970/F770 is
recommended.
• The “InfoLITHIUM” battery pack NP-F570/F550/F530/F330 cannot be used.
• Do not attach the video light to a camcorder equipped with an intelligent accessory shoe. The
accessory shoe may be damaged.
•Only use the video light within an ambient temperature range of 0 °C (35 °F) to 40 °C (104 °F).
• Do not block the vents. Doing so will raise the internal temperature, and it may cause a fire or
accident, or cause the unit to malfunction.
• Do not look directly at the white LED while it is on. It may damage your eyes.
• To prevent the camcorder from dropping, do not carry your camcorder by the video light
when it is attached.
• Do not place the video light near combustible or volatile solvents, such as alcohol or benzine.
Doing so may cause fire or smoke to be emitted.
•Do not allow any liquids into the video light or drop combustible objects or metal objects on
the video light. Doing so may cause a fire or cause the unit to malfunction if used.
•During use or storage, do not place the video light in the following locations. Doing so may
cause the video light to malfunction or deform:
– Hot weather or abnormally hot locations such as inside a car with closed windows
– Direct sunlight or near heating apparatus
– Locations subject to intense vibrations
• The battery pack life is shorter when used at low or high ambient temperatures, so the
lighting time is also reduced. The battery capacity deteriorates. When using the battery packs
at the temperature of 10 °C (50 °F) or less, the following steps are recommended for longer
battery life:
– To warm the battery pack, put it in your pocket. (Do not put the battery pack together with
a pocket heat pad.) Just before recording, insert the battery pack into the video light.
–Charge the battery pack at room temperature (from 10 °C (50 °F) to 30 °C (86 °F)).
• When you have finished using the video light, be sure that the POWER switch on the video
light is set to OFF.
• When not using the video light or when you have finished using it, remove the battery pack.
• Do not store away the video light immediately after using it. The white LED may be damaged
by the generated heat. Check that the power of the video light is set to OFF and the video
light has cooled sufficiently before storing it in your bag, etc.
• Leaving the condenser lens in direct sunlight while closed could cause a malfunction. Leaving
the condenser lens in direct sunlight while open could cause fire near the focal point of the
lens.
• Recording with the video light attached to the video camera body can slightly affect the
recorded sound.
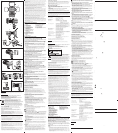
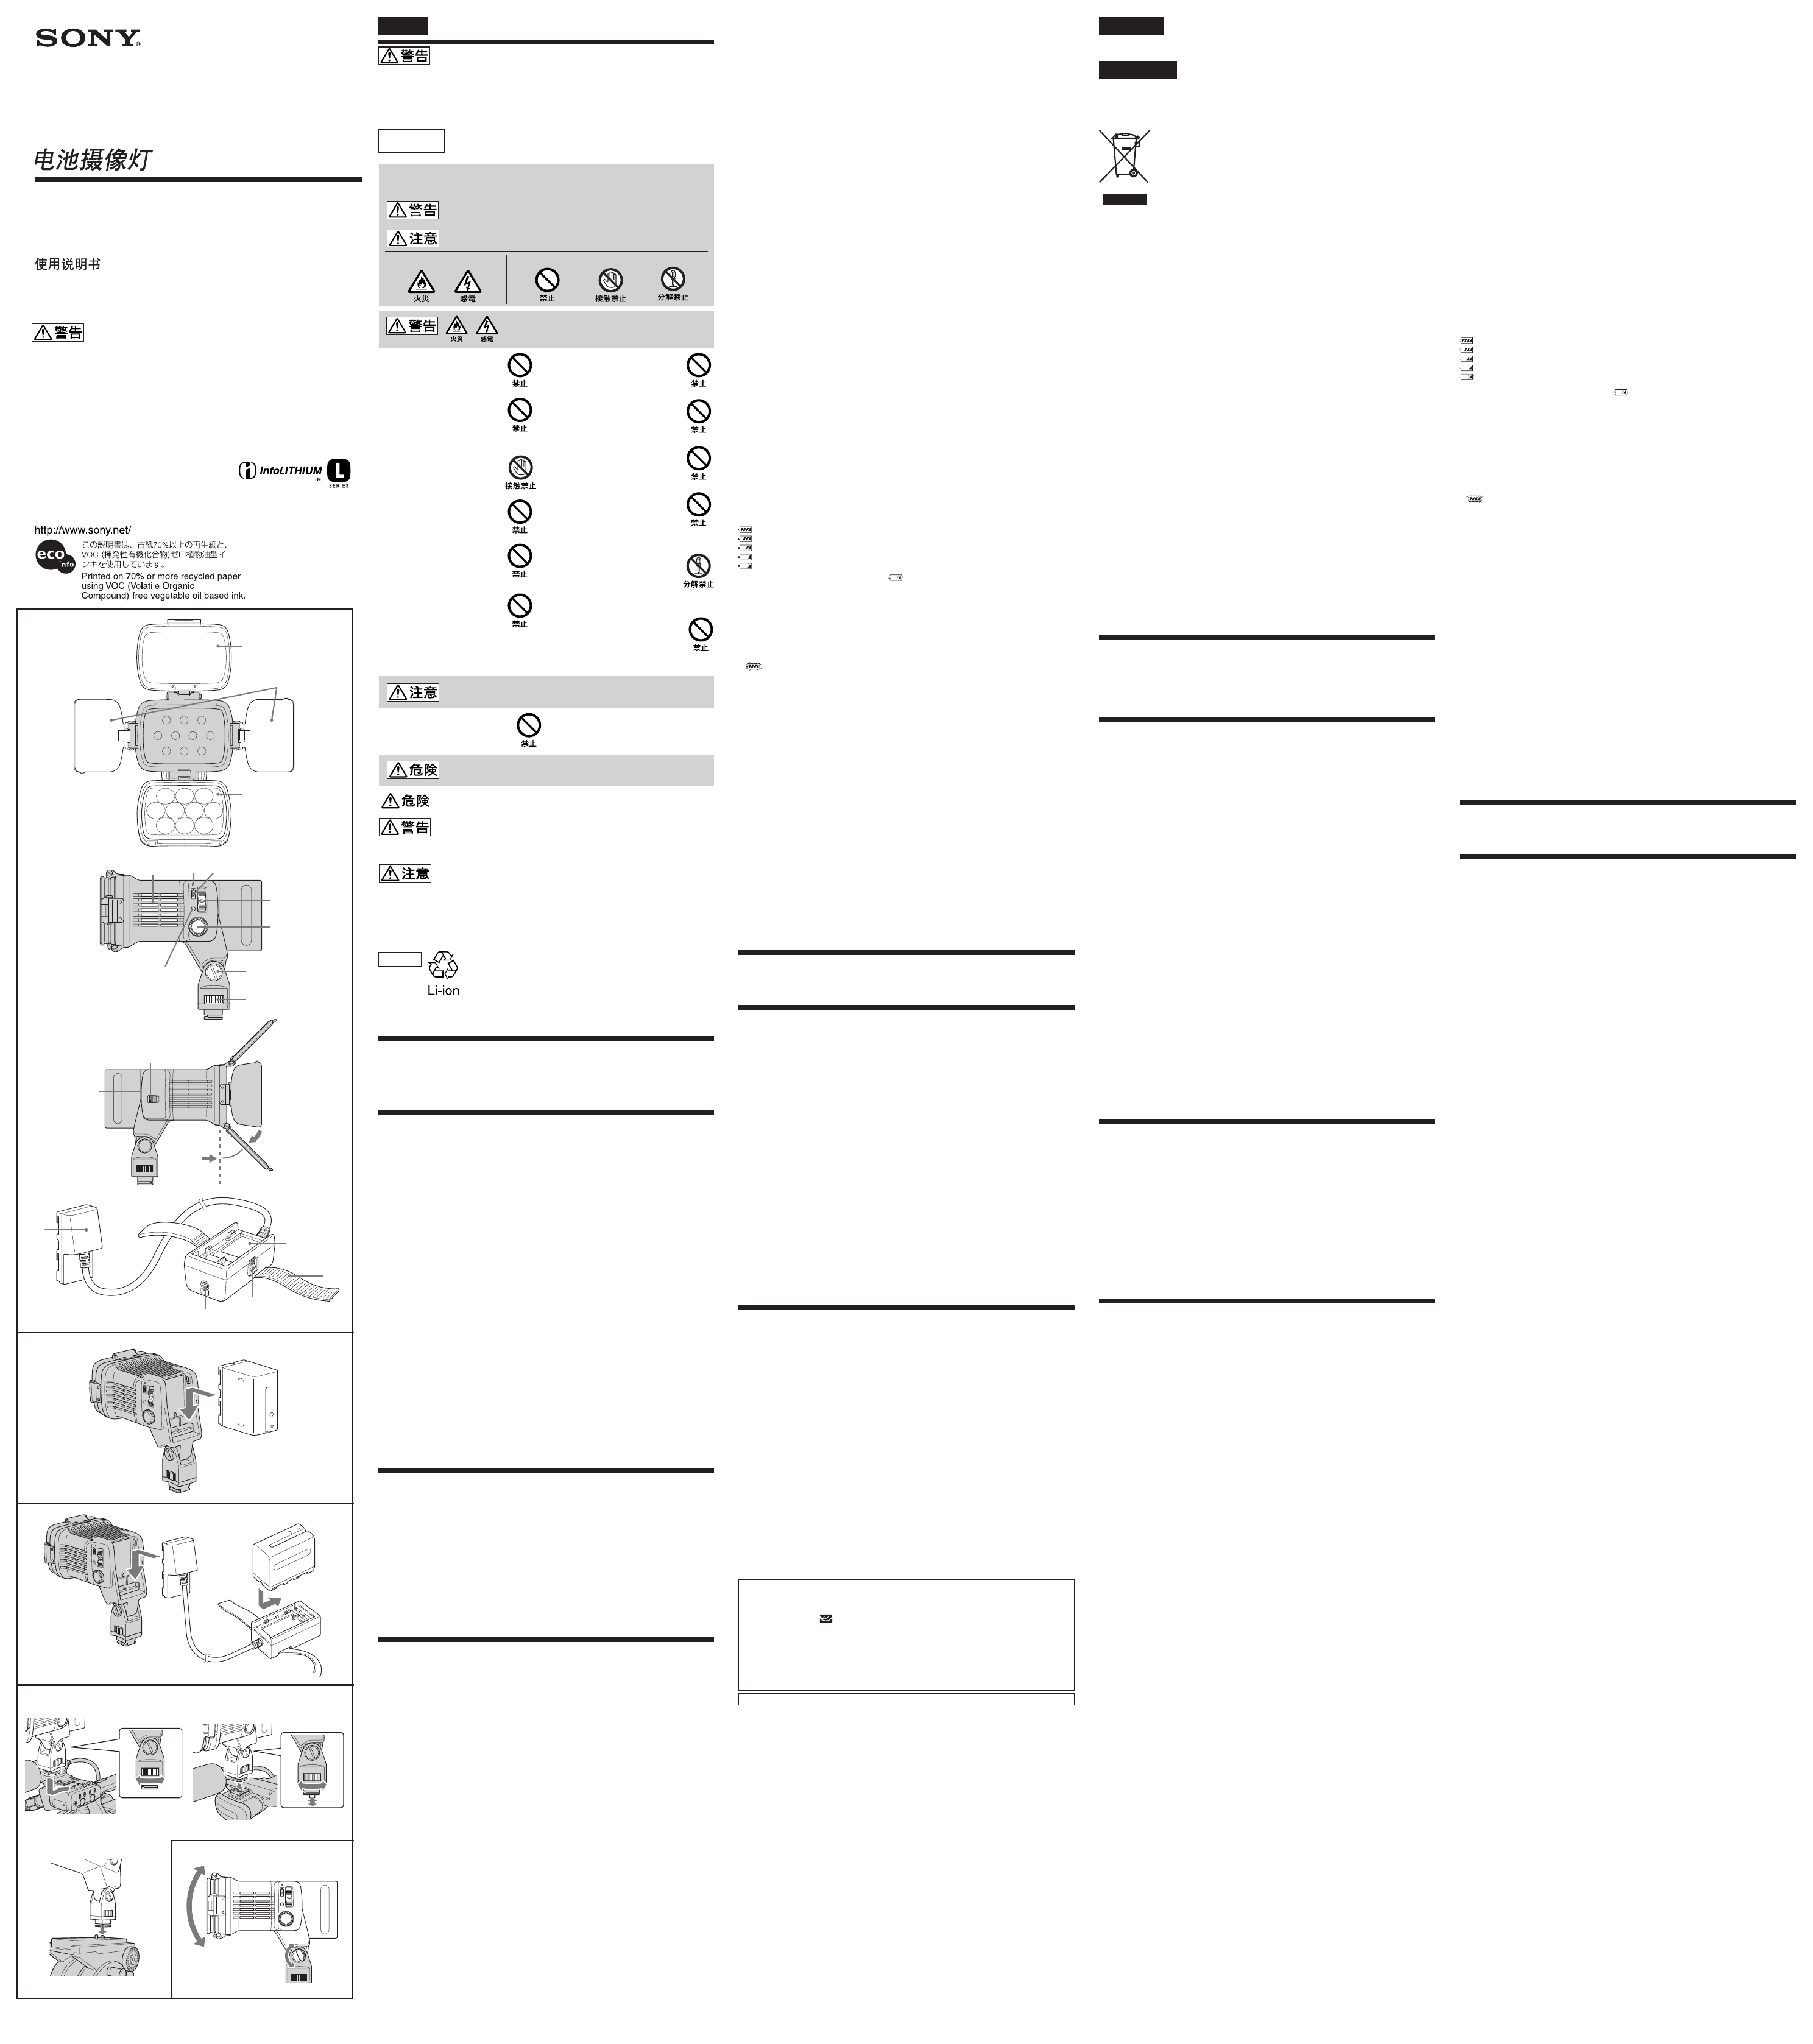
A Identifying the parts
Using the condenser lens
Illuminance can be doubled by using the condenser lens.
The angle of illuminance will become narrower.
Using the diffuser
The diffuser reduces glare and softens the light.
Notes
• When recording with the video light, if the subject is too close to the camcorder, several
shadows of the subject may overlap (multi-shadow).
•The color temperature varies slightly depending on the position of the BRIGHT dial and the
temperature of the white LED. Always adjust the white balance of the video camera manually
before recording.
• When storing the video light, store the condenser lens first, followed by the diffuser and then
the protection plate.
Checking the remaining battery capacity
The remaining battery capacity can be checked even if the POWER switch is set to OFF.
1Attach the battery pack to the video light.
2 With the POWER switch set to OFF, press the battery check button.
3 The remaining battery lamp lights up in steps as the remaining battery capacity
is checked and calculated.
4About 8 seconds after, the remaining battery capacity will be displayed.
5 After about 10 seconds, the remaining battery lamp will turn off.
If you press the battery check button, the calculation or display function will be stopped.
If you turn on the POWER switch while the remaining battery capacity is being calculated or
displayed, POWER ON operation begins. (Remaining battery capacity is rechecked.)
Lamp indicators
Remaining battery lamp
This indicator shows the approximate remaining battery power. The remaining battery power
will be displayed about 8 seconds after setting the POWER switch to ON or after pressing the
battery check button.
(4 segments lit) About 75% or more
(3 segments lit) About 50% - 75%
(2 segments lit) About 25% - 50%
(1 segment lit) About 5% - 25%
(1 segment flashing) About 5% or less
• When the battery capacity is low ( when flashing)
About 5 minutes before the batteries run out, the remaining battery lamp turns green and
begins to slowly flash (1 segment).
The time before the batteries run out varies depending on the frequency of use of the batteries
and the ambient temperature. This indicator should only be used as a rough guide, and it is
recommended that the batteries be replaced promptly.
• When the battery pack runs out
When the battery pack runs out, the video light goes out and the remaining battery lamp
turns green and blinks rapidly for about 10 seconds (1 segment). Set the POWER switch to
OFF and recharge the battery pack or replace it with a fully charged battery pack.
• Communication error
(4 segments flash) For about 10 seconds after the remaining battery check is complete
If an error occurs for some reason during communication with the battery pack or if batteries
other than the Sony “InfoLITHIUM” battery pack L series are inserted, 4 segments flash for 10
seconds to indicate a communication error and then the remaining battery display
disappears.
Notes
• When using batteries other than the Sony “InfoLITHIUM” battery pack L series (NP-F900
range, NP-F700 range) with the video light, the remaining battery capacity will not be
displayed.
• When using a battery pack that only has a short lifetime remaining, the remaining battery
display may not agree with the actual remaining battery capacity.
• When using a “InfoLITHIUM” battery pack attached to the “InfoLITHIUM” compatible AC
adaptor/charger, the available operating time will not be displayed. To display the operating
time, attach the battery pack to the camcorder and then use for about 20 seconds before
attaching the battery pack to the AC adaptor/charger again.
•The battery pack cannot be recharged with the video light.
TEMP lamp
When the white LED overheats for some reason, the video light will be turned off for safety
reasons, and the TEMP lamp turns red and blinks rapidly for about 60 seconds. If the ambient
temperature is high, use the video light at a lower temperature.
If the TEMP lamp continues to blink, stop using the video light and consult your Sony dealer or
local authorized Sony service facility.
Removing the video light
1Set the POWER switch to OFF.
2 Slide the battery release button and at the same time pull the battery pack
upward.
3 Turn the light attachment knob on the video light toward RELEASE.
If the video light is attached to a convex screw, loosen the convex screw.
4Remove the video light from the accessory shoe of the camcorder, tripod etc.
Cleaning
Clean the video light with a soft dry cloth. If you clean it with a soft cloth lightly moistened
with a mild detergent solution, wipe it with a soft dry cloth after cleaning. Do not use a damp
cloth or any type of solvent, such as alcohol or benzine, which might damage the finish.
Specifications
Power source Sony “InfoLITHIUM” battery pack L series
(NP-F900 range, NP-F700 range)
DC 7.2 V
Power consumption Approx. 16 W
Maximum luminosity Approx. 600 lux (1 m (3 1/5 ft.)) (when used with a condenser lens)
Lighting direction Lighting angle Vertical Approx. 45 degrees
Horizontal Approx. 60 degrees
(when used with a condenser lens)
Continuous lighting time Approx. 3 hours (when using a fully charged NP-F970 and
when the BRIGHT dial is set to MAX at an ambient temperature
of 25 °C (70 °F))
Approx. 2 hours (when using a fully charged NP-F770 and when
the BRIGHT dial is set to MAX at an ambient temperature of 25 °C
(70 °F))
Lighting distance Approx. 1 m (3 1/5 ft.) 600 lux
(When using the condenser Approx. 3 m (9 4/5 ft.) 66 lux
lens) Approx. 5 m (16 1/2 ft.) 24 lux
Approx. 8 m (26 1/3 ft.) 9 lux
Approx. 10 m (32 4/5 ft.) 6 lux
Color temperature Approx. 5,500 K (default setting with the BRIGHT dial set to MAX
and an ambient temperature of 25 °C (70 °F))
Operating temperature 0 °C to 40 °C (35 °F to 104 °F)
Storing temperature -20 °C to +60 °C (-4 °F to -140 °F)
Dimensions Approx. 108 × 150 × 129 mm (w/h/d) (4 3/8 × 6 × 5 1/8 in.)
Mass (Video light only) Approx. 420 g (14.9 oz.)
Included items Battery video light (1),
Battery adaptor cord (Cord part Approx. 1.2 m (3 4/5 ft.)) (1),
Set of printed documentation
Design and specifications are subject to change without notice.
“InfoLITHIUM” is a trademark of Sony Corporation.
1
2
3
C
1
2
D
E
4
11
7
8
9
10
12
13
56
HVL-LBP
1
2
3
4
5 TEMP
6
7 POWER
8 BRIGHT
9
10
11
12
13
14
15
16
17
18
B
POWER OFF
C
1 C
-1
2 C
-2
•
•
10
•
D
1
RELEASE
2
3
LOCK
1
LOCK
2
3
LOCK
1
RELEASE
2
HVL-LBP video light
1 Diffuser
2 Protection plate
3 Condenser lens
4 Vents
5 TEMP lamp
6 Remaining battery lamp
7POWER switch
8BRIGHT dial
9 Lighting angle adjusting screw
(Coin screw)
10 Light attachment knob
11 Battery check button
12 Battery release button
13 Battery mount
Battery adaptor cord
14 Battery release button
15 Tripod screw hole
16 Holding band
17 Video light side attachement
18 Battery mount
Using the video light
Attaching the battery pack
Attaching the battery pack to the video light (Illustration B)
Check that the POWER switch is set to OFF and attach the fully charged battery
pack to the battery mount on the video light.
Using the battery adaptor cord (Illustration C)
The battery adaptor cord allows you to use the video light with the battery pack detached.
1Attach the battery adaptor cord (Illustration C-1) to the battery mount on the
video light.
2 Attach the battery pack to the battery mount on the adaptor (Illustration C-2).
Notes
•The battery adaptor cord can only be used with this video light.
• When using the video light with the battery pack attached to the battery adaptor cord, the
continuous lighting time will be about 10 % shorter than if the battery pack was attached
directly to the video light.
• If the battery mount part of the battery adaptor cord is fixed with a holding band etc., be
careful when moving the unit not to pull the cord and knock down the camcorder or
tripod.
Attaching the video light to the camcorder (Illustration D)
Attaching the video light to the accessory shoe
1 Turn the light attachment knob on the video light toward RELEASE in order to
retract the screw.
2 Attach the video light to the accessory shoe on the camcorder.
3 Turn the light attachment knob on the video light toward LOCK to fasten the
video light.
(Do not attach the video light to a video camera that has an intelligent accessory shoe. The
accessory shoe may be damaged.)
Attaching the video light to the concave screw
1 Turn the light attachment knob on the video light toward LOCK to extend the
screw.
2 Align the screw part of the video light with the concave screw.
3 Turn the light attachment knob on the video light toward LOCK to fasten the
video light.
Attaching the video light to the convex screw on the tripod or grip
1 Turn the light attachment knob on the video light toward RELEASE as far as it
will go, in order to retract the screw.
2 Insert the video light into the convex screw, and screw the video light.
Adjusting the angle of the video light (Illustration E)
1 Unfasten the lighting angle adjusting screw with a coin and adjust the angle of
the video light.
2 Fasten the lighting angle adjusting screw with a coin and lock firmly to fix the
angle of the video light.
Note
When adjusting the angle, hold the video light body firmly while loosening the lighting angle
adjusting screw.
Opening the protection plate, condenser lens and diffuser
Note
Open the protection plate, condenser lens and diffuser about 45 degrees as in Illustration A.
The angle of 45 degrees or more provides a buffer range to prevent damage. Note that using
force to open to 45 degrees may cause damage.
Turning the video light on
1 Slide the POWER switch to ON while pressing down on the green button.
2 The remaining battery lamp lights up in steps as the remaining battery capacity
is checked and calculated.
3 The white LED comes on about 1.5 seconds after the POWER switch is turned on.
4 The remaining battery capacity appears about 8 seconds after the POWER switch
is turned on.
Adjust the illuminance
The illuminance of the video light can be adjusted between 100% (max) and about 10% (min)
using the BRIGHT dial.
18
17
16
14
15
45°