


English
Before operating the product, please read this manual thoroughly and retain it for
future reference.
WARNING
To reduce re or shock hazard, do not expose the unit to rain or moisture.
Tape over lithium battery contacts to avoid short-circuit when disposing of batteries,
and follow local regulations for battery disposal.
Keep batteries or things that could be swallowed away from young children. Contact a
doctor immediately if an object is swallowed.
Immediately remove the batteries and discontinue use if...
the product is dropped or subjected to an impact in which the interior is exposed.
the product emits a strange smell, heat, or smoke.
Do not disassemble. Electric shock may occur if a high voltage circuit inside the
product is touched.
CAUTION
Replace the battery with the specied type only. Otherwise, re or injury may result.
Do not expose the batteries to excessive heat such as sunshine, re or the like.
is symbol is intended to alert the user to the presence of important
operating and maintenance (servicing) instructions in the literature
accompanying the appliance.
For the Customers in the U.S.A.
CAUTION
You are cautioned that any changes or modications not expressly approved in this
manual could void your authority to operate this equipment.
NOTE
is equipment has been tested and found to comply with the limits for a Class B
digital device, pursuant to Part 15 of the FCC Rules. ese limits are
designed to provide reasonable protection against harmful interference in a
residential installation. is equipment generates, uses, and can radiate radio
frequency energy and, if not installed and used in accordance with the
instructions, may cause harmful interference to radio communications.
However, there is no guarantee that interference will not occur in a particular
installation. If this equipment does cause harmful interference to radio or
television reception, which can be determined by turning the equipment o
and on, the user is encouraged to try to correct the interference by one or more of the
following measures:
– Reorient or relocate the receiving antenna.
– Increase the separation between the equipment and receiver.
– Connect the equipment into an outlet on a circuit dierent from that to which the
receiver is connected.
– Consult the dealer or an experienced radio/TV technician for help.
For the Customers in Europe
Disposal of Old Electrical & Electronic Equipment (Applicable
in the European Union and other European countries with
separate collection systems)
is symbol on the product or on its packaging indicates that this
product shall not be treated as household waste. Instead it shall
be handed over to the applicable collection point for the recycling
of electrical and electronic equipment. By ensuring this product
is disposed of correctly, you will help prevent potential negative
consequences for the environment and human health, which could
otherwise be caused by inappropriate waste handling of this product.
e recycling of materials will help to conserve natural resources. For
more detailed information about recycling of this product, please
contact your local Civic Oce, your household waste disposal service
or the shop where you purchased the product.
<Notice for the customers in the countries applying EU
Directives>
e manufacturer of this product is Sony Corporation, 1-7-1 Konan Minato-ku
Tokyo, 108-0075 Japan. e Authorized Representative for EMC and product safety is
Sony Deutschland GmbH, Hedelnger Strasse 61, 70327 Stuttgart, Germany. For any
service or guarantee matters please refer to the addresses given in separate service or
guarantee documents.
What is the “InfoLITHIUM” ?
e “InfoLITHIUM” is a lithium ion battery pack which can exchange data with
compatible electronic equipment about its battery consumption. Sony recommends
that you use the “InfoLITHIUM” battery pack with electronic equipment having the
logo.
Notes on Use
This unit is a Vertical Grip for DSLR-A350, A300 and A200.
Do not attach it to other devices. Not all of the above
models are available in all countries and regions.
This unit does not have dust-proof, splash-proof or water-
proof specications.
Only one or two “InfoLITHIUM” battery pack(s) NP-FM500H
can be used.
NP-FM55H, NP-FM50, NP-FM30 cannot be used.
Remove the battery packs when storing this unit for an extended period of time.
Leaving the battery packs inserted in the unit may cause the battery chamber to be
damaged because liquid can leak from a battery. If that should occur, take the unit
immediately to the nearest Sony dealer for repair.
Be sure to use a genuine Sony battery pack with this unit.
is unit does not have a battery charger function.
Places to avoid for unit use and storage
Regardless of whether this unit is in use or in storage, do not leave it where it can be
exposed to:
Extremely high temperatures
Do not leave this unit where it might be exposed to direct sunlight; Avoid places
like vehicle dashboards or near heat sources. e inside of a vehicle can become
extremely hot if the vehicle windows are closed in the summer or if the vehicle is
under direct sunlight. e unit can become deformed or experience malfunctions if
le inside a vehicle.
Excessive vibrations
Strong electromagnetism or rays
Excessive sand or dust
Other cautions
is unit is designed for use from 0 °C to 40 °C (32 °F to 104 °F).
A rapid and dramatic rise in temperature causes condensation to form. erefore,
seal the unit in a plastic bag and remove as much of the air inside of the bag as
you can before attempting to bring this unit inside aer being in the cold for any
extended period of time. Once the temperature in the bag has had a change to rise
gradually to the temperature in the room, you can safely remove it from the bag.
ese procedures will prevent the unit from changing temperatures rapidly, and
therefore prevent condensation from forming.
When dirty, this unit may be cleaned with a clean, dry cloth. Do not allow this unit
to come in contact with alcohol or other chemicals.
is unit has an electrically-connected signal contact point with the camera.
If you load the battery pack(s) while this unit is not attached to the camera, the unit
could malfunction or be damaged by a shorting of the contact point.
When attaching this unit to the camera, detaching this unit from the camera or
storing this unit separately, be sure to remove the battery pack(s) from this unit.
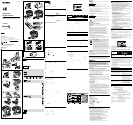
Identifying the Parts
1
Electrical contacts
2
Guide bar
3
Attachment screw
4
Recording: AEL (AE lock) button
Playback:
(Enlarge) button
5
Grip control ON/OFF switch
6
Recording:
(Exposure) button
Playback:
(Reduce) button/ (Index) button
7
Battery cover storage
8
Strap hook
9
Shutter button
10
Front control dial
11
Tripod receptacle
12
Battery pack stopper
13
Battery pack tray
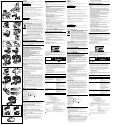
Attaching this unit to the camera
1 Set the POWER switch of the camera to “OFF.”
If the battery pack(s) is in this unit, remove the battery pack(s) from this unit.
2 Remove the battery pack from the camera.
3 Remove the terminal cover of this unit’s electrical contacts.
Aer use, put the terminal cover back on to protect the electrical contacts.
4 Detach the battery cover from the camera.
5 Fit the battery cover into the battery cover storage.
When tting the battery cover into the battery cover storage, check the direction of
the battery cover. (See illustration
-
5
-
.)
6 Align the following part to attach this unit to the camera.
[is unit] Guide bar
[Camera] Battery chamber
[is unit] Attachment screw
[Camera] Tripod receptacle
7 Rotate the attachment screw to lock it.
Periodically conrm that the attachment screw is not loose while in use.
Owner’s Record
e model and serial numbers are located inside of the unit.
Record the serial number in the space provided below.
Refer to them whenever you call upon your Sony dealer regarding this product.
Model No. VG-B30AM Serial No.
Printed on 70% or more rectcled paper
using VOC (Volatile Organic Compound)
-free vegetable oil based ink.
NP-FM500H 2
2
70-200mm F2.8G 300mm F2.8G
70-200mm F2.8G
DMF
5.5 mm
5.5 mm
POWER
ON
ON/OFF
OFF
POWER OFF
POWER OFF
NP-FM500H DC7.2V
DSLR-A200
NP-FM500H 2 1,500
DSLR-A350 A300
NP-FM500H 2 820
1,460
CIPA
132.5 mm 115.1 mm 82.2 mm( )
280 g )
0 40
1 1 1
InfoLITHIUM
1
8
VG-B30AM
3
1
3
2
Inserting the battery packs
Battery pack NP-FM500H (1 or 2 required)
NP-FM55H, NP-FM50, NP-FM30 are not available with this unit.
Be sure to charge the battery packs with the specied battery charger before use.
1 When replacing the battery packs with this unit attached to the
camera, set the POWER switch of the camera to OFF.
2 Press
on the battery chamber door to slide it in the direction of
the arrow to open the battery chamber door.
3 Press the battery stopper (blue) down with your nger in the
direction of the arrow as illustrated.
When releasing the lock of the battery pack stopper, be careful to pop up the
battery pack tray.
4 Remove the battery pack tray.
5 Attach the battery packs to the battery tray according to the
display on the battery tray.
When attaching a battery pack, attach it to either side.
Do not touch the terminal of the battery pack tray
.
Attach the battery pack NP-FM500H only to the battery pack tray. Do not attach
the other battery packs.
Do not disassemble the battery pack tray.
When inserting two battery packs, start by using the one that has less power.
When the battery capacity of the used battery pack runs out, the unit will
automatically switch to the other battery pack.
6 Insert the battery pack tray into the original position by pressing
it until it clicks.
Make sure that the battery pack stopper locks the battery pack tray.
If you force the battery tray at an angle into the unit when no battery pack is
installed, you can insert it partway, but that will damage the unit.
Insert the battery tray in the horizontal position to the unit and in right direction.
(See illustration
-
6
-
.)
7 Close the battery chamber door of this unit and slide it in the
direction of the arrow until it clicks.
Shooting vertical images
e operations of the unit’s dials and buttons are same as those for the camera main
body.
When using this unit in vertical orientation, set the grip control ON/OFF switch to
“ON.”
e grip control ON/OFF switch switches the dial and button functions ON and
OFF.
Regardless of the position of the grip control ON/OFF switch, the camera operating
button always operates.
Switch the power ON and OFF with the POWER switch of the camera. e grip
control ON/OFF switch can not switch the power ON and OFF.
Remaining battery power indicator
When inserting the two battery packs, the following indicator will be displayed on the
LCD screen of the camera.
Of the two battery packs, the one that has less power will be used rst.
At that time, the mark of the battery pack in use is bright and the mark of the other
battery pack is dark. e remaining battery level of the battery pack in use is displayed
as a percentage (%).
e mark of the battery pack in use changes as shown below. When the power of
battery in use runs out, the unit automatically switches to the other battery pack.
Remaining
battery capacity
high low
If images are still being shot for a short time aer the mark appears, the
power of that battery will run out, but the unit will automatically switch to the
other battery pack.
Notes relating to the lens
When using this unit attached to the camera with the 70-200mm F2.8 G or 300mm
F2.8 G lens attached to the tripod-mounting collar, rotate tripod-mounting collar
to the position that allows the grip to be used.
When using this unit attached to the camera with 70-200mm F2.8 G lens attached
to the tripod-mounting collar, the following lens switches may not operate at the
vertical shooting. Before vertical shooting, set them at the horizontal position.
Focus-mode switch
DMF-mode switch
Focus-range limiter
When using a tripod, use one screw that is 5.5 mm or shorter. is unit cannot be
rmly fastened on a tripod using long screws. Attempting to do so will damage this
unit.
Troubleshooting
Symptom Remedy
e camera does not work even aer the
unit is attached to the camera, the battery
pack(s) are inserted into the unit and the
camera POWER switch is set to ON.
Check that the unit attachment screw
is securely tightened.
Check that the battery pack(s) are
charged.
Reattach the battery pack tray to the
unit.
Shutter button or other operating
buttons do not work.
Check that the grip control ON/OFF
switch is not set to OFF.
Reattach the battery pack tray to the
unit.
Set the camera POWER switch to
OFF, remove the battery pack(s), and
reattach the unit to the camera.
“For “InfoLITHIUM” battery only” is
displayed even though genuine Sony
battery pack(s) are being used.
Reattach the battery pack tray to the
unit.
Set the camera POWER switch to
OFF, remove the battery pack(s), and
reattach the unit to the camera.
Specications
Battery pack NP-FM500H DC7.2V
Recording performance
When DSLR-A200 is attached
With two NP-FM500H battery packs
Approx. 1,500 frames
When DSLR-A350 or A300 is attached
With two NP-FM500H battery packs
In Live view mode : Approx. 820 frames
In Viewnder mode : Approx. 1,460 frames
e measuring method conforms to CIPA standard.
Depending on the condition of use, recording performance may be lower less
than what was listed.
For details, refer to the operating instructions supplied with your camera.
Dimensions Approx. 132.5 mm × 115.1 mm × 82.2 mm (w/h/d)
(5 1/4 in. × 4 5/8 in. × 3 1/4 in.)
Mass Approx. 280 g (9.9 oz)
(including the battery tray, excluding the battery packs)
Operating temperature 0°C to 40°C (32°F to 104°F)
Included items Vertical grip (1), Battery tray (1), Terminal cover (1),
Set of printed documentation
Design and specications are subject to change without notice.
and “InfoLITHIUM” are trademarks of Sony Corporation.
5
1
JBRC
http://www.jbrc.net/hp/contents/index.html
InfoLITHIUM
DSLR-A350/A300/A200
NP-FM500H 1 2
NP-FM55H NP-FM50 NP-FM30
0 40
1
2
3
4 AEL(AE
(
5 ON/OFF
6
( )
7
8
9
10
11
12
13
1
POWER OFF
2
3
4
5
-
5
-
6
7
NP-FM500H 1 2
NP-FM55H NP-FM50 NP-FM30
1
POWER OFF
2
3
4
5
1
NP-FM500H
2
6
-
6
-
)
7
ON/OFF ON
ON/OFF
ON/OFF
ON/OFF
ON/OFF POWER
ON/OFF ON/OFF
1
2
13
12
11
3
4
5
6
7
9
10
8
6
2
4
7
6
7
4
5
/ Operating Instructions /
Mode d’emploi / Manual de instrucciones
VG-B30AM
Vertical Grip
Poignée verticale
© 2008 Sony Corporation Printed in Japan
3-291-833-03 (1)