


PRECAUTION
1. You can install the camera indoors or outdoors.
2. Choose an ideal location for the camera, since a camera
unit must be protected against vibration.
3.
Be careful not to scratch the lens or dome cover.
4. Use the camera within the temperature(-10 ~ +50 ).
5. Handle with care. Dropping it can cause serious dam-
age to the camera.
6. Avoid any direct sun light toward the lens.
7. Use the AC adaptor 12V DC regulated.(1A recom-
mendddded)
(24V AC available-Dual power version only) of time.
FEATURES
1. IP67(Waterproof)
2. Durable MATERIAL : Body-Aluminum,
Dome : Polycarbonate
3. Wall & Ceiling mount available
4. New method to adjust the camera direction
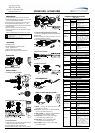
DIMENSION
INSTALLATION
1-1. Ceiling mount installation
1-2. Mounting camera to electrical box
1-3. Pipe application
(1) Remove the bolt, the cable fixing screw and the
cable plug on the bottom of the base.
(2) Use the TEPLON tape to wipe the pipe.
(3) After distributing cables, combine the pipe with the
base.
1-4. Camera direction adjustment and fixing
(1) Cover can be installed four directions using two screws
beside the cover.
(2) After loosening two screws on the cover, you can
adjust the direction of camera.
(3) You can tighten up two screws again to fix the direction.
2. Wall mount installation
3. Finishing installation
CONFIGURATION
HOW TO USE THE JOG LEVER
(1) MENU : To access the main setup menu. Push
this button for 1 second.
(2) TELE / UP : To close in on a far object.(ZOOM-IN)
/To move the arrow indicator to up.
(3) WIDE / DOWN : To widen the view.(ZOOM-OUT)
/ To move the arrow indicator to down.
(4) NEAR / LEFT : To see a near object clearly.
/ To move the arrow indicator to left.
(5) FAR / RIGHT : To see a far object clearly.
/ To move the arrow indicator to right.
(6) EXT. VIDEO : Plug your test monitor in here.
(The cable is option)
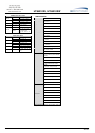
CAMERA FUNCTION SETTING
MAIN SETUP
OFF
CAMERA
TITLE
ON
Set Camera Title String and
OSD Display Position.
ATW–MODE :
OUTDOOR
INDOOR
ATW is controlled by color
tem-perature range
*MODE
- INDOOR : 3000~10,500°K
- OUTDOOR : level
AWC SET
ONE PUSH
WHITE BAL
MANUAL
RED / BLUE Adjustable.
BACKLIGHT
OFF / LOW /
MIDDLE /
HIGH
Backlight compensation.
OFF
Motion detection off
MOTION
DETECTION
ON
AREA(4 Programmable zone/
SIZE)
The words "MOTION
DETECTED" appear on the
screen and MD output signal
when movement is detected.
FOCUS
Refer to focus setup
EXPOSURE
Refer to exposure setup
SPECIAL
Refer to special setup
RESET
Returns to the level which was
set by the manufacturer for
shipment.
(except for communication and
Day & Night)
EXIT
Saves all settings, then exits.
FOCUS SETUP TABLE
AUTO
Focus is controlled
automatically
MANUAL
Focus is controlled manually
MODE
ONE-PUSH
Focus is automatically adjusted
just once, after zoom position
is changed.
OFF
Zoom tracking off
ZOOM TRK
ON
Zoom tracking on
ZOOM SPEED
FAST / SLOW
Zoom speed Control
ON
Digital zoom limit selectable
(x2 ~ x10).
D-ZOOM
OFF
Digital zoom off
ON
Zoom magnification set at power
on (x1 ~ x10)
DIS ZOOM
MAG
OFF
Zoom magnification display off
ON
Zoom magnification display on.
ZOOM POS
INIT
OFF
When initialized, zoom position
is disabled.
LENS INIT
Execute lens initialization.
EXPOSURE SETUP TABLE
BRIGHTNESS
Brightness level adjustment.
MANUAL
IRIS is controlled manually.
IRIS
AUTO
IRIS is controlled automatically.
MANUAL
Shutter is controlled manually
SHUTTER
A. FLK
Anti-flicker
OFF
Automatic gain control off.
AGC
NORMAL /
HIGH
Automatic gain control limit set.
OFF
Noise reduction off.
SSNR
LOW /
MIDDLE /
HIGH
Noise reduction level set.
OFF
Sense-up off
SENS-UP
AUTO
Sense-up limit selectable
(x2 ~ x128)
SPECIAL SETUP TABLE
OFF
Turns function off
USER PRESET
ON
Using the position preset function,
8 sets of camera shooting
conditions can be stored and
recalled.
OFF
Privacy mask off
PRIVACY
ON
AREA(4 Programmable zone)
/ SIZE / TONE adjustable.
COLOR
IR-Cut Filter is fixed to color
position.
B/W
IR-Cut Filter is fixed to B/W
position.
Day Night
AUTO 1, 2
When Input luminance level is
low, IR Cut Filter is switched
to the B/W position for
increasing
infrared sensitivity automatically.
And, it switches back to Color
position when luminance
is quite increased. Auto 1
mode is switched to IR Cut
Filter more quickly than Auto
2.
INT
Internal Sync.
SYNC
LL
External Sync(can adjust
desired phase from 0° ~ 359°).
Trigger Signal: Auto Detection.
COMM ADJ
Refer to communication setup
IMAGE ADJ
Refer to communication setup
If the product is to be put out of operation
definitively, take it to a local recycling plant for a
disposal which
is not harmful to the environment.
HT65010XS, HT65010XW