


Toshiba IK-WB11 Camera Installation & Configuration Guide 3
This guide explains how to install and configure the Toshiba IK-WB11 camera in the local
network.
It is strongly recommended that you add only one camera at a time to the network for
configuration.
1 Prerequisites
Before the configuration begins, check the following:
The camera is unpacked and correctly connected to the power source and network. If
using a Wired LAN connection, confirm that the network LAN is plugged in.
If using a wired network, make sure to plug in the network cable to the camera before
powering the camera on. If the network cable is not connected during start-up, the
camera will automatically switch to wireless mode.
WebCCTV NVR is installed, activated, running and properly connected to the network
(see Installation manual).
You have an exact list of IP addresses and passwords for WebCCTV NVR and the
network cameras.
The IP address of WebCCTV NVR is properly configured (see Installation manual).
Monitor, keyboard and mouse are connected to WebCCTV NVR (see Installation
manual).
If Java 2 Runtime Environment SE Ver.1.4.2 is not installed , this product may not
output images or sound properly. Access the following website to download “Java 2
Runtime Environment SE” http://java.com
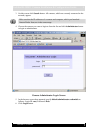
The IP address of the camera and the IP address of the computer you will use for the
network camera configuration are in the same range. The default camera network
settings are as follows:
IP address: 198.162.0.30, Subnet mask: 255.255.255.0
If your computer address is not in the range 198.162.0.n please change it appropriately.
Make sure that IP address of the camera and the IP address of the computer you will
use for the network camera configuration are in the same range. After the
configuration is complete, make sure that the IP address of WebCCTV/GuardNVR
server and the IP address of the camera are in the same range.
Version 3.0 Series