


Quick Installation Guide
This guide covers the installation and basic setup procedures for your
AXIS 200+. Should you require more detailed instructions, please
refer to the AXIS 200+ User’s Manual available via the Axis WWW
Home Page at http://www.axis.com/salessupport/manuals.html, or
http://www.se.axis.com/products/documentation/manuals.html
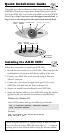
Installing the AXIS 200+
Follow these instructions to install your AXIS 200+:
1. Record the serial number of your AXIS 200+. Please note that the
serial number is identical to the Ethernet address of the unit.
2. Connect your AXIS 200+ to the network using an Ethernet
10baseT connector.
3. Connect the external power supply (Axis type PS-D), to the
AXIS 200+ and check that the Power indicator is lit.
4. Acquire an unused Internet address for your AXIS 200+.
5. Assign the Internet address to your AXIS 200+ using the method
appropriate for your network environment as detailed below:
Windows 95, Windows NT
Start a DOS window and type the following commands:
Example:
arp -s 192.168.3.191 00-40-8c-10-00-86
ping 192.168.3.191
arp -s <Internet address> <Ethernet address>
ping <Internet address>
When using the Windows 95 implementation of ARP you must
first, if you have an empty ARP table (seen with
arp -a), ping an
existing unit on your network before setting the Internet address.
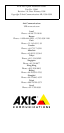
Net indicator
Power
RS232
I/O
Ethernet
Power indicator
Control Snapshot Camera lens
Front view
10baseT
supply
Lock ringCS ring
button
indicator