


Page 12 AXIS 209FD/FD-R/FD-R M12/MFD/MFD-R/MFD-R M12 Installation Guide
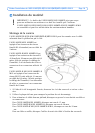
Complete the installation
1. Clean the dome with a dry soft cloth to remove dust and fingerprints and use a blower to
remove any dust from the lens.
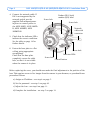
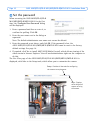
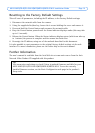
2. To absorb any moisture in the
AXIS 209FD-R/AXIS 209FD-R
M12/AXIS 209MFD-R/AXIS
209MFD-R M12, remove the
supplied silica gel sachet (dry
bag) from the plastic bag and
affix inside the cover, behind
the dome.
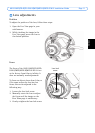
3. You can replace the cover in
either of these two ways:
• Replace cover and gently
tighten the tamper-proof
screws by hand using
the supplied allen key. In
the AXIS 209FD-R/AXIS 209FD-R M12/AXIS 209MFD-R/AXIS 209MFD-R M12,
take care not to pinch the gasket.
• Replace cover and tighten the tamper-proof screws with torque screwdriver
(torque<0.4 Nm).
The installation is now complete.
Accessing the AXIS 209FD/FD-R/FD-R M12/MFD/MFD-R/
MFD-R M12 from the Internet
Once installed, your AXIS 209FD/FD-R/FD-R M12/MFD/MFD-R/MFD-R M12 is accessible on
your local network (LAN). To access the camera from the Internet, network routers must be
configured to allow incoming traffic, which is usually done on a specific port. Please refer to
the documentation for your router for further instructions. For more information on this and
other topics, visit the Axis Support Web at www.axis.com/techsup
Affix dry bag here.