


AXIS M3007–PV
Video
Set Gain to
• Auto to set the gain automatically. If required, use Max gain to limit the applied gain.
• Fixed to use a xed gain.
When Shutter and Gain are both set to Auto, it is possible to set the Priority between low motion blur and low noise manually and to
use a different Priority in Normal Light and in Low Light.
Example
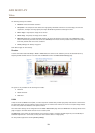
Consider an area where people or vehicles move during the day, but where there should be no movements during night. To be able to,
for example, recognize faces or license plates, move the normal light priority slider toward low motion blur. At nighttime, motion
detection is more important than identication. Motion blur is acceptable and since low light can cause a lot of noise, move
the low light priority slider toward low noise.
Example
If storage space or bandwidth is limited, try using a lower gain. This will reduce image noise and produce smaller image les.
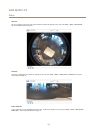
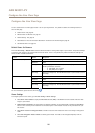
View areas
A view area is a cropped part of the full view. It is treated as a video source in Live View and has its own video stream and PTZ
settings. See PTZ (Pan Tilt Zoom) on page 27. To set up a view area go to Video > View Areas. Here you can dene the name and
resolution for a view area, set up a Home position and lock to this position if desired.
To dene the video stream settings for each view area click on the respective view area from Setup > Video > Video Stream.
See page 16.
You can select a view area that you have set up from the Source drop-down list in the Live View page. Use the Pan, Tilt, Zoom
sliders, or click on the overview map at the bottom right to zero in on an area. The current position is indicated in the overview
map by a green circle.
Overlay
Overlays are used to provide extra information, for example for forensic video analysis or during product installation and
conguration. Overlays are superimposed over the video stream.
An overlay text can display the current date and time, or a text string. When using a text string, modiers can be used to display
information such as the current bit rate or the current frame rate. For information about available modiers, see File Naming &
Date/Time Formats in the online help
.
To enable overlays:
1. Go to Video > Video Stream and select the Image tab.
2. To include an overlay image, select Include overlay image at the coordinates. The overlay image must rst be uploaded to
the Axis product, see Overlay Image.
3. To include date and time, select Include date and Include time.
4. To include a text string, select Include text and enter the text in the eld. Modiers can be used, see File Naming &
Date/Time Formats in the online help
.
5. Dene text overlay characteristics in the relevant elds.
6. Click Save.
To modify the date and time format, go to System Options > Date & Time. See Date & Time on page 44.
22