


AXIS P1428–E Network Camera
Video
• Low noise to prioritize low noise.
It is also possible to set the Min and Max limits for Shutter and Gain.
Shutter is related to the amount of time the shutter is opened and is measured in seconds (s). A slow shutter speed allows more light
to reach the sensor and can help produce a brighter image in low light situations. On the other hand, a slow shutter speed can
cause moving objects to appear blurry.
Gain, measured in decibel (dB), is the amount of amplication applied to the image. A high gain may provide a better image in low
light situations but will increase the amount of image noise.
Example
If storage space or bandwidth is limited, try using a lower gain. This will reduce image noise and produce smaller image les.
Iris adjustment
Select Enable automatic iris adjustment to automatically compensate for changing light conditions. This option is not available
if a xed iris is used.
Use the Iris adjustment slider to set the preferred F-value. The scale represents the amount the iris is open. If set to 0, the iris is
opened as much as possible. If set to 100, the iris is closed as much as possible. The actual F-value is shown below the slider. If
automatic iris adjustment is enabled, the iris will stay at this position as long as light conditions are favorable. If light conditions
change, the iris will adjust itself to the best iris settings. If automatic iris adjustment is disabled, the iris will lock on the set
position regardless of light conditions
Day/Night
The IR cut lter prevents infrared (IR) light from reaching the image sensor. In poor lighting conditions, for example at night, or when
using an external IR lamp, set the IR cut lter to Off. This increases light sensitivity and allows the product to “see” infrared light. The
image is shown in black and white when the IR cut lter is off.
If using automatic Exposure control, set the IR cut lter to Auto to automatically switch between On and Off according to the
lighting conditions.
The Day/Night shift level bar helps determine when the camera will shift from day mode to night mode. Normally, the camera
automatically changes mode from day to night when very dark (level 100 in the slider). By setting Day/Night shift level to a
lower value, the camera will change to night mode earlier.
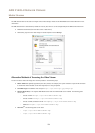
View Area
A view area is a cropped part of the full view. Each view area is treated as a video source in Live View and has its own video
stream and PTZ settings.
When setting up a view area it is recommended that the video stream resolution is the same size as or smaller than the view area
size. Setting the video stream resolution larger than the view area size implies digitally scaled up video after sensor capture,
requiring more bandwidth without adding image information.
To enable, go to Video > Camera Settings and select Enable View Areas.
To add a new view area:
1. Go to Video > View Area.
2. Click Add.
3. The new view area appears under Selected view area. Enter a descriptive name in the Name eld.
4. Select an Aspect ratio and a Video stream resolution.
5. A new view area covers the whole image. Use the mouse to move and resize the view area.
6. Select Enable PTZ to enable digital PTZ for the view area.
19