


AXIS P5534–E PTZ Dome Network Camera
Video
Image Settings
Important
The autofocus behavior is affected by factors such as light conditions, contrasts in the scene, and objects moving in and out. In
these conditions or scenes, a manual focus could be preferable to enhance performance and allow the camera to focus faster.
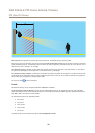
Autofocus enabled - Autofocus enables the camera to focus although the distance to different objects of interest is constantly
changing. Whenever the camera’s pan/tilt/zoom position is changed, the autofocus performs a search to nd the ideal focus point.
Automatic focusing is enabled by default. If the focus position is changed manually using the focus bar, autofocus will be disabled
even if enabled in Image Settings. In this case, use the PTZ control panel to enable autofocus, see page 10. If required, the focus
control can be disabled under PTZ > Advanced > Controls.
Image freeze on PTZ - Select All movements to freeze the image while the camera is moving during a pan, tilt or zoom operation.
Once the camera reaches its new position, the view from that position is shown. Presets freezes the image only when the camera
moves between preset positions.
Overlay
Overlays are used to provide extra information, for example for forensic video analysis or during product installation and
conguration. Overlays are superimposed over the video stream.
An overlay text can display the current date and time, or a text string. When using a text string, modiers can be used to display
information such as the current bit rate or the current frame rate. For information about available modiers, see File Naming &
Date/Time Formats in the online help
.
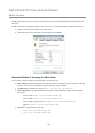
To enable overlays:
1. Go to Video > Video Stream and select the Image tab.
2. To include an overlay image, select Include overlay image at the coordinates. The overlay image must rst be uploaded to
the Axis product, see Overlay Image.
3. To include date and time, select Include date and Include time.
4. To include a text string, select Include text and enter the text in the eld. Modiers can be used, see File Naming &
Date/Time Formats in the online help
.
5. Dene text overlay characteristics in the relevant elds.
6. Click Save.
To modify the date and time format, go to System Options > Date & Time. See Date & Time on page 37.
Overlay Image
An overlay image is a static image superimposed over the video stream. The image, for example a company logo, is used to provide
extra information or to mask a part of the image.
Since it is static, the position and size of an overlay image will remain the same regardless of resolution and Pan/Tilt/Zoom
movements. Use a privacy mask to set up a dynamic mask which will always mask the specied part of monitored area.
For more information about privacy masks, see Privacy Mask on page 20.
To use an overlay image, the image must rst be uploaded to the Axis product. The uploaded image should be a Windows 24-bit BMP
image with maximum 250 colors. The image width and height, in pixels, must be exactly divisible by 4 and cannot be larger than the
maximum image resolution. If combining text and image overlays, take into consideration that the text overlay occupies 16 or 32
pixels in height (depending on the resolution) and has the same width as the video image.
To automatically scale the image to the resolution used by the Axis product, select the option Scale with resolution from the
Transparency Settings page which is displayed when uploading in the image.
19