


AXIS Q6042 PTZ Dome Network Camera
Video and Audio
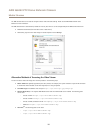
Day/Night shift priority - Use the Day/Night shift priority bar to determine when the camera shifts into either day mode or night
mode. By default, the camera will automatically change from day to night mode at a pre-dened level which corresponds to light
conditions. By dragging the bar handle towards the sun, the camera will change to day mode earlier and change to night mode late.
Image Settings
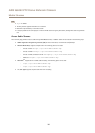
Autofocus enabled - Automatic focusing is enabled by default. If the focus position is changed manually using the focus bar,
autofocus will be disabled even if enabled here. In this case, use the PTZ control panel to enable autofocus, see PTZ Controls on page
12. If required, the focus control can be disabled under PTZ > Advanced > Controls.
Noise reduction - Set to On to enable noise reduction. Noise reduction may increase the amount of motion blur.
Stabilizer - When monitoring environments that are subject to vibrations (e.g. trafc control), images may appear to be unsteady.
Select the frequency, High or Low, that gives the best improvement in image quality. Enabling the stabilizer will limit the digital
zoom. See the online help
for more information.
Image freeze on PTZ - Select All movements to freeze the image while the camera is moving during a pan, tilt or zoom operation.
Once the camera reaches its new position, the view from that position is shown. Presets freezes the image only when the camera
moves between preset positions.
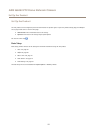
Overlay
Overlays are used to provide extra information, for example for forensic video analysis or during product installation and
conguration. Overlays are superimposed over the video stream.
An overlay text can display the current date and time, or a text string. When using a text string, modiers can be used to display
information such as the current bit rate or the current frame rate. For information about available modiers, see File Naming &
Date/Time Formats in the online help
.
It is also possible to display text when an action rule is triggered, see Use Overlay Text in an Action Rule.
To enable overlays:
1. Go to Video & Audio > Video Stream and select the Image tab.
2. To include an overlay image, select Include overlay image at the coordinates. The overlay image must rst be uploaded to
the Axis product, see Overlay Image.
3. To include date and time, select Include date and Include time.
4. To include a text string, select Include text and enter the text in the eld. Modiers can be used, see File Naming &
Date/Time Formats in the online help
.
5. Dene text overlay characteristics in the relevant elds.
6. Click Save.
To modify the date and time format, go to System Options > Date & Time. See Date & Time on page 47.
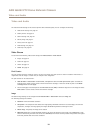
Overlay Image
An overlay image is a static image superimposed over the video stream. The image, for example a company logo, is used to provide
extra information or to mask a part of the image.
Since it is static, the position and size of an overlay image will remain the same regardless of resolution and Pan/Tilt/Zoom
movements. Use a privacy mask to set up a dynamic mask which will always mask the specied part of monitored area.
For more information about privacy masks, see Privacy Mask on page 23.
To use an overlay image, the image must rst be uploaded to the Axis product. The uploaded image should be a Windows 24-bit BMP
image with maximum 250 colors. The image width and height, in pixels, must be exactly divisible by 4 and cannot be larger than the
21