


AXIS Q60 Series
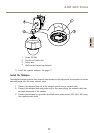
3. Make sure the rubber gasket is tted correctly on the dome cover.
4. Align the bulge on the dome cover with one of the logotypes on the dome ring.
5. Attach the dome bracket and the dome cover to the dome ring and tighten the screws
(torque 1.2 Nm).
6. To install an SD card (not included), see Install an SD Card onpage 15.
7. To attach the dome cover to the top cover, align the bulge on the dome cover with the
heater on the camera unit and tighten the screws (torque 1.5 Nm).
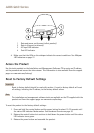
Install an SD Card
It is optional to install a standard or high capacity SD card (not included), which can be used for
local recording with removable storage.
1. Loosen the dome ring screws and remove the dome cover.
2. Insert an SD card (not included) into the SD card slot.
3. To attach the dome cover to the top cover, align the bulge on the dome cover with the
heater on the camera unit and tighten the screws (torque 1.5 Nm).
NONO
NO
TICETICE
TICE
To prevent corruption of recordings, the SD card should be unmounted before it is ejected.
To unmount, go to Setup > System Options > Storage > SD Card and click Unmount.
Bracket Mount (sold separately)
NONO
NO
TICETICE
TICE
• The product shall be grounded using a grounding wire. Make sure both ends of the
grounding wire are in contact with their respective grounding surfaces.
• To comply with the IP66-rated design of the camera and maintain the IP66 protection,
the supplied RJ45 Push-pull Connector (IP66) shall be used. Alternatively, use the RJ45
IP66-rated cable with premounted connector which is available from your Axis reseller.
Do not remove the plastic network connector shield from the camera.
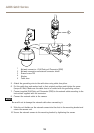
1. Install the selected bracket according to the instructions supplied with the bracket. If
drilling is required, make sure to use drill bits, screws and plugs that are appropriate for
the material.
2. Secure the camera using the supplied safety wire.
3. Route the networkcable and a groundingwire through the holes inthe mounting bracket.
4. Loosen the grounding screw and remove the washer and cable shoe.
15
ENGLISH