


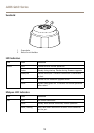


AXIS Q60 Series
Install the Hardware
NONO
NO
TICETICE
TICE
• The AXIS product shall be connected using a shielded network cable (STP). All cables
connecting the product to the midspan shall be shielded (STP) and intended for their
specic use. Make sure that the midspan is properly grounded. For information about
regulatory requirements, see RegulatoryInformation on page 2 .
• Mount the product with the dome cover facing downward.
• Be careful not to scratch, damage or leave ngerprints on the dome cover because this
could decrease image quality. If possible, keep the protective plastic on the dome cover
until the installation is complete.
The Axis product can be installed with the cables routed through or along the wall or roof.
Read all the instructions before installing the product. Some installation steps would benet from
being completed together because they require removal of the dome cover.
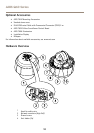
A hardware installation can include the following:
• The product is supplied with a clear dome cover (premounted). A smoked dome cover is
available as an accessory. To replace the dome cover, see page 14.
• A standard or high capacity SD card (not included) can be used to store recordings locally
in the product. To install an SD card, see page15.
• To install the product using a compatible bracket from AXIS T91A Mounting Accessories
(sold separately), see page 15.
• To install the supplied midspan, see page 17.
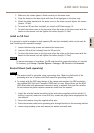
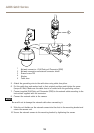
Attach the Sunshield
Attaching the sunshield is optional. The sunshield protects the camera against UV light and helps
keep the temperature inside the camera down.
1. Slide the sunshield over the unit holders on the camera unit.
2. Secure the sunshield using the supplied screws (T20).
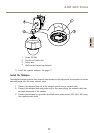
Replace the Dome Cover
Replacing the dome cover is only necessary if you want to use a smoked dome cover or if the
dome cover is scratched or damaged. Smoked dome covers and spare clear dome covers can be
purchased from your Axis reseller.
1. Loosen the dome ring screws and remove the dome cover.
2. Remove the dome bracket screws and remove the dome bracket and the dome cover
from the dome ring.
14