


DIGITAL TECHNICAL SUPPORT
OLYMPUS IMAGING AMERICA INC.
(888) 553-4448
http://support.olympusamerica.com
©2008 Olympus Imaging America Inc. Page 11 of 26 Last updated on February 28, 2008
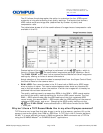
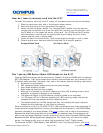
Is it possible to view the Live View image on a computer?
The E-3 has a VIDEO OUT jack that can be used to display images on a television
screen. When the E-3 is connected to a computer in the CONTROL USB mode, the
VIDEO OUT can be enabled using the Camera Control option in OLYMPUS Studio 2.0.
In the Shooting/Camera Settings column on the right side of the Camera Control
window, the last item in the Camera Settings list is VIDEO OUT. Setting this option to
ON opens up a video output of the Live View image. The bundled Video Cable is used to
connect the E-3 to a television or secondary computer monitor to display the Live View
image in real time.
The Live View display option can be useful in studio setups, teaching, and scientific or
engineering applications in which the E-3 is mounted on instruments such as
microscopes or bore scopes.
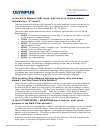
How is the Enlarged Display operation used in Live View?
The Live View Enlarged Display option provides an enlarged view of a selected area in
the image to facilitate fine manual focus.
When Live View is enabled, pressing the [INFO] button reveals a green target area that
is to be enlarged in the center of the LCD screen. The target area can be repositioned on
another area of the image by using the arrow keys on the camera back. Pressing the
[OK] button causes the target area to be enlarged.
The degree of magnification can be changed to 7x or 10x by turning either the main dial
or the sub dial. Pressing [OK] will return the image on the LCD screen to the normal
viewing size.
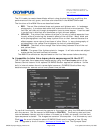
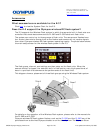
How can I setup FRAME ASSIST on my LCD screen?
FRAME ASSIST superimposes ruled lines on the image in Live View. The purpose is to
assist in composition of images for the purposes of square alignment, centering and
compositional balance. The options are:
• OFF: No ruled lines are selected.
• GRID: Horizontal and vertical lines are displayed. These are useful in copy and
architectural photography to correctly align the image.
• Golden Section: This pattern is used to aid composition using the “Rule of Thirds.”
• Scale: Cross hairs with graduations are displayed. This is useful in centering subjects
within an image.
To select which ruled lines are to be used when FRAME ASSIST is activated, do the following:
1. Open the menu and use the arrow pad to select Custom Menu 1D. Its icon looks like
this:
.
2. Press the Right Arrow on the arrow pad to enter the submenu.
3. Select FRAME ASSIST.
4. Toggle right to show the options.
5. Select an option.
6. Press the [OK] button to set the option and exit the menu.
To display the superimposed ruled lines over the Live View image, press the [INFO] button
repeatedly. Each time it is pressed, the display will change until the ruled lines appear.
The ruled lines do not become a part of captured images when photographs are taken.