


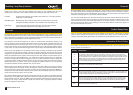


Function Display Description
*Lamp LP Off (OFF) - Lamp remains ʻoffʼ during operation.
USER (USR) - In ʻuserʼ mode the modelling lamp
can be adjusted from f5.0 to f10.0
Proportional (PRO) - In ʻproportionalʼ mode
the modelling lamp will automatically adjust itself
to the same output level as the flash.
Full (FUL) - When the modelling lamp is set
to ʻfullʼ the power output will remain at the
maximum level.
*Lamp Ready
Indication
IND Off (OFF) - No lamp ready indication.
Intermittent (INT) - If modelling lamp is on it goes
off after the unit has fired and comes back on at
the set level once the unit has recharged.
Pulse (PUL) - Modelling lamp pulses when the
unit has recharged after firing.
Ready Sounder SND Off (OFF) - The Ready Sounder beep
remains off and does not indicate when
the unit has charged.
Intermittent (INT) - The unit emits a short beep
when it has fully recharged to indicate
that it is ready to fire again.
Continuous (CON) - The unit emits a continuous
beep while it is recharging and stops once
fully recharged.
Photocell PHO Off (OFF) - Photocell remains ʻoffʼ.
1st (1st) - Photocell is set to trigger unit on
the first flash detected.
2nd (2nd) - Photocell is set to trigger on
the second flash detected.
3rd (3rd) - Photocell is set to trigger on
the third flash detected.
4th (4th) - Photocell is set to trigger on
the fourth flash detected.
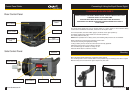
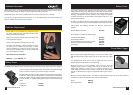
During normal use simply rotate the dial to adjust the power to the required level. The unit ready
indication is by means of a ʻsteadyʼ display and a sounder beep (if on) as well as the modelling lamp
indication function when the unit reaches ready (if switched on). While changing the power level the
display flashes at different rates to indicate whether the unit is charging or if there is excess power that
needs dumping. The display will flash ʻquicklyʼ while the unit is charging and flash ʻslowlyʼ to indicate
that there is excess power that needs to be dumped. To test the flash and/or dump any excess power
press the ʻTESTʼ button.
The unit can be triggered via the ʻsync socketʼ connected to the relevant system or via the ʻPhotocellʼ
as required. Other displays may occur during operation to provide warnings of problems or to indicate
the unit status.
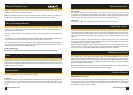
To change any of the unitʼs settings first press the ʻMENUʼ button on the side of the unit; ʻSETʼ will be
displayed briefly showing that the unit is entering the user setup options followed by ʻLPʼ (for ʻLamp
settingsʼ) as the first item. Each press of the ʻMENUʼ button takes you down one level of the menu
structure until you cannot go any further; at this point the sounder (if switched on) will provide a warning
beep.
At any menu level turning the rotary control will either select another function/option or change the
setting of the chosen function. Each press of the ʻDONEʼ button takes you up one level until you exit
the user setup mode, at which point ʻEndʼ is displayed. Any altered user setting will be saved to the units
memory. See below illustration for example of how to change the Modelling Lamp settings to off.
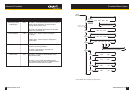
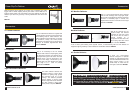
Example Illustration: How to change the Modelling Lamp to off.
Functions Overview
Step One.
During normal operation
press the MENU button to
enter the normal functions
menu.
Step Two.
Next, turn the rotary dial to
scroll through the normal
functions.
Step Three.
Once the desired setting is
shown press the MENU
button again to enter the
available functions for that
particular setting.
Step Four.
Next turn the rotary dial again
to find the desired option of
the setting you wish to
change.
Step Five.
Scroll through the available
options until the desired
setting is shown.
Step Six.
Next press the TEST/DONE
button to confirm your
selection and go up one
menu level. Repeat as
necessary with other
functions. Finally press
TEST/DONE until END is
displayed.
www.bowens.co.uk8
Normal Functions
www.bowens.co.uk 9
* Only available when operating from mains power.