


External Connections 137
4Touch [a] to open the scene selection screen.
When you convert scenes from the [Playlist] index screen (including the
playlist of video snapshot scenes), you cannot select individual scenes;
instead, the entire playlist will be converted. Skip directly to step 6.
5 Touch on the individual scenes you want to convert.
• A checkmark O will appear on scenes selected. Touch a selected
scene again to remove the checkmark.
• To select all the scenes at once: Touch [Select All] instead of
touching individual scenes. (Remove in advance any checkmarks
from scenes you may have selected individually.)
6Press Z and touch [Yes].
• If a copyright notice appears, read it
carefully and touch [OK] if you agree.
• Before touching [Yes], you can touch
[5] to change the conversion
settings as described below.
•Touch [B] to interrupt the operation
while it is in progress.
7 When the conversion is completed,
a confirmation screen will appear.
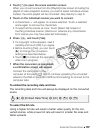
Connect the camcorder to the
computer at this point (0 138) to continue uploading the converted
videos to the Web or touch [End Without Connecting] to connect to the
computer later.
To embed the recording date and time
The recording date and time will always be displayed on the converted
scene.
To select the bit rate
Using a higher bit rate will result in better video quality for the con-
verted scenes, while a lower bit rate will result in smaller file sizes and
faster uploads.
[5] 8 [Embed Date/Time] 8 [On] 8 [f] 8 [f]
COPY