


9
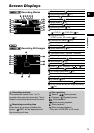
Introduction
E
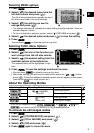
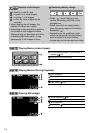
Selecting MENU options
1. Press .
2. Select ( ) the desired menu from the
left side column and press ( ).
The title of the selected menu appears on top of
the screen and under it the list of settings.
3. Select ( ) the setting you want to
change and press ( ).
• The orange selection bar indicates the menu setting currently selected. Items not
available appear in black.
• To return to the menu selection screen, select ( ) [RETURN] and press ( ).
4. Select ( ) the desired option and press ( ) to save the setting.
5. Press .
You can press to close the menu at any time.
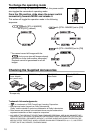
Selecting FUNC. Menu Options
1. Press .
2. Select ( ) the icon of the function you
want change from the left side column.
3. Select ( ) the desired setting from the
available options at the bottom bar.
The selected option will be highlighted in light
blue.
4. Press to save the settings and close the menu.
• You can press to close the menu at any time.
• With some settings, you will need to make further selections ( , ) and/or
press ( ). Follow the additional operation guides that will appear on the screen
(such as the icon, small arrows, etc.).
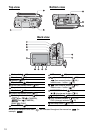
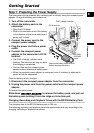
About the Operating Modes
* To use the still images functions ( or , only
) you need to set [STILL IMAGES] to [ON] as explained below.
To activate the still images modes
1. Press .
2. Select ( ) [SYSTEM SETUP] and press ( ).
3. Select ( ) [STILL IMAGES] and press ( ).
4. Select ( ) [ON] and press ( ).
5. Press again to close the menu.
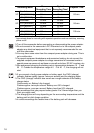
Operating Mode Operating Mode Indicator Operation
/ (CAMERA)
Red LED
Recording movies
22
Recording still images
24
(PLAY)
Green LED
Playing movies
26
Viewing still images
28
MENU
MENU
MENU
FUNC.
FUNC.
FUNC.
MENU
MENU