


CT1-7508-016 © CANON INC. 1995 2008.5
Tripod mount Orientation locking knob
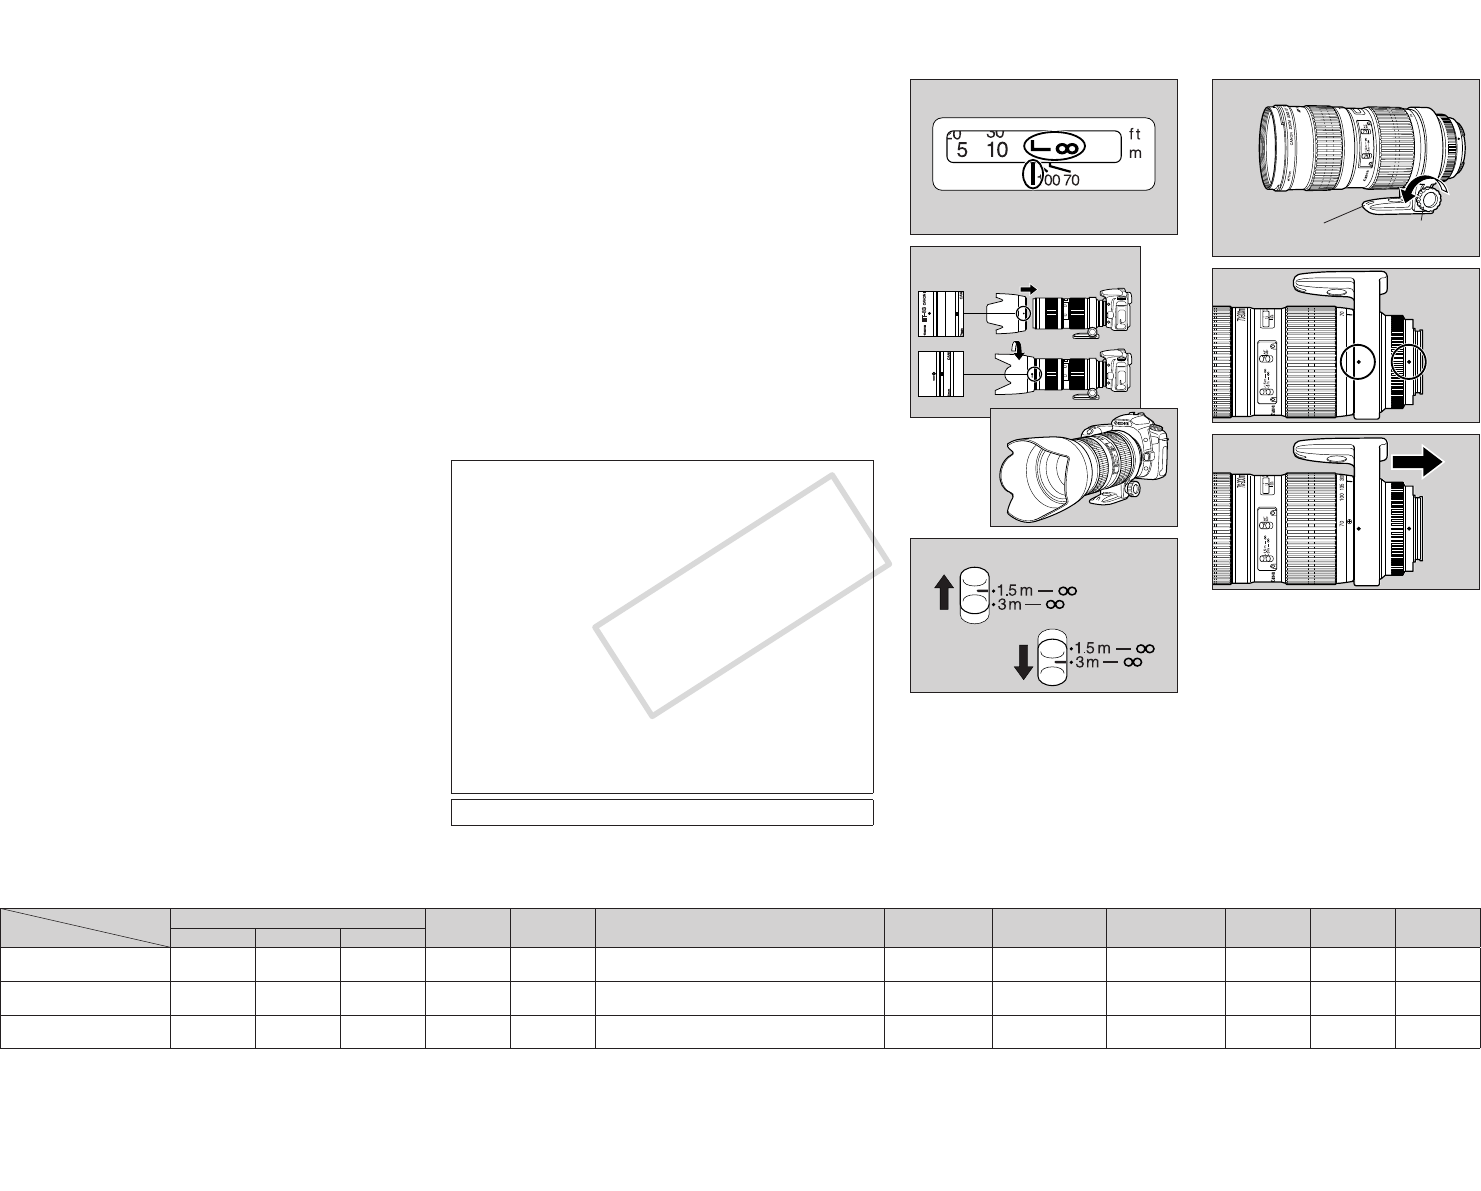
5. Infinity Compensation Mark
To compensate for shifting of the infinity focus point that results
from changes in temperature.
The infinity position at normal temperature is the point at which the
vertical line of the L mark is aligned with the distance indicator on
the distance scale.
• For accurate focusing in MF on subjects at infinity distance, look
through the viewfinder while rotating the focusing ring .
6. Hood
To attach the hood, align the hood’s attachment position mark
with the red dot on the front of the lens, then turn the hood in the
direction of the arrow until the lens’s red dot is aligned with the
hood’s stop position mark .
The hood can be reverse-mounted on the lens for storage.
• Part of the picture may be blocked if the hood is not attached
properly.
7. Filters (Sold Separately)
You can attach filters to the filter mounting thread on the front of
the lens.
• Use a polarizing Canon filter (77mm).
8. Switching the Focusing Distance Range (EF70-
200mm f/2.8L USM Only)
You can set the focusing distance range to 1.5 m/4.9 ft. to infinity or
3m/9.8 ft. to infinity .
• If you use AF from outside the specified focusing distance range,
the lens may stop focusing when it reaches the limit of the range.
This is not a malfunction. If this occurs, press the shutter button
halfway down again.
9. Extenders (Sold Separately: EF70-200mm f/2.8L USM
Only)
AF is possible with Extender EF1.4× II/EF2× II.
• The aperture F values and focal lengths when an extender is used
are as follows:
EF1.4× II: f/4, 98-280mm, EF2× II: f/5.6, 140-400mm
Attach the extender to the lens, and then attach the lens to the
camera. To remove it, reverse the order. Errors may occur if you
attach the extender to the camera first.
When you are using an extender, use the center focusing point for
AF. If you use AF with a different focusing point, a focusing error
may occur.
10. Using the Tripod Mount (EF70-200mm f/2.8L USM
Only)
By loosening the orientation locking knob on the tripod mount you
can rotate the camera to set the image for any vertical or horizontal
position.
Detaching the Tripod Mount
First remove the lens from the camera and then remove the tripod
mount from the lens as shown below. To attach the tripod mount,
reverse the procedure.
1) Loosen the orientation locking knob
.
2) Align the red mark on the tripod mount with the lens mount
index .
3) Slide off the tripod collar away from the rear of the lens .
Q
The lens length is measured from the mount surface to the front
end of the lens. Add 21.5 mm when including the lens cap and
dust cap.
Q
The size and weight listed are for the lens only, except as
indicated.
Q
Aperture settings are specified on the camera. The camera
automatically compensates for variations in the aperture setting
when the camera is zoomed in or out.
Q
All data listed is measured according to Canon standards.
Q
Product specifications and appearance are subject to change
without notice.
This device complies with Part 15 of the FCC Rules. Operation is
subject to the following two conditions: (1) This device may not cause
harmful interference, and (2) this device must accept any interference
received, including interference that may cause undesired operation.
Do not make any changes or modifications to the equipment
unless otherwise specified in the instructions. If such changes
or modifications should be made, you could be required to stop
operation of the equipment.
This equipment has been tested and found to comply with the limits
for a class B digital device, pursuant to part 15 of the FCC Rules.
These limits are designed to provide reasonable protection against
harmful interference in a residential installation. This equipment
generates, uses and can radiate radio frequency energy and, if not
installed and used in accordance with the instructions, may cause
harmful interference to radio communications.
However, there is no guarantee that interference will not occur
in a particular installation. If this equipment does cause harmful
interference to radio or television reception, which can be determined
by turning the equipment off and on, the user is encouraged to try to
correct the interference by one or more of the following measures:
• Reorient or relocate the receiving antenna.
• Increase the separation between the equipment and receiver.
• Consult the dealer or an experienced radio/TV technician for help.
This Class B digital apparatus complies with Canadian ICES-003.
Specifications
Angle of view
Lens
construction
Minimum
aperture
Max. magnification and field of view
Min. focusing
distance
Filter diameter
<Usable number>
Max. diameter
and length
Weight Hood Case
Diagonal Vertical Horizontal
EF17-35mm f/2.8L USM 104°-63° 70°30’-38° 93°-54° 10-15 22
0.06 -0.11× 432 × 671 mm -214 × 320 mm
(17” × 26.4”-8.4” × 12.6”)
0.42 m 77 mm <1>
83.5 × 95.7 mm
(3.3” × 3.8”)
545 g
(19.1 oz)
EW-83 CII LP1216
EF28-70mm f/2.8L USM 75°-34° 46°-19°30’ 65°-29° 11-16 22
0.08 -0.18× 298 × 452 mm -133 × 198 mm
(11.7” × 17.8”-5.2” × 7.8”)
0.5 m 77 mm <1>
83.2 × 117.6 mm
(3.3” × 4.6”)
880 g
(30.8 oz)
EW-83 BII LP1219
EF70-200mm f/2.8L USM 34°-12° 19°30’-7° 29°-10° 15-18 32
0.06 -0.16× 409 × 617 mm -152 × 226 mm
(16.1” × 24.3”-6” × 8.9”)
1.5 m 77 mm <1>
84.6 × 193.6 mm
(3.3” × 7.6”)
1,310 g
(45.9 oz)
ET-83II LZ1324
COPY