


Appendix: Menu Options Lists
146
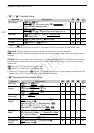
[LCD Mirror Image]: When set to [A On], you can rotate the LCD panel 180 degrees to let the subject
check the image while you record. While the LCD panel is rotated toward the subject you will not be
able to decorate the scene.
[Notification Sounds]: A beep will accompany some operations like turning on the camcorder, the self-
timer countdown, etc.
• While pre-recording (0 79) is activated, the camcorder will not emit any notification sounds.
[Wireless Remote Control]: Allows the camcorder to be operated with the wireless controller.
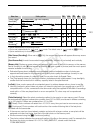
[POWERED IS Button]: Determines the operation mode of the POWERED IS button.
[x Press and Hold]: Powered IS will be activated while you hold the button pressed down.
[y Toggle On/Off]: Each press of the button will turn the Powered IS function on and off.
[Set WB Priority]: You can press an assignable button set to [m WB Priority] to switch between the
current white balance and the white balance setting selected for [Set WB Priority].
[Focus Ring Direction]: Changes the direction the focus ring needs to be turned.
[Focus Ring Response]: Selects the sensitivity of the response when operating the focus ring.
[Focus Preset Speed]: Determines the speed at which the focus changes to the preset position.
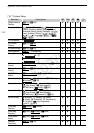
[Autostart Decoration]: When set to [A On], the decoration screen will open automatically when you
stow the LCD panel with the LCD screen facing out.
[Power Saving Mode]: Controls the camcorder’s automatic power off settings.
[Auto Power Off]: In order to save power when the camcorder is powered by a battery pack, it will
automatically shut off if left without any operation for 5 minutes.
• Approximately 30 seconds before the camcorder shuts off, [Auto Power Off] will appear.
• In standby mode, the camcorder will shut off after the time selected for the [Quick Start (Standby)]
setting.
[Quick Start (Standby)]: Select whether to activate the Quick Start function (0 42) when you close the
LCD panel in a recording mode and the length of time after which the camcorder will end the standby
mode and shut off automatically.
• You can set Quick Start to [Off], for example, if the camcorder is set on a fixed position and you
want to keep recording video with the LCD panel closed in order to conserve the battery’s power.
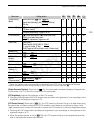
[Battery Info]: Displays a screen where you can verify the battery charge (as a percentage) and the
remaining recording time ( , mode) or playback time ( , mode).
[Control for HDMI]: Activates the HDMI-CEC (Consumer Electronics Control) function. When you
connect the camcorder to an HDTV compatible with HDMI-CEC using the supplied HDMI cable, you
can control the camcorder’s playback using the remote control of the TV.
•If set to [A On], when the camcorder is connected to a compatible HDTV using the supplied
HDMI cable, the video input on the TV will automatically be set to the camcorder’s video input.
Then, you can use the up/down/left/right buttons and the OK or SET button on the TV’s remote
control to play back your recordings.
• Depending on the TV set, additional settings may be required on the TV itself to activate the HDMI-
CEC function. Refer to the TV’s instruction manual.
• Correct operation of the HDMI-CEC function cannot be guaranteed even when connecting the
camcorder to compatible TV sets. If you cannot use the remote control of the TV, set [Control for
HDMI] to [B Off] and operate the camcorder directly or use the camcorder’s wireless controller.
COPY