


1
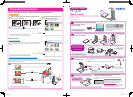
Installing the Bundled Software
Install the bundled software
on your computer.
*
After restarting your computer, check to make
sure the PJ Camera Software icon is in your
Windows taskbar.
Refer to “Using the CASIO CD-ROM” in
the YC-430 User’s Guide for details.
4
Starting Up the Software
Position and focus adjustment
are performed automatically.
Make sure there is nothing on
the document stage.
Refer to “PJ Camera Software Overview and Basic Operations” in the YC-430 User’s Guide.
Turn on stand power will start up the PJ Camera
Software and display a dialog box.
*
All system operations are performed using the PJ Camera Software.
Dialog Box
Select the startup mode
you want to use.
Business Document startup mode:
Select this mode to configure the camera as a
document camera, which will simplify shooting of
documents and three-dimensional objects.
Multi PJ startup mode:
Select this mode to enable the full range of camera
functions, including document camera, scanner,
board area capture, and other functions.
�
Using the Multi PJ Startup Mode (2)
Other Functions
PC Image Mode
You can select images from thumbnails of images on your computer and project the
images. You also can use the “Playlist” to arrange the sequence of the images for a
presentation.
Refer to Chapter 2 of the PJ Camera Software User’s Guide.
Preview list area (Thumbnails of images on
your computer)
Playlist area
(Projection sequence of images)
Board Area Capture/Projection Area Capture
After you project an image onto a whiteboard and add handwritten notes with a marker, you can record the image along with the
handwritten notes to a new image. Whether you should use “Board Area Capture” or “Projection Area Capture” depends on the area of
data you want to include in the image.
1
Depending on the area of data you want to include in the image, click .
Image projected from the projector
Records the area within the projected image.
Records the entire whiteboard area.
Projection Area Capture
Board Area Capture
Refer to Chapter 2 of the PJ Camera Software User’s Guide.
Camera Image Mode: To project images recorded with the PJ Camera
Camera Image
1
After recording the images with the PJ Camera, attach
the camera to the stand.
1
2
2
Click [Camera Image] .
This will display thumbnails of the image files in PJ Camera memory
Refer to Chapter 2 of the PJ Camera Software User’s Guide.
3
Double-click the thumbnail of the
image you want to project.
Preview list area (Thumbnails of images
stored in PJ Camera memory)
Playlist area
(Projection sequence of images)
3
Cables and
Connections
Connect the YC-430, projector, and computer.
Use the A-B USB cable that comes with the YC-430 system to connect to
your computer.
*
Be sure to connect only the bundled AC adaptor to the PJ Camera
Stand.
Refer to “Setting Up the Multi PJ Camera System” in the YC-430 User’s Guide for more information.
RJA518150-002 MA0705-000501A Printed in Japan
MULTI PJ CAMERA
MULTI PJ CAMERA
YC-430
Quick Guide
This guide provides simplified information about how to use the functions of
the CASIO YC-430 MULTI PJ CAMERA. For details, see the user’s guide that
comes with the YC-430.
http://world.casio.com/
2
Setting Up the Multi PJ Camera System
1.
Prepare the YC-430 stand.
You also can remove
the PJ Camera from
the stand and use it as
a digital camera.
Refer to “Setting Up the Multi PJ Camera System”
in the YC-430 User’s Guide for more information.
Projector
A-B USB cable RGB cable
Computer
*
Note that the YC-430 does
not come with an RGB cable.
Unfold these parts until
you hear them click into
place.
Press the PJ Camera
against the camera
bracket until it clicks
securely into place.
Install batteries in the PJ Camera
and then attach it to the bracket.
Use a coin or other
object to tighten.
2.
Attach the PJ Camera to the camera stand.
When
case
closed
YC430_QG_e.indd 1 2007/04/27 15:43:59