


Q-SEE QUICK INSTALLATION GUIDE
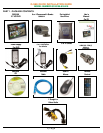
M
M
O
O
D
D
E
E
L
L
N
N
U
U
M
M
B
B
E
E
R
R
Q
Q
C
C
4
4
0
0
1
1
0
0
8
8
-
-
8
8
1
1
8
8
/
/
4
4
1
1
8
8
4 | Page
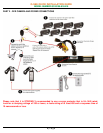
Part 4 – Accessing the DVR menus
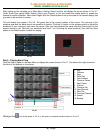
After the system boots up it will go into multiple window mode. Click Enter or left click with the mouse
anywhere on the screen and you will bring up the login interface (shown as Pic 4.1) and enter the admin
password which is admin by default under the admin login. This will bring up the Main Menu screen in Pic
4.2. There are 6 icons; Search, Info, Setting, Advanced, Backup and Shutdown. Use the Search option to
find and playback files from the hard drive. Go to the Info option for hard drive info, system log, version
information, and online users. The Setting option is used to access General settings where you set system
time, Language, hard drive overwrite, file size, and video display format, the Encode option where you set
compression, frame rate, bit rate, audio, and sub stream, Schedule setup, RS232 setup, Network setup,
Alarm setup, motion detection setup, PTZ setup, Display setup, and Load Default setup. The Advanced
option is used for hard drive management, alarm output, manual recording, account setup, auto
maintenance, and TV output adjustment. The Backup icon is used to backup files from the hard drive, and
the Shutdown option is used to safely shutdown the system.
Pic 4.1 Pic 4.2
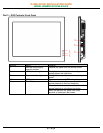
Part 5 – Setting up DVR to record
There are 3 modes for recording
Manual Recording
Scheduled Recording
Motion Recording.
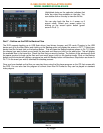
1. Manual Recording:
You can get to the Manual Record menu by right clicking on the screen with the mouse or by going to the
Main Menu and selecting Manual Record. This will take you to the screen in Pic 5.1. You can click the All
option on the manual line to start recording on all channels, or you can select the cameras that you want
to record in manual mode. To stop recording you can select the all option on the stop line, or select
individual cameras as shown in Pic 5.2.
Pic 5.1 PIC 5.2