


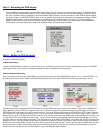

3. Time Schedule Recording.
Follow instructions in Part 5 to go to MAIN MENU. Use the Direction Keys to select RECORD CONFIG (blue box in Pic 6.6) and hit ENTER, This
will display the screen in Pic 6.7. Use the Direction Keys to go to the SCHEDULE RECORD option and hit the ENTER key to put a check mark
in the box. To go to the SETUP Box and hit ENTER, this will display the screen in Pic 6.8. You can put a check mark in the Whole Day box to
record all day, or use the Direction Keys to go to a time period, hit enter to select hours or minutes, and then use the Number Add or Decrease
Buttons (numbers 3 & 4 on Front Panel in Part 4) to set the hours and minutes. You can set it to record during 4 different time periods per day.
You can use the COPY option to copy this setting to other days. Then click on the OK button to save the settings.
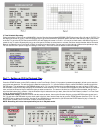
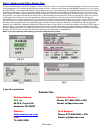
Part 7 – Setting up DVR to Playback Files
Press the SEARCH button on the DVR (number 6 on the Front Panel in Part 4), if the system is password protected it will ask you to enter the
user name and password. This will bring up the Data box shown as Pic 7.1. Use the Direction Keys to select PLAYBACK (red box) and hit the
ENTER button. This will display the CALENDAR shown as Pic 7.2. Use the Direction Keys to select the date you want, the days in RED have
files available, hit the ENTER key to display the PLAYBACK menu shown as Pic 7.3. Press the ENTER button to select the channel you want to
view, and use the Direction Keys to select the date you want to search for. The area on the time line in RED has files available, the top line is
hours and the bottom line is minutes. Use the Direction Keys to select the time you want, then click the PLAY Button (number 7 on Front Panel
in Part 4), then press ENTER to play the file.
TO SEARCH BY EVENT: Select the channel and date same as above, then use the Direction Keys to go to the MOTION option (green box in
Pic 7.3) and hit the ENTER button to put a check mark in the box, then use the Down key to go to the EVENTS button (blue box in Pic 7.3). Hit
the ENTER key to display the event list. Use the UP and DOWN keys to select the file you want and the ENTER button to play it. Press the
STOP button (number 10 on Front Panel in Part 4) to return to live view.
NOTE: Recording will not be interrupted while you are in Playback mode.