


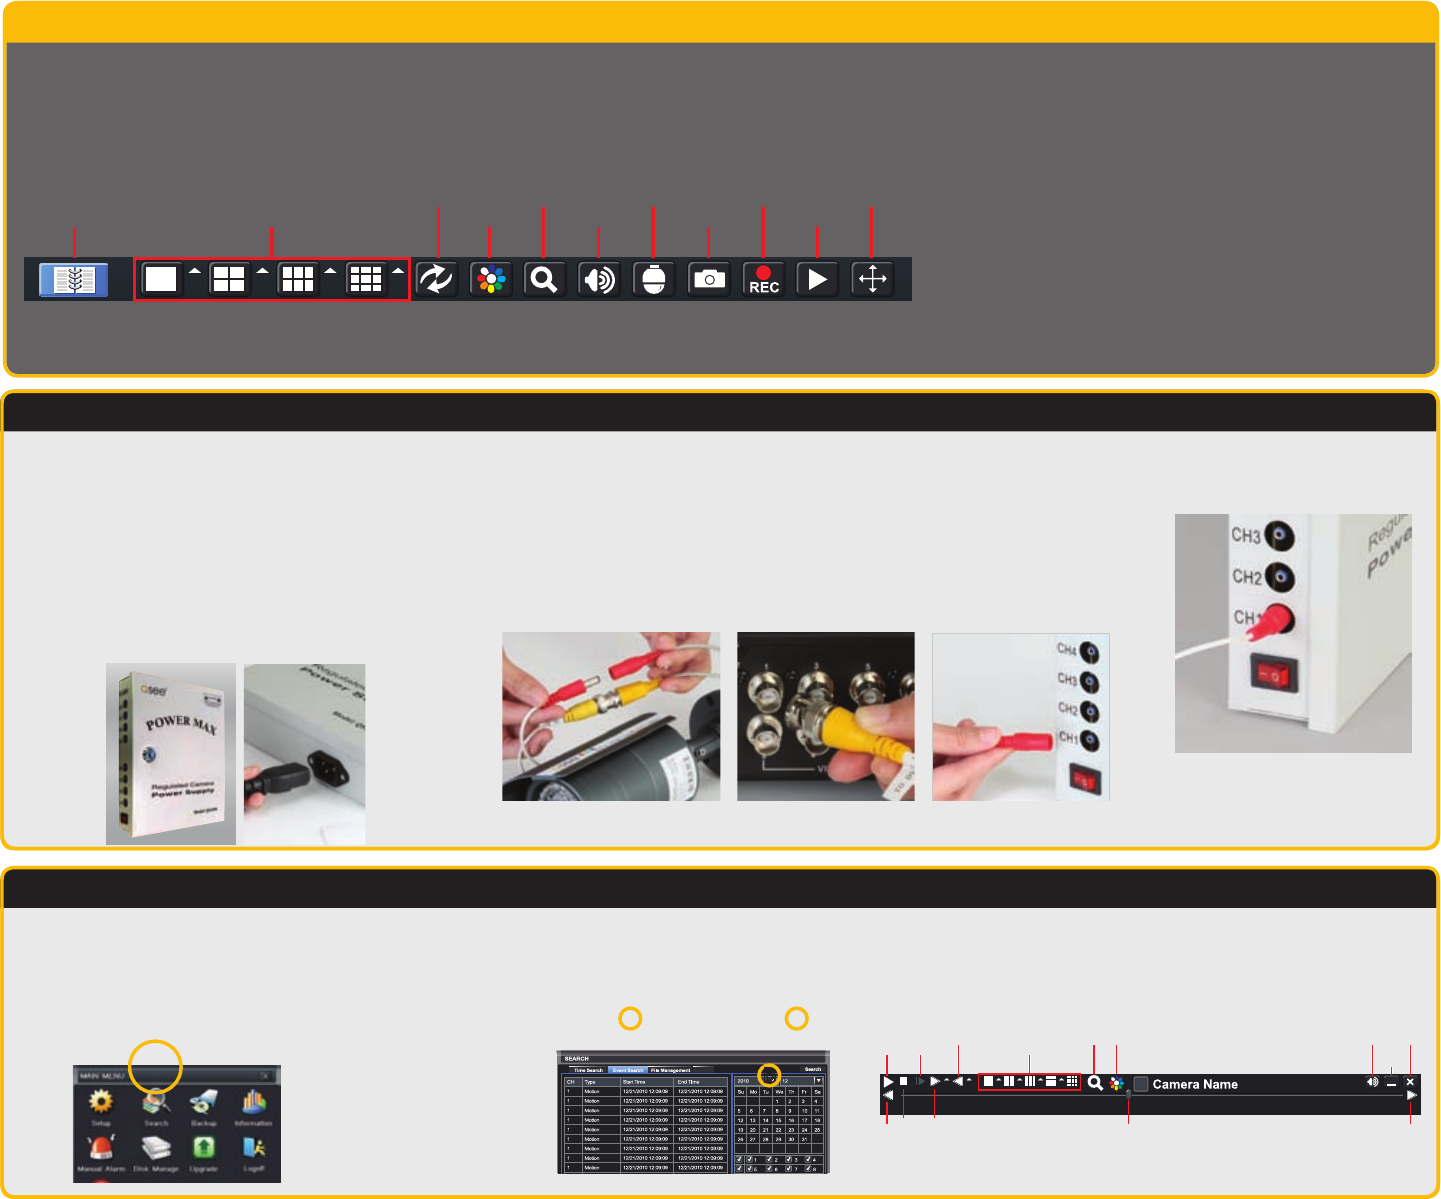
Control Bar Click on any icon to use that feature.
Screen Display
Mode
Dwell
Volume Snapshot Playback
PTZ Record
Color
Zoom
Move
Control Bar
Menu
Menu: Opens the Main Menu.
Screen Display Mode: Choose the number of screens you wish to view
simultaneously. Channels without attached cameras will display “Video Loss.”
Clicking on the upward pointing arrows to the right of each icon will allow you
to select which channels to view in that mode.
Dwell: Enable/disable the automatic cycling between channels.
Color: Adjust brightness, hue, saturation and contrast for any channel.
Zoom: Available in single screen display mode, this digitally enlarges a section of
the display. Click and drag to move within the video image.
Volume: Adjust volume. This is only applicable if you have attached a
microphone or audio-capable camera to the DVR.
PTZ: Controls optional Pan-Tilt-Zoom cameras.
Snapshot: Captures a still image from all channels.
Record: Begin manual recording on all channels.
Playback: Switches to Playback mode and brings up the Playback Control Bar.
Move Control Bar: Reposition the Control Bar anywhere on the screen.
The basic functions of the Control Bar are listed to the right. Each function is covered in more detail within the manual.
Camera Power and Set Up
Operation
STEP 8 Connecting the Cameras
1. Connect the BNC and power leads on the camera to the matching connectors on the
power and video cable.
NOTE: The male power end fits into the matching power lead on the camera.
2. Connect the BNC connector on the other end of the cable to any of the Video In ports on
the back of the DVR.
3. Plug the remaining power connector into one of the DC power jacks on the side of the
Power Distribution Panel.
STEP 7 Mount the Power Distribution Panel
1. Read the instructions included with the Power Distribution Panel
before continuing.
2. Find a suitable location to mount the Power Distribution Panel. It
should be located near to where the DVR will be located.
3. Use the included template to properly position the mounting
screws.
4. Mount the panel.
5. Be certain that the power switch is set to OFF before attaching
the power cord.
6. Lock the front panel to prevent unauthorized access.
STEP 9 Powering Up
Plug in the Power Distribution Panel
and turn it on.
STEP 10 Playback and Search
1. Return to the Main Menu as described in
Step 6, above.
2. Click on the Search icon.
3. This DVR is default configured to record on motion
detection.
To view these recordings:
a. Select the EVENT SEARCH tab.
4. Double click on the event you wish to review and it will begin replaying. The Playback
Control Bar will appear below the video, allowing you to control the playback. It
operates like a standard video player.
1 2 3
Previous
Record
Play/
Pause
Stop Fast
Forward
Rewind Screen Display
Mode
Volume
Hide
Tool Bar
ExitFrame
Advance
Next
Record
Playback
Progress Bar
Zoom Color
b. Select the date you
wish to search.
c. Click the Search
button.
You will be presented
with a list of recorded
events.
Image
a c
b
You may now mount your cameras.
To hide the control bar, right-click again.
4. Repeat for each camera included with this package to ensure proper connection and
function.
You should now see a live video image
from your cameras.
If your packaged did not include a power distribution panel, then refer to the instruction manual that came with your cameras.