


22
Press the “Prev” button to enter to the PICTBRIDGE menu page. Then press
the Flash/Set Button to enter the sub menu.
When you enter the PICTBRIDGE menu page, the camera will flash an icon
of a cable which indicates you must insert a USB/AV cable that is
connected to a printer. Only when the camera is connected to a
PICTBRIDGE enabled printer can you enter the print-setting interface and
begin printing pictures.
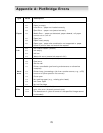
If there is an error message on the LCD during printing, please refer to the
error-type-table in the appendix. (see Page 38)
4-4 Setup Mode
In this mode, you can complete some special settings. There are two menu
pages in this mode: SYSTEM 1 and SYSTEM 2.
Setup Operation:
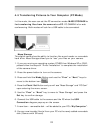
(1) First, turn on the power, and press and hold the MODE button to enter the
mode-selection menu. Then use the “Prev” and “Next” buttons to select the
setup symbol
(
). Press the Flash/Set Button to enter.
(2) By pressing the down “Next” button, and the highlight bar will move
between different menu items. Press the Flash/Set Button again to enter a
sub menu.
(3) Press the up “Prev” button to enter to enter the SYSTEM 2 menu page.
(4)When setting the date and time, use the play button
tab between
numbers. Press the Flash/Set Button to save the settings.