


4
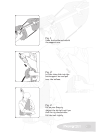
Using the Easyrig
It is as simple to put the Easyrig on as it is with a backpack.
Just don’t forget to adjust it so it feels comfortable.
The weight of the camera should primarily be on your hips. It
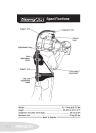
is important that the support bar is vertical – if it is lopsided,
the load will be unevenly distributed on the hips and the cam-
era might hit the bar.
The hip belt should be tightened so that the rig doesn’t slide
down or around the hips. The shoulder strap is mainly for bal-
ancing the Easyrig, and prevent it from tilting.
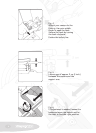
If the support arm is too high or too low, rst try adjusting
the support bar in relation to the hip belt/vest, or change po-
sition of your hips. It is also possile to adjust the tube inside
the support bar, but that might require adjusting the tight-
ness of the suspension line. Note that there must not be more
than 10 cm (4 in) between the lower end of the tube and the
adjustment ring.
When attaching the hook onto the camera, you might nd it
easier to put the camera on a table or a bench rst. Try and
nd the right balance before you secure the hook.
Don’t forget to fasten the safety line.
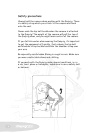
Hip shots
Easyrig gives you the freedom to shoot from various levels.
You simply move the camera down from your shoulder as you
would in an ordinary handheld situation – only now you don’t
feel more than a fraction of the camera’s weight.
When shooting at hip level, lean backwards when pushing the
camera forward, thus minimising the load on your back.
The length of the suspension line makes it possible to move
the camera as far as your arms reach.