


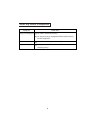

6
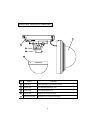
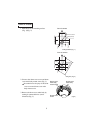
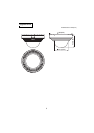
4. Fasten the main body to the ceiling/wall
surface/box with a main body mount
screw (Figs. 4).
Make sure that it is fixed firmly.
Make sure of the position of the front
of the camera.
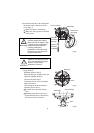
5. While watching the monitor, adjust the
image direction.
· Right/left direction (Fig.5)
Rotate the base pan to right or left, and
adjust the right/left direction.
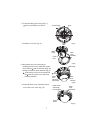
· Up/down direction (Fig.6)
Loosen the tilt lock screw, and adjust
up/down direction.
After setting the up/down direction,
fasten the tilt lock screw.
Be careful not to drop the tilt lock
screw.
Manually fasten the tilt lock screw.
If fastened with pliers or the like, the
tilt lock screw may be broken.
(Fig.4)
Main body
Dome cover
main body
Screw hole
for mounting
main body
Base pan
Lens
(Fig.5)
Warning
Weight of the main body and
mounting metal piece is 650 g.
Make sure that the ceiling or wall
is strong enough to support the
weight of the main body and
mounting metal piece
altogether.If not strong enough,
the device may drop and injure
the personnel around.
Caution
Please do not hold a part of the
lens, when adjusting the image
direction. It may cause a
breakdown of the lens.
Tilt lock screw
(Fig.6)
Main body
Main body
mount screw
(not attached)
Front of camera
Lens