


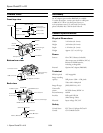

Epson PhotoPC L-410
3 - Epson PhotoPC L-410 8/04
Using Memory Cards
You can take pictures and save them in the camera without a
memory card. However, you can store more pictures when
you use a memory card. You can use either of the following
types of cards:
❏ an SD
™
card (Secure Digital) up to 512MB. (To shoot at
the maximum speed, you need an SD memory card with a
recording/transfer speed of 10MB/second.)
❏ an MM card (Multimedia, MMC V 2.1 or later) up to
512MB.
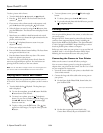
Caution: Make sure that the camera is turned off before installing or
removing a memory card. Make sure that you insert the card in the
correct orientation, or you may damage the camera as well as the
card.
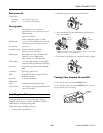
Taking and Viewing Photos
You can take several different types of photos with your
camera, as described below:
❏
Automatic photos: Use automatically adjusted settings for
great snapshots. All you have to do is point and shoot.
❏
Manual photos: Fine-tune your shots by adjusting a
variety of camera settings, including resolution, exposure
compensation, sensitivity, white balance, and more.
❏
Continuous photos: Capture a series of shots, up to 3
photos per second.
❏
Videos: Record videos with sound. The length of the video
is limited only by the amount of storage you have.
❏
PRINT Image Framer
®
(PIF) photos: Take photos with
fun frames for holidays and special occasions.
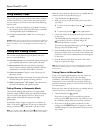
Taking Photos in Automatic Mode
The automatic photography mode lets you capture high-
resolution images without making any complicated settings.
You can use the zoom buttons to move in closer to your
subject and/or set the flash for indoor or low-light
photographs.
In automatic mode, images are captured at a resolution of
2304 × 1728 pixels ( N2304). If you want to change this
setting, use manual mode as described in the next section.
Note: You can also use the macro and/or self-timer features in
automatic mode. For instructions, see the on-screen User’s Guide.
Before you start, make sure the batteries are installed and the
camera is turned on as described on page 2.
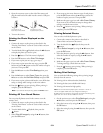
1. Turn the Mode dial to Automatic.
2. Make sure you are at least 20 inches (50 cm) away from
your subject.
❏ To zoom in on your subject, press the T (telephoto)
button.
❏ To zoom out, press the W (wide-angle) button.
3. Center your subject in the middle of the square focus frame
on the screen.
The default flash setting is automatic, indicated by the
icon on the
LCD screen. The flash will go off
automatically whenever necessary.
If you want to change the flash setting, press the
r button.
See page 4 for a list of flash settings.
4. Press and hold the shutter button halfway. The focus frame
turns green and the focus is set. If you want to reframe your
picture, move the camera until the photo you want appears
on the screen.
5. Press the shutter button all the way down. The camera
beeps as it captures the image.
Note: The LCD screen may turn off to save battery power after you
take a picture. Press any button or turn the Mode dial to turn the
screen back on.
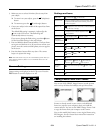
Taking Photos in Manual Mode
If you are an advanced photographer, you may want to use
manual mode. This allows you to select the quality
(resolution), white balance, light sensitivity, and exposure
compensation. You can also select special scene modes for
portraits or landscape photos, or turn the LCD screen off to
save battery power.
Before you start, make sure the batteries are installed and the
camera is turned on, as described on page 2.
1. Turn the Mode dial to Manual.
If you want to turn the LCD screen off to save battery
power, press the DISP button twice. You will have to use
the viewfinder instead of the screen to frame your shot.
2. If you want to adjust the quality (resolution) or other
settings, press the MENU button. See page 4 for a list of
available settings. For more information, see the on-screen
User’s Guide.