


SKU 91194 PAGE 4
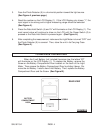
3. Face the Photo Detector (5) in a horizontal position toward the light source.
(See Figure A, previous page.)
4. Read the number on the LCD Display (1). If the LCD Display only shows “1”, the
input signal is too strong and a higher measuring range should be selected.
(See Figure A.)
5. Press the Data Hold Switch (4) and “H” will illuminate on the LCD Display (1). The
most recent value will continue to show on the LCD until the Power Switch (2) is
pressed or the Data Hold Switch is pressed again. (See Figure A.)
6. After completing the measurement, make sure the Light Meter is turned “OFF” and
the Photo Detector (5) is covered. Then, store the unit in its Carrying Case.
(See Figure A.)
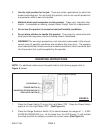
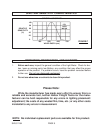
TO REPLACE THE BATTERY
When the 9 volt Battery (not included) becomes low, the letters “BT”
will illuminate on the LCD Display (1). To replace the Battery, remove the
Screw on the Battery Compartment Door located on the back of the Light
Meter. Then remove the Battery Compartment Door by sliding it down. Re-
move the old Battery. Install a new 9 volt Battery. Then, replace the Battery
Compartment Door and the Screw. (See Figure B.)
BATTERY
COMPARTMENT
DOOR
FIGURE B
REAR VIEW
SCREW