


6
C
C
h
h
e
e
c
c
k
k
i
i
n
n
g
g
C
C
o
o
n
n
t
t
r
r
o
o
l
l
s
s
Once the housing has been closed push the controls back into
place Make sure they line up with the camera’s controls
T
T
u
u
r
r
n
n
C
C
a
a
m
m
e
e
r
r
a
a
O
O
n
n
Turn the camera on and operate each of the housing controls to
get a feel for using the camera in the housing Take a few
pictures above water with the camera in the housing
J
J
o
o
g
g
D
D
i
i
a
a
l
l
C
C
o
o
n
n
t
t
r
r
o
o
l
l
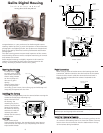
The housing’s Jog Dial
Control has a small bump
o
n the inside face of the
control for depressing the
Jog Dial on the camera
The small bump is in the
s
ame location as the
white dot on the control
knob To use rotate the
control knob until the
white dot is in the
o’clock position In this
position the small bump will depress the Jog Dial
To select an item turn the jog dial to the item you want to set
Then pull out on the control slightly and position the white dot
over the jog dial and depress This will set the item you selected
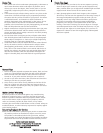
Shutter
Release
O'ring
External
Strobe Connector
Lid
Snap
Menu
Focus
LCD
Zoom
CF Card
Power
Jog Dial
Exposure
Focus
AE Lock
Delete
Control
Button
Back of Housing
5
C
C
l
l
o
o
s
s
i
i
n
n
g
g
t
t
h
h
e
e
H
H
o
o
u
u
s
s
i
i
n
n
g
g
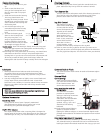
Place housing face down in your
lap
Check to see that there is an
o’ring on the housing back and
t
hat it is clean and in its proper
location
Guide the back onto the housing
The o’ring should touch the
housing all the way around There
should be an even gap all the way
a
round between the housing and
the housing back
Lift the lid snaps so they are
extended and place the lid snap
into the hook on the housing
back
To close the housing push
down on the lid snaps until
they snap into place Lid
snaps on opposite sides of the
housing should be closed at the
same time Be sure they are down
far enough to engage the lock
D
D
o
o
u
u
b
b
l
l
e
e
c
c
h
h
e
e
c
c
k
k
Once the housing is closed check the o’ring seal
Check the gap between the housing back and the housing it
should be even all the way around
Look through the clear plastic back at the o’ring You should see a
darkened area where the o’ring is compressed against the
housing back If you do not see an even black compression seal
all the way around the back open the lid snaps reseat the
housing back and close the lid snaps Visually check the seal again
o’ring
housing back
housing back
o’ring
even gap
all 4 sides
housing
housing
7
L
L
u
u
b
b
r
r
i
i
c
c
a
a
n
n
t
t
s
s
Ikelite provides silicone lubricant with the housing We
recommend that you use only Ikelite lubricant on Ikelite
products as some other brands may cause the o’ring to swell
and not seal properly
Use only enough lubricant to lightly cover control shafts and
o’rings Wipe off any excess lubricant with a clean cloth
Lubricant is not a sealant it is used to reduce friction Excessive
lubricant can collect sand and dirt which may interfere with
proper sealing
C
C
A
A
U
U
T
T
I
I
O
O
N
N
N
N
e
e
v
v
e
e
r
r
u
u
s
s
e
e
s
s
p
p
r
r
a
a
y
y
l
l
u
u
b
b
r
r
i
i
c
c
a
a
n
n
t
t
s
s
a
a
s
s
t
t
h
h
e
e
p
p
r
r
o
o
p
p
e
e
l
l
l
l
a
a
n
n
t
t
i
i
n
n
g
g
r
r
e
e
d
d
i
i
e
e
n
n
t
t
c
c
a
a
n
n
c
c
a
a
u
u
s
s
e
e
t
t
h
h
e
e
p
p
l
l
a
a
s
s
t
t
i
i
c
c
h
h
o
o
u
u
s
s
i
i
n
n
g
g
t
t
o
o
c
c
r
r
a
a
c
c
k
k
O
O
p
p
t
t
i
i
o
o
n
n
a
a
l
l
A
A
c
c
c
c
e
e
s
s
s
s
o
o
r
r
i
i
e
e
s
s
B
B
a
a
c
c
k
k
O
O
'
'
r
r
i
i
n
n
g
g
O'rings last for several years if properly maintained
(See Maintenance) Always carry a spare o'ring in case
the housing o'ring becomes damaged or lost
U
U
R
R
/
/
P
P
r
r
o
o
F
F
i
i
l
l
t
t
e
e
r
r
The UR/Pro underwater color correcting filter is designed to
restore some of the warm colors filtered out by the water For
available light use only not recommended for use with flash
8
C
C
a
a
m
m
e
e
r
r
a
a
’
’
s
s
B
B
u
u
i
i
l
l
t
t
i
i
n
n
F
F
l
l
a
a
s
s
h
h
The camera’s builtin flash cannot be used to illuminate subject
underwater
E
E
x
x
t
t
e
e
r
r
n
n
a
a
l
l
F
F
l
l
a
a
s
s
h
h
C
C
a
a
m
m
e
e
r
r
a
a
S
S
e
e
t
t
t
t
i
i
n
n
g
g
s
s
When using an external flash
you must turn external flash on
in the camera’s menu See
camera instruction booklet
U
U
s
s
i
i
n
n
g
g
D
D
S
S
S
S
u
u
b
b
s
s
t
t
r
r
o
o
b
b
e
e
s
s
w
w
i
i
t
t
h
h
t
t
h
h
e
e
E
E
V
V
C
C
o
o
n
n
t
t
r
r
o
o
l
l
l
l
e
e
r
r
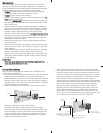
The Ikelite EVController
provides manual power
settings in halfstop increments
with the DS or DS
Substrobes The EVController
must be triggered by the
optional sync cord
attached to the housing
bulkhead
External strobes expand lighting
options to achieve the best
lighting for different subjects A second external digital strobe
package can be added to fill shadows and produce more realistic
photographs
U
U
s
s
i
i
n
n
g
g
I
I
k
k
e
e
l
l
i
i
t
t
e
e
S
S
u
u
b
b
s
s
t
t
r
r
o
o
b
b
e
e
s
s
w
w
i
i
t
t
h
h
S
S
y
y
n
n
c
c
C
C
o
o
r
r
d
d
s
s
Any Ikelite Substrobe Substrobe Substrobe DS Substrobe
Substrobe DS or Substrobe can be connected to the
housing and used in the manual mode with the sync cord
Substrobe
DS51 or
DS125
EV
-Contr
oller
#4103.51
Sync Cord
SA-100Q
Arm