


Control Maintenance Cont.
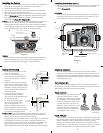
3. Some of the controls have a short shaft and cannot be pulled
out exposing the shaft for lubrication. In the unlikely event
one of these controls sticks or becomes difficult to operate
you can remove the control from the housing and lubricate it,
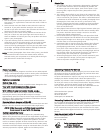
or return the housing to Ikelite for maintenance. To remove
the control (Diagram A), loosen the set screw in the knob
(allen wrench required); remove the knob. If there is salt or
dirt build-up on the exposed control shaft, clean the shaft.
Open the housing and gently slide the control shaft out of the
control gland. Clean and lightly lubricate the shaft, including
the end of the shaft. Slide the shaft back into the control
gland and gently slide it back and forth a few times without
fully removing the shaft from the gland. Replace the knob
noting the flat area on the shaft. The set screw in the knob
should tighten down against the flat area on the control, so
the knob does not turn on the shaft.
13
16
Loosen set screw
Tighten set screw down
against this flat area
when replacing the knob.
housing
gland
control
Lubricate end of shaft
before reinserting into
gland
Control Maintenance
Ikelite controls are designed to provide years of reliable service
with minimal maintenance.
1. Push button controls require no maintenance other than rinsing
in fresh water after saltwater use. If a push button control
becomes difficult to push or if it sticks when depressed, soak the
housing in luke warm fresh water. After a few minutes, operate
the push button. If this does not correct the problem, return the
housing to Ikelite for maintenance.
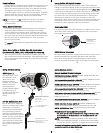
2. Some of the controls have long shafts. These controls can be
pulled out, exposing the shaft (see diagrams A and B on pages
#16 & #17).
To lubricate the control, gently pull on the knob until the
stainless steel shaft is exposed. Lightly lubricate the shaft, then
move the shaft in and out several times. This will lubricate the
x-ring in the Ikelite control gland. This should be done before
using the housing after a prolonged storage period, or once a
week when the housing is in constant use.
15
14
Maintenance
The Ikelite Digital Housing should be given the same care and
attention as your other photographic equipment. In addition to
n
ormal maintenance, we recommend that the housing be returned
to Ikelite periodically to be checked and pressure tested.
1.
Do Not
leave the camera and housing in direct sunlight for
prolonged periods. Heat may damage the camera.
2.
Do Not
ship the camera in the housing.
3. Before using the housing, always check the tightness of the
set
screw
in each control knob.
Check each
control gland
penetrating the housing to make sure
they are tight. There is a slight chance that either could vibrate
l
oose during travel.
4. Keep the back o-ring clean and lightly lubricated. To lubricate,
remove the o-ring from the back. Put a small amount of lkelite
lubricant on your fingers. Pull the o-ring through your fingers
to apply a light coating of lubricant. Only apply enough
lubricant to make the o-ring feel slick.
Do Not stretch the
o-ring
. This light coating of lubricant will help to keep the
o-ring from drying out and will help to show a dark sealing
line when the housing back is properly sealed.
5. Keep the area where the o-ring fits and the sealing surface of
the housing clean.
6. Rinse the housing exterior thoroughly in fresh water after each
salt water use. Dry with a soft cloth. Dry lens port to eliminate
water spotting.
After several uses in salt water, soak the housing exterior in a
mild soap solution, rinse and dry, before storing. When storing
the housing, remove the back o-ring, lightly lubricate, and place
in a plastic bag. Place the plastic bag with o-ring inside the
housing for safe keeping.
7. If removing a housing push button,
Do Not
re-use the E-clip.
Contact Ikelite for replacement E-clips (part #0319.12).
Lubricants
1. Ikelite provides silicone lubricant with the housing. We recommend
you use only Ikelite lubricant on Ikelite products as some other
brands may cause the o-ring to swell and not seal properly.
2. Use only enough lubricant to lightly cover control shafts and
o-rings. Wipe off any excess lubricant with a clean cloth.
Lubricant is not a sealant, it is used to reduce friction. Excessive
lubricant can collect sand and dirt which may interfere with
proper sealing.
CAUTION
Never use spray lubricants as the propellant ingredient can
cause the plastic housing to crack.
Diagram A
NOTE: DS Substrobe Update information
DS50 Substrobes
•
DS50 SubStrobes with a Serial Number below 63,850 can not be
updated to operate with the Conversion Circuitry.
• DS50 SubStrobes with a Serial Number between 63,850 and
69,999 operate with the Conversion Circuitry, but require an
u
pdate to provide optimum performance.
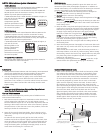
• DS50 Substrobes with a Serial Number of 70,000 or higher, or
with one of the two following
labels in the battery
compartment provide
optimum performance with
the Conversion Circuitry and
do not need an update.
DS125 Substrobes
• DS125 Substrobes with a Serial Number below 2,500 must be
updated to operate correctly with the Conversion Circuitry.
• DS125 Substrobes with a Serial Number between 2,501 and
4,999 will operate with the Conversion Circuitry, but require an
update to provide optimum performance.
• DS125 Substrobes with a Serial Number of 5,000 or higher, or
with one of the two
following labels in the
battery compartment,
provide optimum
performance with the
Conversion Circuitry and do
not need an update.
i
kelite
Substrobe
Substrobe
MOD-NC
i
kelite
Substrob e
Substrobe
MOD-NC
To Update Your Substrobe:
Send to the Ikelite address on the back page of this manual or
contact Ikelite for more information.
ikelite
Substrobe
MOD-NC
ikelite
Substrob e
MOD-NC
i
kelite
Substrobe
Substrobe
MOD-NC
i
kelite
Substrob e
Substrobe
MOD-NC
i
kelite
Substrobe
MOD-NC
i
kelite
Substrob e
MOD-NC
serial number
serial number