


6
C
C
l
l
o
o
s
s
i
i
n
n
g
g
t
t
h
h
e
e
H
H
o
o
u
u
s
s
i
i
n
n
g
g
Place housing face down
Check to see that there is an o’ring
on the housing back and that it is
clean and in its proper location
Some control shafts can be slid out
making camera installition easier
G
ently pull out on a control until it
stops
Guide the back onto the housing
The o’ring should touch the
h
ousing all the way around There
should be an even gap all the way
around between the housing and
the housing back
Lift the lid snaps so they are
extended and place the lid snap
i
nto the hook on the housing back
To close the housing push
down on the lid snaps until
they snap into place Lid
snaps on opposite sides of the
housing should be closed at the
same time Be sure they are down
far enough to engage the lock
D
D
o
o
u
u
b
b
l
l
e
e
c
c
h
h
e
e
c
c
k
k
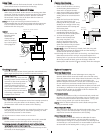
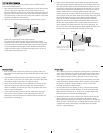
Once the housing is closed check the o’ring seal
Check the gap between the housing back and the housing it
should be even all the way around
Look through the clear plastic back at the o’ring You should see a
darkened area where the o’ring is compressed against the
housing back If you do not see an even black compression seal
all the way around the back open the lid snaps reseat the
housing back and close the lid snaps Visually check the seal again
o’ring
housing back
housing back
housing
housing
o’ring
even gap
all 4 sides
5
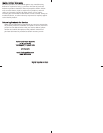
External TTL Strobe Connector
W
aterproof Cap
O
'ring
H
ousing Back
Hot Shoe
Connector
Camera
F
F
l
l
a
a
s
s
h
h
C
C
o
o
n
n
n
n
e
e
c
c
t
t
i
i
o
o
n
n
f
f
o
o
r
r
E
E
x
x
t
t
e
e
r
r
n
n
a
a
l
l
S
S
t
t
r
r
o
o
b
b
e
e
s
s
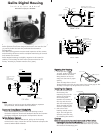
When using an external strobe connect the housings Hot Shoe
Connector slide the connector into the hot shoe of the camera
f
rom the back of the camera as shown Slide the connector
forward until it stops This can be done after the camera is
s
ecured with the mounting bolt
N
N
O
O
T
T
E
E
:
:
Even if you are not using an external strobe it is
r
ecommended that you slide the housings Hot Shoe Connector
into the camera's hot shoe In this position it is less likely to
interfere with the o'ring seal
C
C
a
a
u
u
t
t
i
i
o
o
n
n
:
:
Do not remove the
External Strobe
Connector’s
waterproof cap
unless an external
sync cord is going
to be plugged in
U
U
s
s
i
i
n
n
g
g
F
F
l
l
a
a
s
s
h
h
The camera's builtin flash cannot be used To use flash an
external flash must be connected to the housing
7
C
C
h
h
e
e
c
c
k
k
i
i
n
n
g
g
C
C
o
o
n
n
t
t
r
r
o
o
l
l
s
s
Once the housing has been closed push the controls back into
place Make sure they line up with the camera’s controls
Z
Z
o
o
o
o
m
m
C
C
o
o
n
n
t
t
r
r
o
o
l
l
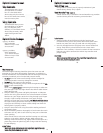
(NOTE:) After you have used the
housing’s zoom control it must be
returned to the center position to
disengage If the housing zoom
control is pushing the camera
zoom lever in either direction you
cannot take a picture or access
any other function as the camera
is receiving a signal from the
engaged zoom control
T
T
u
u
r
r
n
n
C
C
a
a
m
m
e
e
r
r
a
a
O
O
n
n
Turn the camera on and operate each of the housing controls to
get a feel for using the camera in the housing Take a few
pictures above water with the camera in the housing
Zoom contr
ol
engaged
Zoom control
disengaged
(centered)
L
L
e
e
n
n
s
s
P
P
o
o
r
r
t
t
Treat the glass in the lens port as a camera lens After use rinse
and gently dry the lens port to avoid water spotting To clean
use a mild soap solution or lens cleaner
Do not use alcohol or window cleaner on the Lens Port
C
C
a
a
u
u
t
t
i
i
o
o
n
n
When the camera is in the housing and the lens is fully extended
the lens almost touches the inside of the housing's port
R
R
e
e
m
m
o
o
v
v
e
e
a
a
n
n
y
y
a
a
c
c
c
c
e
e
s
s
s
s
o
o
r
r
y
y
l
l
e
e
n
n
s
s
a
a
t
t
t
t
a
a
c
c
h
h
m
m
e
e
n
n
t
t
s
s
s
s
u
u
c
c
h
h
a
a
s
s
f
f
i
i
l
l
t
t
e
e
r
r
s
s
b
b
e
e
f
f
o
o
r
r
e
e
i
i
n
n
s
s
t
t
a
a
l
l
l
l
i
i
n
n
g
g
t
t
h
h
e
e
c
c
a
a
m
m
e
e
r
r
a
a
i
i
n
n
t
t
o
o
t
t
h
h
e
e
h
h
o
o
u
u
s
s
i
i
n
n
g
g
Any attachment that
adds length to the lens will restrict the zoom and may scratch
the inside of the housings port
8
O
O
p
p
t
t
i
i
o
o
n
n
a
a
l
l
A
A
c
c
c
c
e
e
s
s
s
s
o
o
r
r
i
i
e
e
s
s
E
E
x
x
t
t
e
e
r
r
n
n
a
a
l
l
S
S
u
u
b
b
s
s
t
t
r
r
o
o
b
b
e
e
s
s
External strobes offer several advantages over using the
camera’s builtin flash External strobes move the flash away
from the camera lens which helps reduce backscatter They also
expand lighting options to achieve the best lighting for
different subjects and lenses A strobe such as the DS is ideal
for use with macro and most standard camera lenses up to
mm When an optional wide angle lens is added a strobe such
as the DS is needed as it has a greater angleofcoverage A
second external strobe can be added to fill the shadows and
produce more realistic photographs
T
T
T
T
L
L
E
E
x
x
p
p
o
o
s
s
u
u
r
r
e
e
M
M
o
o
d
d
e
e
Ikelite DS Substrobes are fully TTL functional and provide real
Olympus TTL control with this housing For TTL exposure you
must use an Ikelite DS Substrobe and the Ikelite sync
cord or dual sync cord for dual strobes
N
N
O
O
T
T
E
E
:
:
Refer to camera manual for camera flash settings when
using an external strobe
M
M
a
a
n
n
u
u
a
a
l
l
E
E
x
x
p
p
o
o
s
s
u
u
r
r
e
e
M
M
o
o
d
d
e
e
This camera can be used with the Ikelite Substrobe DS A
DS or in the manual mode A sync cord is
required to connect the Substrobe to the housing
M
M
a
a
n
n
u
u
a
a
l
l
E
E
x
x
p
p
o
o
s
s
u
u
r
r
e
e
M
M
o
o
d
d
e
e
Use the Ikelite EVController with a DS Substrobe for more
control over manual exposure The EV Controller provides
manual power settings in / stop increments For housings with
an external sync cord connection it is recommeded to connect the
EVController to the housing with a sync cord