


34
A B
C
IN OUT
ᮣ 1 0:00:25
2
3
4
5
6
7
8
COUNTER 0:00:25
TOTAL 0:00:00
IN OUT
1 0:00:25 0:01:05
2 0:03:18 0:03:31
3 0:02:33 0:02:53
ᮣ 4 0:04:11
5
6
7
8
COUNTER 0:04:11
TOTAL 0:01:13
EDITING
(cont.)
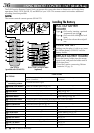
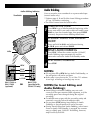
PREPARE CAMCORDER
2
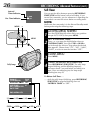
Insert a recorded tape and set the Power switch to
“PLAY”.
PREPARE VCR
3
Turn the power on, insert a recordable tape and
engage the AUX mode (refer to VCR’s instructions).
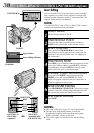
SELECT SCENES
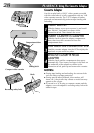
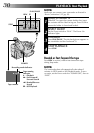
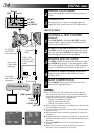
ACCESS R.A. EDIT COUNTER
DISPLAY
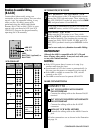
1
Press PLAY/PAUSE, then press R.A. EDIT and the
counter display appears in the viewfinder and the
screen of the connected TV.
REGISTER BEGINNING OF SCENE
2
Press REW or FF to locate the beginning of a scene
you want, then press IN/OUT to register that point.
The data appears under IN on the display.
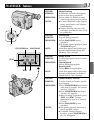
REGISTER END OF SCENE
3
Press REW or FF to locate the end of the scene and
press IN/OUT to register it. The data appears under
OUT on the display. The total time of the registered
scene(s) is displayed at the bottom of the screen.
REGISTER ADDITIONAL SCENES
4
Repeat steps 2 and 3 for each additional scene
(as many as 8).
MAKE CORRECTIONS
5
Press CANCEL during steps 2 and 3 to erase the
most recently registered point.
NOTES:
●
For GR-AX570 only: The MBR can be used to operate
other camcorder functions as well. Point the MBR at the
camcorder’s remote sensor and press any of the following
buttons (function appears in parentheses):
— ON/OFF (camcorder R.A. EDIT)
— IN/OUT (camcorder IN/OUT)
— CANCEL (camcorder CANCEL)
●
There must be at least one second between an in-point and
its corresponding out-point.
●
To ensure correct operation, leave at least 15 seconds open
between scenes.
●
Blank portions of tape cannot be registered as in-points or
out-points.
●
If it takes more than 5 minutes to search for an in-point, the
VCR’s Record-Pause mode is cancelled and editing doesn’t
take place.
●
Pressing R.A.EDIT clears all in- and out-points from
memory.
●
Leave a small margin for error around each in-point to
ensure the scene is recorded in its entirety.
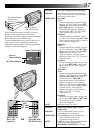
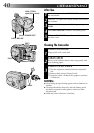
R.A. EDIT
PLAY/PAUSE
STOP CANCEL
IN/OUT
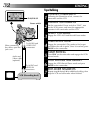
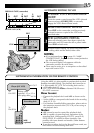
Open the cover
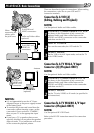
To AUDIO
and VIDEO
out connectors
REW/FF
To J terminal
(JLIP)
Editing cable
(optional, 3.5ø –
3.5ø mini-plug
cable)
To AUDIO
and VIDEO IN
connectors
To Pause-In
To Remote
PAUSE
VCR (Recording deck)
IN/OUT
CANCEL
VCR REC STBY
ON/OFF
MBR (optional)
Audio and
Video cable
(optional)