


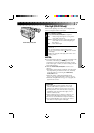

13
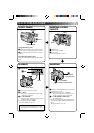
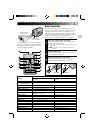
10°
5m
10°
30°
30°
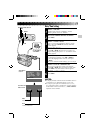
Infrared beam
sensor window
Infrared beam
effective area
The transmitted beam may not be effective or
may cause misoperations when the infrared
beam sensor window is directly exposed to
sunlight or powerful lighting.
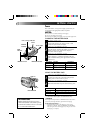
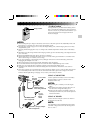
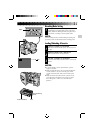
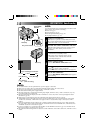
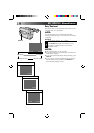
Remote Control Unit
The RM-V704U Full-Function Remote Control Unit can
operate this camcorder from a distance as well as the basic
operations (PLAY, STOP, PAUSE, FF, and REW) of your
VCR. This remote control unit makes additional recording
functions possible. To operate, point it at the camcorder’s
remote sensor. The RM-V704U is provided with
GR-AX760, and is available optionally for GR-AX660.
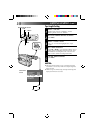
PULL OUT BATTERY HOLDER
1
Pull out the battery holder according to the type of
remote control unit you have.
Type
A
: Pull out the battrery holder while sliding the lock
hole.
Type
B
: Pinch the release tab and pull out the battery
holder.
INSERT BATTERY
2
Insert the lithium battery* (CR2025), with its plus (+)
side up, into the battery holder.
REPLACE BATTERY HOLDER
3
Replace the battery holder until it clicks in place.
*Read warning on lithium battery. (੬ pg. 2)
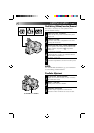
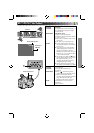
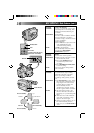
1
2
3
4
5
6
7
8
9
0
!
#
@
$
%
^
&
Functions
Buttons
With the camcorder’s power switch set to With the camcorder’s power switch set to
“CAMERA”. “PLAY”.
1PAUSE IN connector — ੬ pg. 40
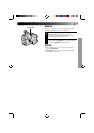
2Infrared beam Transmits the beam signal.
transmitting window
3MBR SET button — ੬ pg. 39
4INT. TIME button Self-Timer/Time lapse (੬ pg. 32, 33) —
5REC TIME button Animation/Time lapse (੬ pg. 33) —
6FF button Retake (Forward) (੬ pg. 15) FF/FF Shuttle Search (੬ pg. 36)
7REW button Retake (Rewind) (੬ pg. 16)/ Rew/Rew Shuttle Search (੬ pg. 36)
Quick Review (੬ pg. 15)
8PAUSE button — Pause/Play (੬ pg. 37)
9PLAY button — Playback start (੬ pg. 36)
0START/STOP button Functions same as the Recording Start/Stop button of the camcorder.
!VISS button Index code marking (੬ pg. 16) —
@ZOOM (T/W) buttons Zoom (invariable speed ੬ pg. 15) —
#VCR CTL button — ੬ pg. 39
$A. DUB button — Audio dubbing (੬ pg. 43)
%STOP button — Stop (੬ pg. 36)
^INSERT button — Insert Editing (੬ pg. 42)
&R. A. EDIT buttons — ੬ pg. 39
A
B
Lock hole
Release tab