


EN31
1F 2S
3S
5F
4F 6F
EXIT
<
PROTECT
>
1F 2S
3S
5F
4F 6F
EXIT
<
PROTECT
>
DPOF
ATFORM
NRETUR
INDEX
PROTECT
EDELET
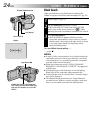
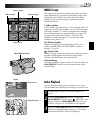
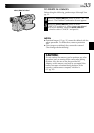
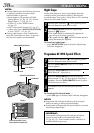
Display
Power Switch
MENU/BRIGHT Wheel
Lock Button
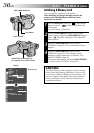
If Protection
is removed
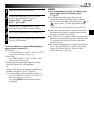
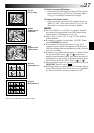
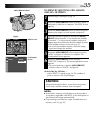
PROTECT Index
Screen
Normal playback
Padlock mark
Normal playback
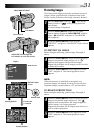
Protecting Images
The Protect mode helps prevent the accidental erasure of
images. When a padlock mark is displayed next to the
Picture Quality indication, that image cannot be deleted.
1
Set the VIDEO/DSC Switch to “ ”, then set the
Power Switch to “ ” while pressing down the
Lock Button.
•A stored image is displayed.
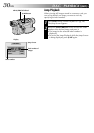
2
Press the MENU/BRIGHT wheel in. The Menu
Screen appears. Rotate the MENU/BRIGHT wheel to
select “ MEMORY” and press it. The MEMORY
Menu appears.
3
Rotate the MENU/BRIGHT wheel to select
“PROTECT” and press it. The PROTECT Index Screen
appears.
TO PROTECT AN IMAGE
Before doing the following, perform steps 1 through 3
above.
4
Rotate the MENU/BRIGHT wheel to move the green
frame to the desired image and press it. A “ ”
padlock mark appears on the selected image.
Repeat this procedure for all images you do not wish
to delete by accident.
5
Rotate the MENU/BRIGHT wheel upward to select
“EXIT” and press it. The normal playback screen
appears.
NOTE:
When the memory is initialised or corrupted, even
protected images are deleted. If you do not want to lose
important images, transfer them to a PC and save them.
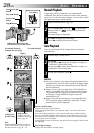
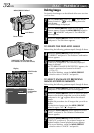
TO REMOVE PROTECTION
Before doing the following, perform steps 1 through 3
above.
4
Rotate the MENU/BRIGHT wheel to move the green
frame to the desired image and press it. The “ ”
padlock mark located above the image disappears
and the image is no longer protected.
Repeat this procedure for all images from which you
wish to remove protection.
5
Rotate the MENU/BRIGHT wheel upward to select
“EXIT” and press it. The normal playback screen
appears.
Menu Screen
VIDEO/DSC Switch (Open the
LCD monitor to access this switch)