GETTING STARTED
12 EN
MasterPage: Left
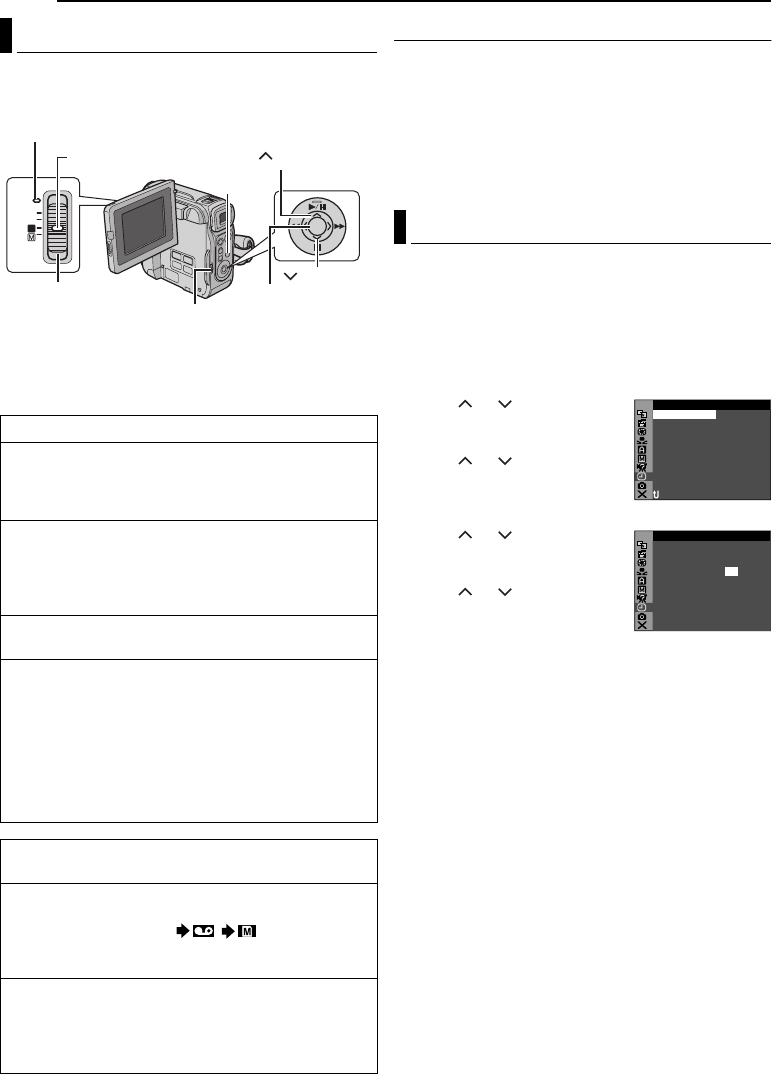
To turn on the camcorder, set the Power Switch to any
operation mode except “OFF” while pressing down the
Lock Button located on the switch.
Choose the appropriate operation mode according to
your preference using the Power Switch and VIDEO/
MEMORY Switch. (GR-DX97/77/67 only)
Power-Linked Operation
When the Power Switch is set to “A” or “M”, you can also
turn on/off the camcorder by opening/closing the LCD
monitor or pulling out/pushing in the viewfinder.
INFORMATION:
The following explanations in this manual supposes the
use of LCD monitor in your operation. If you want to use
the viewfinder, close the LCD monitor and pull out the
viewfinder fully.
The date/time is recorded onto the tape at all times, but
its display can be turned on or off during playback.
(੬ pg. 27, 31)
1 Set the Power Switch to “M” while pressing down the
Lock Button located on the switch.
2 Open the LCD monitor fully. (੬ pg. 15)
3 Press MENU. The Menu Screen appears.
4 Press or to select “n”,
and press SET. The CAMERA
DISPLAY Menu appears.
5 Press or to select
“CLOCK ADJ.”, and press SET.
The parameter for “Day” is
highlighted.
6 Press or to input the day,
and press SET. Repeat to input the
month, year, hour and minute.
7 Press or to select
“BRETURN”, and press SET twice.
The Menu Screen closes.
Built-in Clock’s Rechargeable Lithium Battery
If the camcorder is not used for approx. 3 months, the
clock’s lithium battery will become discharged and the
date/time stored in memory will be lost. When this
occurs, first connect the camcorder to an AC outlet using
the AC Adapter for over 24 hours to charge the clock’s
rechargeable lithium battery. Then perform the date/time
setting before using the camcorder.
Note that the camcorder can be used without setting the
date/time.
Operation Mode
Power Switch Position
A (Full Auto Recording):
Allows you to record using NO special effects or
manual adjustments. Suitable for standard recording.
The “A” indicator appears on the display.
M (Manual Recording):
Allows you to set various recording functions using the
Menus. (੬ pg. 27)
If you want more creative capabilities than Full Auto
Recording, try this mode.
OFF:
Allows you to switch off the camcorder.
PLAY:
●Allows you to play back a recording on the tape.
●Allows you to play back a video clip on the memory
card. (GR-DX97/77/67 only)
●Allows you to display a still image stored in the
memory card or to transfer a still image stored in the
memory card to a PC. (GR-DX97/77/67 only)
●Allows you to set various playback functions using
the Menus. (੬ pg. 27)
VIDEO/MEMORY Switch Position
(GR-DX97/77/67 only)
VIDEO:
Allows you to record on a tape or play back a tape. If
“REC SELECT” is set to “ / ” (੬ pg. 30), still
images are recorded both on the tape and the memory
card.
MEMORY:
●Allows you to record in a memory card or access
data stored in a memory card.
●When the Power Switch is set to “A” or “M”, the
currently selected image size appears.
PLAY
OFF
A
SET
POWER/CHARGE lamp
VIDEO/MEMORY (GR-DX97/77/67 only)
Power Switch
Lock Button
MENU
SET
(Up)
(Down)
Date/Time Settings
LC
–
NRETUR
T/D
AUMET–/TI DA E OT
OFDEM– CO TI E
F
LA
D
ASERA CM I
YP
V
ON X–MIC AU
NCREON S
I
HTBR G
E
20 OK CL C 21.
J AD .
7
1
. 04
: 30
NRETUR
OK
CL C 21
J
AD . 71
LA
D
ASERA CM
I Y
P
. 04
: 30
20.
GR-DX97PAL.book Page 12 Tuesday, January 6, 2004 12:44 PM


