


30 EN
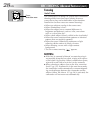
RECORDING
Advanced Features (cont.)
Exposure Control
This feature automatically adjusts the iris for the best
available picture quality, but you can override and make
the adjustment manually.
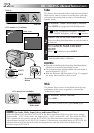
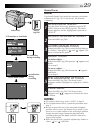
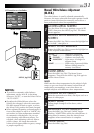
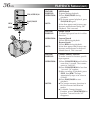
ACCESS MENU SCREEN
1
Turn the Select Dial to any position except AUTO
LOCK, then press the MENU Jog Dial. The Menu
Screen appears.
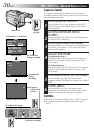
ACCESS EXPOSURE MENU
SCREEN
2
Rotate the MENU Jog Dial to move the highlight bar
to “EXPOSURE” and press it.
ACCESS MANUAL EXPOSURE
3
Rotate the MENU Jog Dial to move the highlight bar
to “MANU”, then press it. “00” (exposure control
level counter) appears.
ADJUST EXPOSURE
4
To brighten the image . . .
Rotate the MENU Jog Dial upward. The exposure
control level counter increases (maximum +06).
Go to step 5.
To darken the image . . .
Rotate the MENU Jog Dial downward. The exposure
control level counter decreases (maximum –06).
Go to step 5.
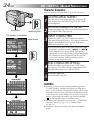
END ADJUSTMENT OF EXPOSURE
5
Press the MENU Jog Dial. The Menu Screen
reappears and the highlight bar is placed on “MENU
END”.
CLOSE MENU
6
Press the MENU Jog Dial. The Menu Screen
disappears and the exposure control level counter
reappers to indicate the exposure is adjusted.
NOTES:
●
To return to the factory setting, select “AUTO” in step 3.
●
To re-adjust exposure, repeat the procedure from
step 1.
MENU
4
MENU END
FOCUS
EXPOSURE
DATE TIME
TELE MACRO
TAPE LENGTH
M. W. B.
ZOOM SPEED
4
NEXT
AUTO
AUTO
25. 12. 98
OFF
T30
AUTO
FAST
+
06
–
06
00
AUTO
MANU
EXIT
EXPOSURE
LCD monitor or viewfinder
To darken the image
To brighten the image
Menu Screen
Exposure Menu Screen
Manual Exposure Screen
MENU
Jog Dial
No indication
during
recording
Exposure
control level
counter
Select Dial
No indication
during recording