


36 EN
4
NEXT
M . W . B .
D . ZOOM
TELE MACRO
DATE TIME
TAPE LENGTH
PICTURE
SNAPSHOT
4
RETURN
AUTO
ON
OFF
T30
FINE
FULL
4
BACK
REC. TIME
INT. TIME
TALLY LAMP
TITLE LANG.
JLIP ID NO
DEMO MODE
4
RETURN
OFF
OFF
ON
ENGLISH
06
OFF
ENGLISH
FRENCH
SPANISH
PORTUGUESE
EXIT
TITLE LANG.
4
BACK
REC. TIME
INT. TIME
TALLY LAMP
TITLE LANG.
JLIP ID NO
DEMO MODE
4
RETURN
OFF
OFF
ON
FRENCH
06
OFF
RECORDING
Advanced Features (cont.)
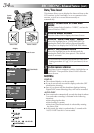
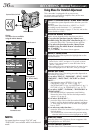
Using Menu For Detailed Adjustment
This camcorder is equipped with an easy-to-use,
on-screen menu system that simplifies many of the more
detailed camcorder settings.
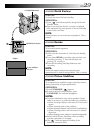
1
SELECT OPERATION SYSTEM AND MODE
The operation system depends on the function you wish
to select.
Set the System Select Switch to “VIDEO” or “D.S.C.”
according to each function's “*/**” explanation
described at the bottom of pages 37 and 38, and set the
Power Switch to “PRO.”.
2
ACCESS MENU SCREEN
Menu access depends on the function you select.
If you select the functions from the “Menu Screen
Available Using The Select Dial” described on pg. 37 . . .
.... press the Select Dial. The Menu Screen appears.
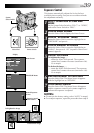
If you select the functions from the “Menu Screen
Available Using The MENU Button” described on
pg. 37 and 38 . . .
.... press MENU. The Menu Screen appears.
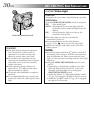
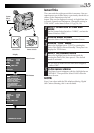
3
SELECT FUNCTION
Rotate the Select Dial to place the highlight bar on the
desired function.
•To go from Menu Screen 1 to Menu Screen 2, rotate the
Select Dial to “NEXT” and press it. To go back to Menu
Screen 1 from Menu Screen 2, rotate the Select Dial to
“BACK”, and press it.
•If the setting you want cannot be found in the Menu Screen,
place the highlight bar on “RETURN”, then go to step 6.
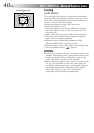
4
MAKE SETTING
Press the Select Dial. The setting procedure depends on
the function you select.
If you select “FOCUS”, “EXPOSURE”, “TITLE”, “DATE/
TIME DISP.”, “DATE/ TIME”, “PICTURE” or "SNAP-
SHOT". . .
.... see respective pages (FOCUS: ੬ pg. 40, 41,
EXPOSURE:
੬ pg. 39, TITLE: ੬ pg. 35,
DATE/TIME DISP.:
੬ pg. 34, DATE/TIME: ੬ pg. 13,
PICTURE:
੬ pg. 24, SNAPSHOT: ੬ pg. 22, 27).
If you select “WIDE”, “D.ZOOM”, “TELE MACRO” or
“DEMO MODE” . . .
.... the selected function’s parameter starts blinking.
Rotate the Select Dial until the desired parameter
appears. Go to step 5.
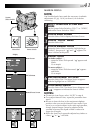
If you select “JLIP ID NO.” . . .
.... press the Select Dial so that the number blinks, then
rotate it until the desired number appears, and press
it. Then rotate the Select Dial to move the highlight
bar to “EXIT”.
If you select any other functions . . .
.... rotate the Select Dial to move the highlight bar to the
desired setting.
• If you decide you want to return to the previous setting,
rotate the Select Dial to move the highlight bar to “EXIT”.
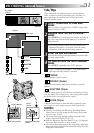
5
END SETTING
Press the Select Dial. The Menu Screen reappears with
the highlight bar on “RETURN”.
6
CLOSE MENU SCREEN
Press the Select Dial. The normal screen reappears.
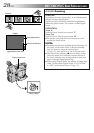
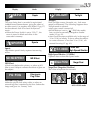
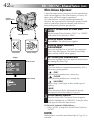
Display
(ex. Menu Screen available
using the MENU Button)
Select Dial
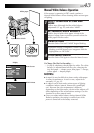
Menu Screen 1
Setting Menu
(ex. TITLE LANG.)
Menu Screen 2
Normal Screen
NOTE:
No menu functions except “FOCUS” and
“EXPOSURE” are available while in the Record
mode.
MENU Button
System Select Switch