GETTING STARTED
GETTING STARTED
EN 9
MasterPage: Start_Right
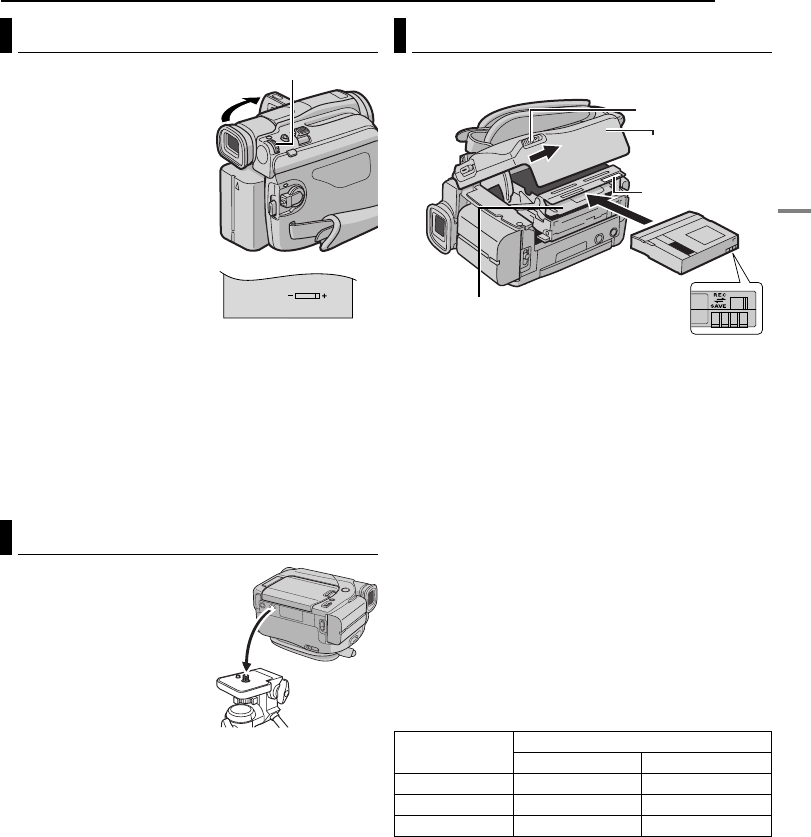
1 Set the Power Switch to “M”
or “PLAY” while pressing down
the Lock Button located on the
switch.
2 Open the LCD monitor fully.
(੬ pg. 10)
3 Press the MMENU/VOL.
Wheel in. The Menu Screen
appears.
4 Rotate the MMENU/VOL.
Wheel to select “n”, and
press it. The CAMERA
DISPLAY Menu appears.
5 Rotate the MMENU/VOL.
Wheel to select “BRIGHT”, and press it. The Menu
Screen closes and the brightness control indicator
appears.
6 Rotate the MMENU/VOL. Wheel until the appropriate
brightness is reached.
7 Press the MMENU/VOL. Wheel in.
● It is also possible to adjust the brightness of the viewfinder
by pulling out the viewfinder, setting “PRIORITY” in the
SYSTEM Menu to “FINDER” (੬ pg. 14, 16) and adjusting
as described above.
To attach the camcorder to a
tripod, align the direction stud
and screw to the mounting
socket and stud hole on the
camcorder. Then tighten the
screw clockwise.
● Some tripods are not
equipped with studs.
CAUTION:
When attaching the camcorder
to a tripod, extend its legs to
stabilise the camcorder. It is not advised to use small sized
tripods. This may cause damage to the unit by falling over.
The camcorder needs to be powered up to load or eject a
cassette.
1 Slide and hold OPEN/EJECT in the direction of the
arrow, then pull the cassette holder cover open until it
locks. The cassette holder opens automatically.
● Do not touch internal components.
2 Insert or remove a tape and press “PUSH HERE” to
close the cassette holder.
● Be sure to press only the section labelled “PUSH HERE” to
close the cassette holder; touching other parts may cause
your finger to get caught in the cassette holder, resulting in
injury or product damage.
● Once the cassette holder is closed, it recedes
automatically. Wait until it recedes completely before
closing the cassette holder cover.
● When the battery pack’s charge is low, you may not be able
to close the cassette holder cover. Do not apply force.
Replace the battery pack with a fully charged one or use
AC power before continuing.
3 Close the cassette holder cover firmly until it locks into
place.
Approximate recording time
To switch the recording mode, refer to pages 14 and 15.
To protect valuable recordings
Slide the erase protection tab on the back of the tape in
the direction of “SAVE”. This prevents the tape from
being recorded over. To record on this tape, slide the tab
back to “REC” before loading it.
For other notes, ੬ pg. 27.
Brightness Adjustment Of The Display
Tripod Mounting
BRIGHT
MMENU/VOL.
Loading/Unloading A Cassette
Tape
Recording mode
SP LP
30 min. 30 min. 45 min.
60 min. 60 min. 90 min.
80 min. 80 min. 120 min.
Make sure the
window side is facing
out.
Cassette holder
cover
Cassette holder
PUSH HERE
OPEN/EJECT
Erase protection tab
GR-D33EK.book Page 9 Thursday, October 30, 2003 9:41 PM


