


EN
15
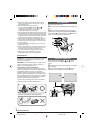
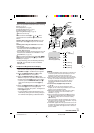
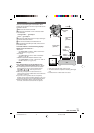
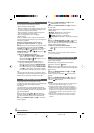
To
S-VIDEO
*
To AV &
Audio/Video
cable
(provided)
White to
AUDIO L IN**
Red to
AUDIO R IN**
To S-VIDEO IN
S-Video cable
(optional)
Connector
cover*
Yellow to
VIDEO IN***
* When connecting the cable, open this cover.
** The Audio cable is not required for watching still images
only.
*** Connect when an S-Video cable is not used.
VCR
TV
To TV or VCR
TAPE PLAYBACK
Connections
These are some basic types of connections. When
making the connections, refer also to your VCR and TV
instruction manuals.
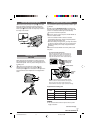
1 Make sure all units are turned off.
2 Connect the camcorder to a TV or VCR as shown
in the illustration.
If using a VCR . . . go to step 3.
If not . . . go to step 4.
3 Connect the VCR output to the TV input, referring to
your VCR’s instruction manual.
4 Turn on the camcorder, the VCR and the TV.
5 Set the VCR to its AUX input mode, and set the TV
to its VIDEO mode.
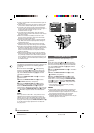
To choose whether or not the following displays
appear on the connected TV . . .
• Date/Time
..... set “DATE/TIME” to “AUTO”, “ON” or “OFF” in the
Menu Screen (੬ pg. 23, 34).
• Time Code
..... set “TIME CODE” to “ON” or “OFF” in the Menu
Screen (੬ pg. 24).
• Indications other than date/time and time code
..... set “ON SCREEN” to “LCD”, “LCD/TV” or “OFF” in
the Menu Screen (੬ pg. 23, 24).
NOTES:
● It is recommended to use the AC Adapter as the
power supply instead of the battery pack (
੬ pg. 7).
● To monitor the picture and sound from the camcorder
without inserting a tape, set the camcorder’s Power
Switch
r to “ ” or “ ”, then set your TV to the
appropriate input mode.
● Make sure you adjust the TV sound volume to its
minimum level to avoid a sudden burst of sound when the
camcorder is turned on.
● If you have a TV or speakers that are not specially
shielded, do not place the speakers adjacent to the TV as
interference will occur in the camcorder playback picture.
● While the Audio/Video cable is connected to the AV
connector, sound cannot be heard from the speaker.
1 GR-D31US EN 11-15 02.12.9, 9:46 AM15