34
EN
Backup All Files
Preparation:
•
Select or mode.
•
Select HDD or microSD card.
•
Connect the camera to the DVD burner.
The following illustrations of display
screens are examples of when backing up
video.
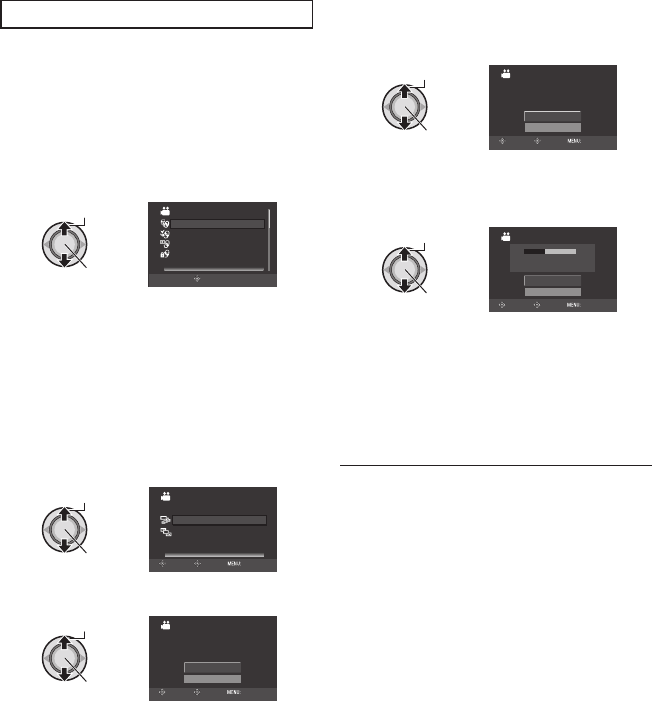
1 Select [CREATE FROM ALL].
Select
Set
VIDEO
PLAYBACK
SELECT AND CREATE
CREATE FROM ALL
FINALIZE
CREATE FROM ALL SCENES
SET
2 Select the desired menu.
•
mode: [UNSAVED SCENES]
mode: [UNSAVED IMAGES]
Files that have never been copied to a
DVD disc are automatically selected and
copied. (either AVCHD or MPEG-2 TS)
•
mode: [ALL SCENES]
mode: [ALL IMAGES]
All fi les in the recording medium are
copied. (either AVCHD or MPEG-2 TS)
Select
Set
CREATE FROM ALL
SELECT ALL VIDEOS
ALL SCENES
UNSAVED SCENES
RETURN
SET TOP
3 Select [OK].
Select
Set
ALL SCENES
RETURN
OK
QUANTITY REQUIRED
PREPARE AN EMPTY DISC
DVD
10 / DVD(DL)
5
SELECT
SET TOP
To cancel the backup, select [RETURN].
4 Select [YES] or [NO].*
•
[YES]: Displays the thumbnails by group
•
[NO]: Displays the thumbnails by date
Select
Set
ALL SCENES
NO
YES
DO YOU WANT TO MAKE
AN AUTOMATIC HEADLINE ON
THE DISC TOP MENU?
SET TOP
SELECT
* In case of still image or video in MPEG-2
TS format, go to step 5.
5 Select [EXECUTE].
Select
Set
ALL SCENES
CANCEL
EXECUTE
0%
100%
DVD(DL)
DVD
3
5
SELECT
SET TOP
•
The fi les are copied on the disc. When
[COMPLETED] appears, press down the
set lever to complete the operation.
•
When [INSERT NEXT DISC. PRESS
[STOP] TO EXIT CREATE] appears,
change the disc. Remaining fi les are
copied on the second disc.
•
To cancel the copying, select [STOP].
To return to the top screen
Press MENU, then select [YES].
To fi nalize the disc after copy is fi nished
1) Connect the camera to the DVD burner.
2) Turn on the camera.
3) Select [FINALIZE].
4) Select [EXECUTE].
5) When [COMPLETED] appears, select
[OK].
To play back the created disc using the
camera
1) Connect the camera to the DVD burner.
2) Turn on the camera fi rst, then turn on the
DVD burner.
3) Select [PLAYBACK].
4) Select the desired folder.
5) Select the desired fi le.
To return to the previous screen, press
INDEX.
To view video/still image on TV
See page 28.
Ⅵ
Ⅵ
Ⅵ
Ⅵ
Copying Files (Continued)


