


9
RECORDING/PLAYBACK
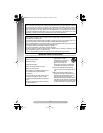
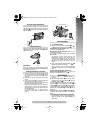
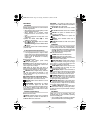
Thread the strap through the eyelet
5
, then fold it
back and thread it through the buckle. Repeat the
procedure to attach the other end of the strap to the
other eyelet
5
, making sure the strap is not twisted.
Adjust the length.
Align the screw and camera direction stud on the
tripod with the tripod mounting socket
-
. Then
tighten the screw.
CAUTION :
When using a tripod, be sure to extend its legs fully to stabilize
the camcorder. To prevent damage to the unit caused by falling
over, do not use a small tripod.
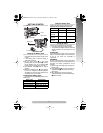
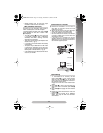
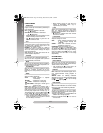
1) Open the LCD monitor fully and keep it aligned vertically
with the camera (do not tilt it). Press EJECT
(
for more
than 2 seconds until the cassette holder opens. Do not
force open.
2) When inserting a cassette, make sure the label is facing
outward.
3) Press the Close button
~
to close the cassette holder
until it locks in place. Close the LCD monitor.
• Closing the LCD monitor while the cassette holder is still
open may cause damage to the LCD monitor.
• Make sure the erase protection tab is in the position that
allows recording. If not, slide the tab. Some cassettes have
removable tabs. If the tab has been removed, cover the
hole with adhesive tape.
• The cassette holder cannot be opened while the
camcorder is in record mode or detached from power
source.
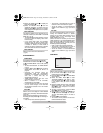
Set REC MODE, TAPE LENGTH and DATE/TIME. (੬ pg.
12 – 15, “MENU SETTINGS”)
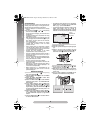
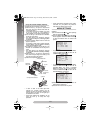
1) Remove the lens cap. Set the Power Switch
#
to “ ”
or “ ” while pressing down the Lock Button
"
.
Shooting while using the viewfinder: Make sure the
LCD monitor is closed and locked.
Shooting while using the LCD monitor: Make sure the
LCD monitor is fully open.
The camcorder is in Record-Standby mode and “PAUSE”
V
is displayed.
• The viewfinder and LCD monitor cannot be used
simultaneously. Therefore, when opening the LCD
monitor and tilting it upward to 180°, you cannot view
any image in the viewfinder. However, you can shoot
yourself while viewing your own image on the LCD
monitor.
2) Press the Recording Start/Stop Button
!
.
=
appears while recording is in progress.
• To stop recording, press the Recording Start/Stop
Button
!
. The camcorder re-enters Record-Standby
mode.
To Adjust The Brightness Of The LCD Monitor:
When the Power Switch
#
is set to “”, adjust “LCD
BRIGHT” in SYSTEM MENU (੬pg. 14).
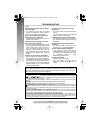
1) Load a tape (੬ “Loading/Unloading A
Cassette”).
2) Set the Power Switch
#
to "PLAY" while
pressing down the Lock Button
"
. To start
playback, press 3/8
&
.
To stop playback temporarily (Still Playback),
press 3/8
&
. To stop playback, press 7
)
.
Press 1
)
to rewind, or ¡
%
to fast-forward.
High-speed picture search (Shuttle Search) is
possible by pressing1
)
or ¡
%
during
playback.
During playback, holding 1
)
or ¡
%
down
continues the search as long as you hold the
button.
For VIDEO RECORDING/VIDEO PLAYBACK
• The camcorder shuts off automatically after
about 5 minutes in the Record-Standby or
Stop mode.
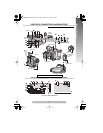
Shoulder Strap Attachment
Tripod Mounting
Loading/Unloading A Cassette
5
-
RECORDING
PLAYBACK
180°
90°
(
Erase protection tab
Cassette holder
~
GR-AXM17-EN.fm Page 9 Tuesday, December 14, 2004 9:14 AM