


EN 61
1
2
3
4
5
6
7
8
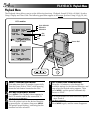
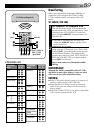
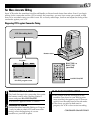
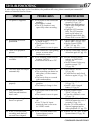
T I ME CODE
TOTAL
00:00
~
~
~
~
~
~
~
~
IN
OUT
: :
:
TW
OFF
P
L
A
Y
R
E
C
5
S
NOTES:
●
Before Random Assemble Editing, make sure the
LCD monitor indications don't appear on the TV
monitor. If they appear during Random Assemble
Editing, they will be recorded onto the new tape.
To clear them, set "ON SCREEN" to "OFF" (
੬
pg.
43). When Random Assemble Editing starts, its
indications disappear and are not recorded on the
new tape.
●
When the source tape has more than 2 identical
time codes (
੬
pg. 21), the camcorder may not
find the Edit-In point you chose and a malfunc-
tion may occur.
●
When choosing a scene, set Edit-In and Edit-Out
points so there’s a relatively large difference
between them.
●
If the search time for an in-point exceeds 5
minutes, the recording deck's Record-Standby
mode will be cancelled and editing will not take
place.
●
If there are blank portions before or after the
Edit-In and Edit-Out points, a blue-backed screen
may be included in the edited version.
●
Since time codes register time only as accurately
as seconds, the time code total time may not
match the total program time exactly.
●
Turning off the camcorder’s power erases all
registered Edit-In and Edit-Out points.
●
If you use Sepia or Monotone P.AE/Effects, you
can’t use the Dissolve or Black & White Fader. In
this case the Dissolve or Black & White indicator
begins blinking. Once the next Edit-In point is
registered, the effect is turned off. To combine
these effects, use Sepia or Monotone during
recording, then use Dissolve or Black & White
Fader during Random Assemble Editing.
CONTINUED ON NEXT PAGE
4
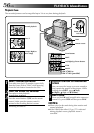
SET EDIT-IN POINT
At the beginning of the scene, press EDIT IN/
OUT on the remote control. The Edit-In
position appears in the LCD monitor and on
the connected TV.
5
SET EDIT-OUT POINT
At the end of the scene, press EDIT IN/OUT.
The Edit-Out position appears in the LCD
monitor and on the connected TV.
6
USE FADE WIPE ON SCENE TRANSI-
TION (IF NECESSARY)
Press FADE/WIPE.
•Cycle through the effects by pressing
repeatedly, and stop when the one you want
is displayed.
•If you select a Fade/Wipe effect for an
Edit-Out point, the effect is automatically
applied to the following Edit-In point.
•When you use Fade/Wipe effects, that time is
included in the total time (this does not apply
to Picture Wipe/Dissolve).
7
USE P.AE/EFFECT (IF NECESSARY)
Press EFFECT.
•Cycle through the effects by pressing
repeatedly, and stop when the one you want
is displayed.
•You can use Classic Film, Monotone, Sepia,
Strobe or Video Echo effects.
8
CONTINUE EDITING
Repeat steps 4 – 7.
•To change previously registered points, press
CANCEL on the remote control. The
registered points disappear, one at a time,
from the most recently registered point.
•If you're not using Fade/Wipe or P.AE/Effects,
repeat steps 4 and 5 only.
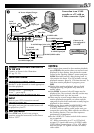
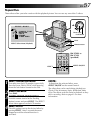
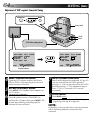
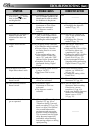
EDIT IN/OUT
EFFECT
Random Assemble Editing Menu
PLAY
R.A.EDIT ON/OFF
CANCEL
Power Dial
FADE/WIPE
Program
RM-V708U or
RM-V710U
(provided)
Remote sensor