


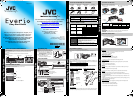

Upload to YouTube™ (Windows) Everio MediaBrowser 3D (Windows)
Archive/View Your Video (Windows) Playing Back Files
Make a Disc (Windows) Archive & Share Overview
USB Menu Operations
Export to iTunes
®
(Windows)
PLAYBACK VIDEOS
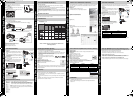
A Open the LCD monitor to turn on the unit.
B Tap q on the touch screen to select the
playback mode.
C Press the A/B button on the unit to select the video
or still image mode.
D Tap on the thumbnail on the index screen to play
back.
• Tap D or E to scroll the pages.
Preparation:
• Turn off both camera and TV.
Ⅲ To connect using the HDMI mini connector
• When connecting to a 3D compatible TV, set [HDMI OUTPUT] to [AUTO].
Ⅲ To connect using the AV connector
• Change the settings in [VIDEO OUTPUT] according to the connection.
Ⅲ Playback Operation
After the connection with TV is completed,
A Turn on the camera and the TV.
B Select the TV input switch.
C Start playback on the camera.
1
2
3
2011
2011
PLAYBACK ON TV
To HDMI (HDMI
mini) Connector
HDMI Connector Input
TV
HDMI Mini Cable (Provided)
AV
Video Input
Video Input
Audio Input (L)
Audio Input (R)
TV
To AV Connector
AV Cable (Provided)
Yellow
White
Red
KEEP IT HIGH DEFINITION (Windows)
Back up to a computer
The provided JVC software also makes it easy to copy your videos to a computer.
For customers with a Blu-ray Player:
The provided JVC software lets you create high definition AVCHD discs using standard
blank DVD-R media, and your Windows PC with DVD Burner.
An AVCHD disc is a great choice because it contains the original HD video, which can be
stored on inexpensive blank DVD-R media.
These discs can be played back in virtually any recent Blu-ray player that has the AVCHD
logo.
YouTube™ is a great way to share your videos, in either HD or SD quality. JVC makes it
easy. Please see “Upload to YouTube™” section.
You can create discs or copy the files on this unit by connecting it to various devices.
3 : Recordable and playable
— : Not applicable
*1 For details, refer to the Detailed User Guide or the help file of Everio MediaBrowser
3D.
Each of these solutions is explained in detail in the
following sections.
UPLOAD TO YouTube™
COPYING FILES
2D Files3D Files
Upper row : MP4(MVC)
Lower row
: AVCHD
—
*1 *1
DVD Writer
External Blu-ray
Drive
Computer
Device
—
—
Media Selection
(DVD Disc)
(Blu-ray Disc)
(Device’s
internal HDD)
(DVD Disc)
(Blu-ray Disc)
(Device’s
internal HDD)
——
——
—
——
——
—
*1
*1 *1 *1
INSTALL Everio MediaBrowser 3D (Windows)
Everio MediaBrowser 3D is included with your camcorder. It lets you archive and organize
your videos. It also lets you create discs and upload video to YouTube™, and other
popular web sites.
Preparation:
• Load the provided CD-ROM into the PC.
• In Windows Vista, the auto play dialog box appears.
A Click [Everio MediaBrowser 3D].
• Follow the on-screen instructions.
B Click [Next].
C Click [Finish].
• Everio MediaBrowser 3D icons are created on the
desktop.
• Everio MediaBrowser 3D uses
a Calendar based interface that
makes it easy to find any video
you have recorded by selecting
the appropriate date.
USB MENU OPERATIONS
By connecting a USB cable between this unit and your computer, you can perform
operations such as file backups to PC/disc or file uploads to file-sharing site using your
computer.
Preparation:
• Install the Everio MediaBrowser 3D software onto
the PC.
• Turn off the camera by pressing the B button for
about 2 seconds.
• Connect the camera to the PC with the USB cable.
A Turn on the camera by pressing the B button for
about 2 seconds.
B The [SELECT DEVICE] menu appears. Tap
[CONNECT TO PC] on the camera’s touch
screen.
• Tap [CONNECT TO OTHER] if the camera is
connected to a device other than a computer.
CThe [CONNECT TO PC] menu appears. Tap an
option that best suits your needs.
For detailed operations on the above options, refer to the other sections in this guide or
the “Detailed User Guide”.
Option Usage
PLAYBACK ON PC
• To play back your recordings on the PC.
• To back up your recordings on the PC without
using the provided software.
CREATE DISC • To save your recordings on a disc.
UPLOAD • To upload videos to YouTube™.
BACK UP • To back up recordings on the PC.
To USB Connector
To DC Connector
AC Adapter
To AC Outlet
To USB Connector
USB Cable
(Provided)
CONNECT TO PC
SELECT DEVICE
SELECT DEVICE
TYPE TO CONNECT
CONNECT TO OTHER
PLAYBACK ON PC
CREATE DISC
UPLOAD
BACK UP
CONNECT TO PC
FILE BACKUP (Windows)
Preparation:
• Install the Everio MediaBrowser 3D software onto
the PC.
• Make sure that enough space is left in the PC’s
HDD.
• Turn off the camera by pressing the B button for
about 2 seconds.
• Connect the camera to the PC with the USB cable.
On the camera:
A Turn on the camera by pressing the B button for
about 2 seconds.
B Tap [CONNECT TO PC] on the camera’s touch
screen.
C Tap [BACK UP] on the camera’s touch screen.
Everio MediaBrowser 3D starts on the PC.
On the PC:
D Select the volume. E Start backup.
• To view video that is still on your camcorder, click on
Device>Camcorder in the left side panel of Everio MediaBrowser 3D.
• To view video that has already been archived to the computer, click on
Library>Calendar and then choose the date the video was recorded.
Note:
Choose Settings/Preferences to see the folder where MediaBrowser
stores your videos. You can also play back your videos from this folder in
most popular media players.
To USB Connector
To DC Connector
AC Adapter
To AC Outlet
To USB Connector
USB Cable
(Provided)
BACK UP
CONNECT TO PC
2
1
Click
Click
Click
Saving destination (PC)
VIEW YOUR VIDEO (Windows)
AVCHD DISC CREATION (Windows)
• Everio MediaBrowser 3D makes it possible to create AVCHD discs to archive your
recordings in their original high definition quality.
• You can use any standard DVD-R, DVD-RW, DVD+R or DVD+RW disc.
• Recordings are recorded with no loss in quality. Recordings made in the UXP mode are
first converted to the XP mode, and then recorded.
• A standard 4.7 GB disc will hold approximately 35 minutes of video in the highest
quality setting.
• AVCHD discs can be played back in any Blu-ray
player that is AVCHD compatible. Just look for the
AVCHD logo.
Preparation:
• Install the software on your PC.
A Click on the “Create Disc” button.
B Select the video clips you wish to include.
C Choose a menu background and enter a menu title.
D Create the AVCHD disc.
Note:
In order to include UXP recordings on your AVCHD discs, be sure to go to Settings>Disc
Creation Settings, and under “AVC Disc Creation in UXP mode”, choose “Re-encode to
XP mode quality level”.
There are limitations when recording 3D images onto the disc depending on the recording
formats. For details, refer to “Help” - “MediaBrowser Help”.
• To save MP4(MVC) to a disc, use an external Blu-ray drive. In addition, only Blu-ray
discs can be used.
• You can view the created disc on the TV by connecting this unit to the external Blu-ray
drive.
* MP4(MVC): MVC (Multiview Video Coding) extension of MPEG-4 AVC standard
specified in Annex H of ISO/IEC 14496-10.
MP4(MVC)*
HOW TO UPLOAD A FILE (VIDEO CLIP) TO YouTube™ (Windows)
Uploading Videos
You can upload your videos to YouTube™ using the provided software “Everio
MediaBrowser 3D”.
Preparation:
• Install the software on your PC.
A Click on the “YouTube™” button.
B Select the video clips you wish to include.
C Enter account and upload information.
D Start upload to YouTube™.
Trouble with Uploading Videos
• Check if you have created an account with YouTube™.
Trouble with Using the Provided Software Everio MediaBrowser 3D
Consult the customer service center below.
• Pixela User Support Center
For details on how to upload to YouTube™, refer to “MediaBrowser Help”.
• Windows® is either registered trademark or trademark of Microsoft Corporation in the
United States and/or other countries.
• YouTube and the YouTube logo are trademarks and/or registered trademarks of
YouTube LLC.
Region Language Phone #
USA and Canada English +1-800-458-4029 (toll-free)
Europe (UK, Germany,
France, and Spain)
English/German/ French/
Spanish
+800-1532-4865 (toll-free)
Other Countries in Europe
English/German/ French/
Spanish
+44-1489-564-764
Asia (Philippines) English +63-2-438-0090
China Chinese 10800-163-0014 (toll-free)
TRADEMARK
HOW TO TRANSFER FILES TO iTunes (Windows PC only)
You can export videos to iTunes using the provided software “Everio MediaBrowser 3D”.
Install the software on your PC and connect this unit to the PC.
• For details on how to use the software, refer to the help file.
• For details on transferring files to iPod, refer to the help file of iTunes.
Trouble with Exporting Files to iTunes
• Refer to “Q&A”, “Latest Information”, “Download Information”, etc. in “Click for Latest
Product Info” in the help file of the provided Everio MediaBrowser 3D software.
Trouble with Using the Provided Software Everio MediaBrowser 3D
• Contact Pixela User Support Center at the numbers provided on the previous page.
C1DW_CW_EN_QSG.fm Page 2 Tuesday, December 28, 2010 3:56 PM