


- 3 -
Ver. 1.0 05042010
TUNING IN LENS TILT AND SHIFT
This is the core step of the setup so please be patient!
• Select "Lens => Shift" and move the image vertically so that it appears to be vertically centered on the screen.
The image may still be somewhat cut off by the lens during initial stages.
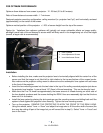
• Loosen the two Lens Adjustment Screws and slide the RSAL3 lens up or down until it does not block the beam.
Note that this will likely move the image vertically off the screen. Make sure the Lens Adjustment Screws are
roughly even in their vertical slot position or the image will show an irregular geometry from right to left.
Repeat steps until the image is vertically centered on the screen and the beam is passing through the center of
the RSAL3 lens.
ADVANCED ADJUSTMENT OPTION
It is possible that some residual color separation may exist in the center of the image at the pixel level. While
this will be very difficult to see, it is possible to make further adjustments to totally eliminate this at the center of
the image and to minimize it at the top and bottom of the image. To do so, it is preferable to have a white grid
test pattern on a black background. This test pattern is not available through the projector so an external
source will be necessary such as an image processor or test pattern DVD. It is also extremely helpful to be
familiar with the pixel offset controls of the projector and to use these controls to begin with the best image
possible. An experienced installer may choose to apply the following steps in combination with the pixel offset
controls for the most flexibility.
• Loosen the large screws that hold the RSAL3 lens in its bracket so that it is free to tilt. At this point it will be
supported by the Fine Tilt Adjustment screw.
• Turn the Fine Tilt Adjustment screw in whichever direction is necessary to minimize any residual color separation
at the center of the image. Note that this will slightly shift the image in the vertical direction.
• Use the remote and select "Lens => Shift" to center the image vertically on the screen. If the amount of shift is
significant you may need to loosen the Lens Adjustment screws and slide the lens vertically to center the beam in
the lens (Note: this will bring back a slight bit of color separation to the center of the image, but less than existed
before).
Repeat steps until the image is vertically centered on the screen and the center of the image is free of any
color separation then tighten the Lens attachment screws.
Fine tune the zoom setting to slightly overscan onto the screen border to insure there are no gaps between the
full projector image and the screen. Finish by fine tuning the focus.
PROJECTOR SETTINGS WHEN USING THE RSAL3
For 2.35:1 or greater aspect ratio sources:
· From the remote, choose Menu > Input > V-Stretch > On AND Menu > Input > Aspect=16:9.
For smaller format sources such as 1.85:1, 16:9 or 4:3 aspect ratios
· From the remote, choose Menu > Input > V-Stretch > Off AND Menu > Input > Aspect=4:3.